- Skip to primary navigation
- Skip to main content
- Skip to primary sidebar
- Crochet Patterns
- Sewing Patterns
- DIY Projects
- Pallet Projects
- Home Organization
- Kids Crafts
- Drawing Ideas
- Fashion & Beauty
- DIY Cat Projects
- DIY Dog Projects
- DIY Wedding Projects
- Jewelry Making Ideas
- Inspiration
- Parenting Tips

25 DIY Luggage Tags: Homemade Luggage Tag Ideas
Making your own DIY luggage tags can transform your travel gear from mundane to unique and easily identifiable. This guide offers 25 innovative homemade luggage tag ideas that cater to all levels of DIY skills. From gathering the materials needed to personalizing your creation, we cover every step to ensure your luggage stands out in style. Not only is this a fun project, but handmade tags also add a personal touch to your belongings, making them instantly recognizable on any luggage carousel.
As we dive into how to make luggage tags , including step-by-step guides and troubleshooting tips , you’ll learn ways to ensure durability, privacy, and creativity in your designs. Whether your focus is on sustainability by crafting eco-friendly luggage tags or finding ways to personalize your tags, this guide has it all. The satisfaction of making something both beautiful and functional is just a few steps away.
Continue reading to discover tips and tricks that will elevate your luggage tag game.

How to Make Luggage Tags – Step by Step
Making your own fabric luggage tag is a fun, easy DIY project that lets you personalize your travel essentials. Whether it’s to make your luggage stand out on the carousel or to add a pop of color to your travel gear, follow these step-by-step instructions to craft a unique accessory. Plus, with a free pattern download, you can jump right into this project without any hassle.
Materials Needed:
- Cotton Fabric
- Fusible Interfacing
- Fabric Marker
- Clear Vinyl
Step by Step Guide:
Learn how to make personalized luggage tags with this step-by-step guide below:
1. Prepare the Pattern:
Start by downloading the free pattern provided in the video. Print it out, then cut along the outlines. Pay attention to include the notch on the pattern, which indicates the top of the pocket. Cut out and discard the center rectangles from the pocket pieces as instructed in the pattern.
2. Cut the Fabric:
Using the pattern, cut out the following:
- Two pieces of the main body fabric
- Two pieces of main body interfacing
- One piece each of the pocket fabric, pocket interfacing, and clear vinyl Also, cut a 12-inch length of bias tape for later use.
3. Fuse the Interfacing:
Center the interfacing pieces on the wrong side of their respective fabric pieces, making sure the shiny, bumpy side of the interfacing is facing down. Use your iron to fuse them together by pressing for at least 10 seconds.
4. Prepare the Pocket:
Snip the inner corners of the pocket piece down to the interfacing. Fold the fabric edges to the wrong side and press them to make clean edges. Place the clear vinyl on the wrong side of the pocket fabric and clip it in place to secure. Sew around the edges of the vinyl, close to the edge, to attach it to the pocket piece. If the vinyl sticks while sewing, place wax paper underneath it to help it feed through the machine smoothly, then tear away the paper afterwards.
5. Assemble the Tag:
Fold over the top edge of the pocket a quarter of an inch to the wrong side and press. Then, topstitch across this folded edge. Place the bias tape on the bottom of the right side of one main body section, overlapping the ends of the tape at the center. Place the prepared pocket on top, aligning it with the top edge of the main body section, with the rest of the tape underneath. Cover it with the other main body piece, right side facing down, and clip.
6. Stitching It Together:
Sew around the periphery with a quarter-inch seam allowance. Leave an opening of a few inches just below the pocket for turning the tag right side out later. Backstitch at both ends to secure. Trim the corners to reduce bulk, then turn the tag right side out, using a pointy tool to neatly poke out the corners.
7. Finishing Touches:
Fold in the edges of the opening and top stitch all around the tag, close to the edge. This not only closes the opening but also adds a neat finish.
Video Tutorial
For a step-by-step video tutorial on how to make fabric luggage tags, watch this helpful video .
It complements this guide perfectly by providing a visual companion to the techniques discussed, making the process clear and enjoyable to follow.
Personalization Techniques for DIY Luggage Tags
Personalizing your luggage tags is not just about adding a unique touch; it’s also about making your luggage easily identifiable. Here are some simple and creative ways to personalize your DIY luggage tags:
- Choose Your Material : Start by selecting a material that resonates with your style. You can use leather for a classic look, fabric for a soft touch, or even recycled materials for an eco-friendly option.
- Design Your Tag : Think about what designs reflect your personality. It could be geometric shapes, floral patterns, or even a quote that inspires you. Use stencils or freehand drawings to sketch your design onto the tag.
- Add Color : Bring your tag to life with color. Fabric markers, acrylic paints, or even natural dyes can be used to fill in your design. If you’re using leather, leather paint or a simple leather stain can work wonders.
- Incorporate Text : Use letter stamps or a permanent marker to add your name, initials, or contact information. Make sure the text is legible and contrasts well with the background.
- Embellish : Add embellishments like buttons, beads, or embroidery to give your tag texture and dimension. These small details can make a big difference.
- Seal and Protect : Once you’re happy with your design, apply a clear sealant over the tag to protect it from wear and tear. For fabric tags, a fabric sealant will do, while for leather, a leather conditioner can provide both protection and a polished finish.
- Attach Securely : Finally, attach your tag to your luggage with a sturdy strap or cord. Ensure it’s secure so you won’t lose it during your travels.
Have fun and be creative when making your DIY luggage tag! Make it unique like you! Travel safely!
Troubleshooting Tips for DIY Luggage Tags
Making DIY luggage tags can be a fun and rewarding project. However, sometimes you might encounter a few hiccups along the way. Here are some troubleshooting tips to help you overcome common challenges:
Problem: The Tag Material Frays or Tears
- Solution : Choose a sturdy material like thick cardstock, leather, or durable fabric. Reinforce the edges with clear tape or use a laminator for paper tags to prevent fraying.
Problem: The Design Fades or Smears
- Solution : Use waterproof and fade-resistant inks or paints. Allow any ink or paint to dry completely before handling. For added protection, apply a clear sealant over your finished design.
Problem: The Tag Detaches from the Luggage
- Solution : Secure your tag with a strong loop, such as a metal ring or a cable tie, rather than just string or ribbon. Double-check that the attachment is tight and secure before traveling.
Problem: Difficulty Writing on Certain Materials
- Solution : If you’re using a slick material like plastic, lightly sand the surface where you’ll be writing to help the ink adhere better. Use permanent markers or paint pens designed for the material.
Problem: The Tag Looks Bulky or Cluttered
- Solution : Simplify your design. Focus on the essential information and a few decorative elements. Remember, less is often more when it comes to design.
By planning ahead and addressing issues, your homemade luggage tags will be durable and look great on all your travels.
Sustainability Focus: Crafting Eco-Friendly DIY Luggage Tags
In today’s world, sustainability is more than just a buzzword; it’s a necessary practice. When making DIY luggage tags, considering the environmental impact is crucial. Here’s how you can craft eco-friendly luggage tags that are both stylish and sustainable:
- Choose Sustainable Materials : Opt for materials that are either biodegradable or recyclable. Materials like recycled paper, fabric scraps, or repurposed items can be excellent choices.
- Non-Toxic Adhesives and Inks : Use adhesives and inks that are labeled non-toxic and eco-friendly. These products minimize harmful emissions and are safer for the environment.
- Digital Information Slots : Instead of writing your information, make a slot to insert a business card or a piece of paper with your details. This way, you can easily update your information without making a new tag.
- Reusable Design : Design your luggage tag in a way that it can be reused for multiple trips. Consider a design that allows for easy updates to the information section.
- Educate on Disposal : Provide information on how to properly dispose of the luggage tag at the end of its life cycle, ensuring it doesn’t end up harming the environment.
By following these tips, you’ll make a unique item for your travels and help the planet. Every small step toward sustainability matters!
Maintenance and Care for DIY Luggage Tags
Proper maintenance and care are essential to ensure your DIY luggage tags remain in great condition throughout your travels. Here’s a straightforward guide to keeping your tags looking their best:
- Material-Specific Care : Different materials require different care methods. For leather tags, use a leather conditioner to keep them supple. For fabric tags, spot clean with a gentle detergent. For plastic or laminated tags, a simple wipe with a damp cloth will do.
- Avoid Water Damage : Keep your tags dry. If they do get wet, dry them thoroughly as soon as possible to prevent damage or mold growth.
- Regular Inspection : Before and after your travels, inspect your tags for any signs of wear and tear. Look for loose threads, fading colors, or detachment from the luggage.
- Storage : When not in use, store your luggage tags in a cool, dry place away from direct sunlight to prevent fading and deterioration.
- Update Information : Keep your contact information up-to-date. If you change your phone number or address, update your tags accordingly.
By following these steps, you can make DIY luggage tags last longer for your next trip. Enjoy safe and stylish travels!
FAQs About DIY Luggage Tags
Get all your questions answered about DIY luggage tags with this comprehensive FAQs guide. Find out everything you need to know to make your own unique tags.
What materials can I use to make a luggage tag?
You can use a variety of materials such as leather, fabric, plastic, cardstock, or even upcycled items like old maps or book covers. The key is to choose something durable that reflects your personal style.
How do I ensure my luggage tag is durable?
Reinforce your tag by using sturdy materials and protect it with a clear sealant or laminate. Secure it to your luggage with a strong attachment like a metal ring or a cable tie.
Can I waterproof my luggage tag?
Yes, you can waterproof paper-based tags by laminating them or using a waterproof sealant. For fabric tags, consider using a fabric protector spray.
What information should I include on my luggage tag?
Include your name, contact number, and email address. You may also add your home address, but some prefer to list a work address or a P.O. box for privacy.
How can I make my luggage tag stand out?
Use bright colors, bold patterns, or unique shapes. Personalize it with your initials, a favorite quote, or an eye-catching design to make it easily identifiable.
Is it possible to update the information on my luggage tag?
Yes, make a slot or pocket in your design to insert a card with your information. This way, you can easily update it as needed.
How do I attach the tag securely to my luggage?
Use a strong loop or strap that can withstand the rigors of travel. Leather straps, metal rings, or cable ties are all good options.
What are some creative ways to personalize my luggage tag?
Consider using stamps, stickers, embroidery, or hand-painting to add personal touches to your tag.
How do I protect my privacy with a luggage tag?
Instead of writing your full address, use a business card or a QR code that links to your contact information. You can also use a flap or cover to conceal your details.
Can I make a luggage tag if I’m not crafty?
Absolutely! There are many simple designs and kits available that require minimal crafting skills. You can also personalize a pre-made tag with stickers or markers.
By addressing these FAQs, you’ll be well on your way to making a luggage tag that’s both functional and reflective of your personality.
Explore creative homemade luggage tag ideas with these 25 DIY projects. Make your luggage stand out with personalized tags that reflect your style.
1. DIY Foiled Tropical Luggage Tag

Upgrade your travel gear with stylish foiled tropical luggage tags crafted through a simple DIY tutorial offered by Lia Griffith . These eye-catching tags are not just fashion statements but practical tools to help you spot your luggage easily at the baggage claim. The crafting process involves using leather scraps, foil iron-on, and basic tools like scissors and an iron.
You can personalize your tag by slipping in your business card, ensuring your valuables are never misplaced. Lia Griffith’s membership provides you with access to this full project tutorial, along with an extensive library of creative DIYs, templates, and instructional videos, all designed to enhance your crafting experience. Join the community to tap into high-quality, creative projects that add a personal touch to every aspect of your life.
2. Summer Camp Luggage Tag for Kids

Get ready for summer camp fun with an easy and creative DIY luggage tag project for kids! Merriment Design ‘s tutorial provides a simple, step-by-step guide for crafting a personalized luggage label that’s both practical and a charming keepsake. In less than 30 minutes and for less than $2, your child can have a custom tag adorning their bag, helping it stand out among a sea of campers’ luggage.
This craft requires basic supplies such as card stock, markers, a corner punch, self-laminating pouches, ribbon, and scissors. Kids can enjoy expressing their creativity by decorating their tag with their name and camp details before sealing it for durability. Attach it with a ribbon for the perfect finishing touch. Engage your child in this enjoyable activity that adds a personal flair to their camp gear!
3. Free Printable Beach Luggage Tag

Prepare for your beach vacation with Redefined Mom ‘s easy-to-follow DIY Printable Beach Luggage Tags guide! Ensuring your luggage stands out on your next trip is simple and fun with these personalized, beach-themed tags. All you need is a printer, some card stock or photo paper, scissors, a hole punch, and laminating materials.
Just print, cut, fill in your details, laminate for durability, and attach the tags to your bags with a ribbon or rubber band. These tags are not only practical, helping to identify your luggage quickly, but they also add a charming touch to your travel gear. Get ready to hit the sands with confidence, knowing your bags are uniquely yours and less likely to be mixed up with someone else’s.
4. How to Make a Leather Luggage Tag

Make your own stylish DIY leather luggage tags with the easy-to-follow template and tutorial from Lia Griffith . This craft guide not only provides a unique and chic way to identify your luggage, but it also introduces an innovative technique for staining leather with designs or text.
Perfect for personalizing your travel gear, the tutorial equips you with a detailed materials list, step-by-step instructions, and handy tips to achieve the best results. With visual aids to assist you, crafting these luggage tags becomes a manageable and rewarding project. Engage in this creative process and add a personal touch to your bags with your custom-made leather luggage tags.
5. Easy DIY Art Deco Luggage Tag

Making your own Art Deco luggage tags is a rewarding DIY project that adds a personal touch to your travel gear. Instructables provides an in-depth guide for crafting these stylish accessories using laser-cutting techniques. You’ll need 1/8″ plywood, clear luggage tap loops or leather cord, lacquer for finishing, and access to a laser cutter.
The provided source files streamline the process, allowing you to achieve professional results. Remember to follow safety guidelines when operating laser equipment, and apply lacquer in a well-ventilated area. These custom luggage tags not only serve as functional identifiers but also as unique expressions of your artistic flair.
6. Make a Luggage Tag From Jeans

Transform old denim into stylish and sturdy luggage tags with Scratch and Stitch ‘s DIY guide. Cathi shows how to upcycle denim jeans into chic travel accessories that are not only durable but also make identifying your luggage a breeze. The provided pattern and clear instructions make the crafting process straightforward, guiding you through making a frayed-edge design with a vinyl window for your contact information. Adding a touch of personal flair to your travel gear is simple, and it’s a fantastic way to repurpose those denim scraps. Gear up for your next adventure with luggage tags that are uniquely yours and environmentally friendly.
7. Sew Your Own Luggage Tag

Planning to craft your own distinctive luggage tags for your next adventure? Sewverycrafty offers a step-by-step guide that is perfect for individuals with basic sewing skills looking to add a personal touch to their travel gear. With clear instructions and helpful tips, you can make durable, eye-catching tags using your favorite fabrics.
This tutorial will ensure that your bags stand out on the carousel, and the added customization means you’ll never mistake another’s luggage for your own again. Dive into this engaging and practical project, and elevate your travel accessories with a homemade flair.
8. Unique Rustic Wooden Luggage Tag

Crafting your own rustic wooden DIY luggage tags is a simple yet rewarding project that adds a personalized touch to your travel gear. Lori Greco’s tutorial on Ideas for the Home guides you through each step with clarity and ease. From selecting a sheet of plywood to adding your personal details with a Sharpie, this guide ensures you make a durable and distinctive luggage tag.
Perfect for gifting or keeping, these tags are not only practical but also add a creative flair to your bags, making them quickly identifiable. The instructions are easy to follow, making the process enjoyable for crafters of all skill levels. Get ready to enhance your luggage with these charming, handcrafted tags. Kenarry
9. Mod Podge and Scrapbook Paper Luggage Tag

Ready to add a personal touch to your travel gear? Crafting your own DIY luggage tags is a fun project that stands out from the usual store-bought varieties. With the help of Mod Podge Rocks , you can make unique and durable luggage tags using MDF wood, your favorite scrapbook paper, and some Mod Podge Matte.
This engaging activity is perfect for those who enjoy a bit of crafting and want to ensure their luggage is easily identifiable. Suitable for anyone who can wield a paintbrush and cut with a craft knife, this DIY project allows for full customization. Decorate your tags with washi tape, paint, and even decals for an extra flair.
Follow the step-by-step instructions provided, and you’ll soon have a set of luggage tags that not only secure your information but also reflect your style. Dive into the creative process and make your next trip a little more special with these handmade luggage accessories.
10. Make Your Own Watercolor Luggage Tag

Kara Whitten at A Beautiful Mess provides a creative and engaging way to add a personalized touch to your travel gear with a DIY watercolor luggage tag tutorial. Perfect for those gearing up for summer vacations or seeking a distinctive keychain accessory, this craft combines the rustic charm of leather with the delicate beauty of watercolor.
You’ll need simple supplies like leather rounds, watercolor paints, a paintbrush, and a few other items readily available at a craft store. The step-by-step guide is clear and concise, making the process approachable for anyone looking to make a unique tag for their luggage. With the ability to customize colors and monograms, your luggage will stand out with style and sophistication the next time you travel.
11. Homemade Typographic Luggage Tag

Sarah Hearts offers a creative way to personalize your travels with DIY typographic luggage tags. In an engaging and straightforward tutorial, Sarah Khandjian guides you through crafting unique tags using a Silhouette or Cricut cutting machine and heat transfer vinyl. This project is not only fun but also practical; it allows for easy identification of your bags at the luggage claim.
The instructions are clear, and the process is quick, making it a perfect activity for craft enthusiasts or anyone looking to add a touch of personality to their luggage. The necessary supplies and detailed steps are provided to ensure your crafting success, resulting in a set of colorful, custom luggage tags ready for your next adventure. Sarah Hearts
12. DIY Leather Luggage Tag at Home

Make personalized leather luggage tags with ease using the Cricut Explore. Damask Love offers an inspiring DIY guide that empowers crafters to fashion durable and customized tags for their travel gear. With detailed instructions and the precision of Cricut technology, you can cut tooling leather and embellish it with durable Angelus leather paint.
Secure your details inside with a Xyron Sticker Maker, then stitch and assemble your creation for a travel accessory that’s both functional and stylish. Get ready to add a touch of personality to your luggage on your next adventure with this engaging and helpful crafting project.
13. Sweets-Inspired Luggage Tag Ideas

Get ready to elevate your travel style with these DIY sweets-inspired luggage tags that are a breeze to create. Perfect for adding a personal touch to your gear, this step-by-step guide from The Small Adventurer walks you through the process of making your own unique tags. Craft a delectable chocolate bar, sprinkle-coated fairy bread, or adorable ice cream design using simple materials like felt, acrylic paint, and cardstock.
Sewing or glue options make this project accessible, regardless of your crafting skills. Plus, the added security of a concealed contact info slip provides peace of mind while you travel. These handmade tags are not only practical but also offer a delightful way to identify your luggage with ease. Dive into the crafting fun and make a tag that’s as sweet as your next adventure.
14. Make Your Own Luggage Tag

Make personalized luggage tags easily with a DIY project from The Idea Room . Perfect for adding a unique touch to your travel gear, this simple craft transforms your suitcases into easily identifiable belongings at the baggage carousel. Gather your supplies, including free printable tags, plastic luggage tag sleeves, a glue stick, scissors or a paper cutter, and optional letter stickers for monogramming.
Print out the tags, stick the fronts and backs together, and insert them into the sleeves. For added flair, customize your tags with monogrammed letters before securing them to your luggage with a ribbon or the provided attachment. Not only is this an enjoyable activity, but it also ensures that your bags stand out while you jet off on your next adventure.
15. How to Make Your Own Luggage Tag

Engage your kids in a fun and creative activity before your summer adventures by crafting their very own luggage tags. Tatertots and Jello offers an enjoyable project that not only serves a practical purpose but also sparks excitement for upcoming travel. With a set of materials from BasicGrey’s Hipster line and an easy-to-follow tutorial, you and your children can design personalized tags to adorn suitcases and bags.
Protect your creations by laminating them for durability, and add a splash of color with leather lacing for secure attachment. Don’t forget to download the complimentary luggage tag printable to ensure all your information is neatly displayed. Get ready to make travel more personal and stylish with this family-friendly craft!
16. Simple DIY Polka Dot Luggage Tag

Spruce up your travel gear with a pop of personality by making your own polka dot luggage tags! Lovely Indeed offers a simple and engaging DIY guide that transforms plain luggage tags into chic, customized accessories. All you need are some blank tags, craft paint, brushes, washi tape, and a hole punch.
The process is straightforward: punch holes in the tape for a polka dot mask, stick it on, dab on the paint, and peel off before it dries. Add a dash of color with a diagonal paint block, and voila! You’ve got a set of stylish luggage tags ready for your next adventure. Dive in, let your creativity flow, and give your luggage a personal touch that stands out at baggage claim.
17. Custom Bag Tag Using Leather

If crafting unique travel accessories is on your to-do list, The House That Lars Built offers a charming and practical project – making your own leather DIY luggage tag. In this engaging guide, Brittany walks you through a 15-minute crafting session, complete with a printable insert for personal details. Using simple materials like leather, scissors, and embroidery floss, you can make a stylish and durable tag to adorn your suitcase. This instructive guide is ideal for anyone eager to add a personalized touch to their travel gear while enjoying a quick and satisfying DIY experience.
18. Handmade Duct Tape Luggage Tag

Make a unique and eye-catching luggage tag with ease using duct tape! Instructables offers a step-by-step guide to crafting a personalized tag that will help your baggage stand out at the airport carousel. This DIY project is perfect for travelers who wish to add a touch of individuality to their luggage. The process is simple, requires minimal materials, and is a fun activity that can also serve as a great crafting idea for gifts. Follow along with the instructions to design a durable and stylish luggage identifier that’s as distinctive as your adventures.
19. No Sew Fabric Luggage Tag

Make your own unique no sew luggage tags with a step-by-step guide from Thirty Handmade Days . Perfect for adding a personal touch to your travel gear, these tags are simple to craft and require no sewing skills. All you need is fabric, Heat N Bond Ultra, clear vinyl or a shower curtain liner, a grommet, and ribbon.
The clear window design ensures your contact information is visible, making your luggage easy to identify on a busy carousel. Not only are these tags practical, but they also add a pop of color and charm to your bags. Enjoy making a personalized accessory for your next adventure, and explore other creative projects that can enhance your travel experience.
20. DIY Luggage Tag – Step by Step Instructions

Get ready to add a touch of personality to your travel gear with the creative DIY Luggage Tags project from Lydi Out Loud . Say goodbye to the frustration of lost or mistaken luggage with these eye-catching and expressive tags. This guide offers a step-by-step approach to crafting your own unique tags using materials like printable vinyl and a Cricut Explore Air.
With helpful tips on using design software, selecting the right vinyl, and sealing your work for durability, Lydi Out Loud ensures your luggage stands out with style and a clear message. Perfect for personal use or as a thoughtful gift, these DIY tags are a must-have accessory for any traveler.
21. Leather Luggage Tag With Cricut Knife Blade

Make custom leather luggage tags with ease using the Cricut Knife Blade and Cricut Maker for your next trip. Giggles Galore provides a step-by-step guide, making it simple to personalize your baggage with unique designs. In just an hour, you can have durable tags ready to withstand any adventure.
The tutorial includes a list of supplies, detailed instructions for design and assembly, and tips for cutting and adhering materials. Suitable for crafters at any skill level, this project adds a special touch to your luggage and ensures your contact information is stylishly displayed. Perfect for those looking to combine creativity with functionality, these custom tags are not just practical; they’re a statement piece for your travels.
22. DIY Gift Map Luggage Tag

Making a unique DIY gift just got easier with HGTV ‘s guide to making custom map luggage tags. These handcrafted tags not only add a personal touch to any traveler’s luggage but also serve as a thoughtful gift. Start by downloading the provided tag templates and printing them out. Next, scan and print your map design onto T-shirt transfer paper, and iron it onto a piece of light-colored leather.
After cutting out the shapes and gluing the pieces together, slide in a clear plastic window along with an address label. Finish by threading a leather cord through the tag. This project is perfect for anyone who enjoys crafting and personalizing gifts, offering a useful and charming way to help friends and family identify their luggage on any adventure.
23. How to Do You Make a Luggage Tag

Easily distinguish your luggage on your next trip with a custom-made luggage tag from leather. The Free People Blog provides an engaging and helpful DIY guide that shows you how to craft a unique luggage tag that not only adds a personal touch to your bags but also ensures they’re easily identifiable in the bustling baggage claim area.
This instructional content outlines the necessary materials, including leather scraps, leather cord, and paint markers, and offers step-by-step instructions that are simple to follow. Whether you’re sewing, cutting, or gluing, this creative project is ideal for travelers looking to infuse individuality into their gear. Make a sturdy and stylish luggage tag to help you spot your belongings quickly and add an extra layer of identification for peace of mind during your travels.
24. DIY Luggage Tag With Embroidery

Make unique and personalized luggage tags with ease using the step-by-step guide from Life Sew Savory . Embroidery adds a special touch to these tags, distinguishing your bags on any journey. Perfect for travelers wanting to combine practicality with style, these DIY tags are not only visually appealing but also serve to quickly identify your luggage among a sea of similar cases.
The tutorial is designed to be straightforward and engaging, helping you craft your own tags with a free template, clear instructions, and helpful photos. With Life Sew Savory’s guidance, your next trip can be both organized and expressive with your custom-made luggage tags.
25. Personalized Photo Art Luggage Tag

Make personalized luggage tags with a unique twist using the DIY guide from Little Red Window . Cassie May walks you through an inventive process of transforming your photos into artistic wood tags, ensuring your bags stand out on any carousel. No prior photo editing skills are needed as BeFunky’s user-friendly platform offers a range of digital art effects that are simple to apply.
Follow the step-by-step instructions to print your images with a laser printer, apply Mod Podge, and secure them to wooden tags for a durable and eye-catching result. Perfect for adding a touch of personal flair to your travel gear, these DIY luggage tags are not only functional but also a fun project to showcase your creativity.
Related DIY Crafts to Make
Crafts to Make and Sell : If you’re looking for a way to make money with your crafting talents, find easy crafts that are perfect for beginners and will be easy to sell.
DIY Charging Station : Find the perfect DIY charging station for your home, office, or dorm. It’s easy to find the perfect charging station tutorial for your needs with this list of 40 tutorials. It saves space by consolidating the mess of cables, and it also looks great.
DIY Projects : Do-it-yourself projects are fun, affordable, and easy to complete. With these easy DIY projects and ideas make the perfect resource for anyone looking to do something new at home.
Crafts for Teens : Find these cool craft projects for teens that are easy to do and creative. Featuring step-by-step instructions and photos, the crafts include activities like jewelry, tie dye, and more.
Candies Jar Ideas : Here are cute and unique candy jar ideas to inspire you! These are perfect for a birthday party favor, wedding favors, holiday gift, or just because.
DIY Photo Gift Ideas : With the holidays right around the corner, it’s time to start thinking about making personalized gifts. Here are DIY photo gifts to inspire you with simple, inexpensive ideas.
Conclusion:
In conclusion, crafting your own 25 DIY luggage tags offers a blend of practicality and creativity that can enhance your travel experience. From selecting the right materials to adding those personal touches that make your luggage stand out, this guide has provided step-by-step instructions, troubleshooting tips, and sustainability advice to ensure your homemade luggage tag ideas come to life. Remember, a well-made luggage tag not only secures your belongings but also reflects your personal style. So, take these ideas and make them your own, and travel with confidence and flair!
Related DIY Ideas to Try:

- Skip to primary navigation
- Skip to main content
- Skip to primary sidebar
- DIY Projects
- DIY For Animal
- DIY Gym Equipment plans
- DIY Vehicle Projects
25 DIY Luggage Tag Ideas For Travelers
DIY luggage tag ideas are a great way to get noticed at the airport, tell your luggage apart from all the other black bags on the baggage carousel, and add some personality to your suitcase. Instead of using a store-bought tag that hundreds of other travellers may have, make your luggage tags a creative and memorable way to identify your bags. These free printable 25 DIY luggage tag ideas can be printed on regular printer paper, or you can use card stock for sturdier tags.
DIY Luggage Tags

And these DIY luggage tags are full of personality, too! From pizzas to surfboards, you’ll be sure to find fresh inspiration here. Plus, they’re super easy to make! Each of the following tutorials is full of step-by-step instructions that account for every detail. Your bag has never looked better (and will never get lost!). These DIY luggage tags are also a great way to add personality to your bags. Stand out at baggage claim and make it easy for your friends to pick you out in a crowd with these clever tag ideas. These super admirable and iconic DIY Luggage Tag Ideas can be used to personalize your travel bags, athletic equipment, and more with fun.
- 28 DIY Camera Strap Projects
Usual Materials and Tools:
- sewing machine
- needle and thread for sewing on the tags by hand.
- hole puncher
DIY Luggage Tag Sewing Tutorial
If you love to travel, you know the importance of a good luggage tag. Not only can it help identify your bag when it is lost, but it can also do so in a stylish way. This DIY luggage tag sewing tutorial will show you how to make your own personalized luggage tag using fabric and a little bit of ribbon. This project is great for beginners as it doesn't require any complex sewing techniques. It's also a great way to use up some fabric scraps you may have laying around the house. This tag is made out of fabric, and you can sew it yourself! The best part is that you can make a bunch of different designs for each member of your family so it will be easier to find your bags.
Skill level: simple
DIY Personalized Luggage Tag
A luggage tag is a travel essential that not only helps your bag stand out from the rest, but also helps you keep track of your bags. This DIY project will allow you to create a unique luggage tag to add personality to any suitcase or bag. This project is quick and easy, and the finished product looks polished and professional. It's a cheap way to notify your luggage so you can spot it easily at the carousel. And because these luggage tags are personalized, they can help you identify your bag if it gets lost in transit.
Skill level: easy
DIY Duct Tape And Leather Luggage Tag
Luggage Tags are a really helpful but often overlooked accessory. They help identify your suitcase to ensure that it isn't lost in transit. But luggage tags also have a little spot for contact information, so if the airline does lose your bag, you can still get it back. That's why luggage tags should have a little bit of personality and not just be a boring rectangle of plastic or paper with your name printed on it. This project takes less than an hour, and the results are really cool. All you need is some duct tape, leather scraps, scissors, and a printer or pen. You can find all of these materials at most craft stores.
DIY Embossed Leather Luggage Tag

Click for more details
In the age of carry-on bags and roller luggage, you may think that luggage tags are a thing of the past. But a stylish leather tag attached to your suitcase actually helps it stand out in a sea of black bags, making it easier to spot. Making this luggage tag was a little more involved than a simple bracelet or key chain , but it was still very easy to do. This quick DIY project that you can do using some leather scraps, along with embossing tools. The tools you need are fairly basic: a utility knife, scissors, pencil, and ruler. And the skill level for this DIY is about the medium — it's not going to take you a long time, but it does require some patience.
Skill level: moderate
DIY Leather Luggage Tags

Leather is an extremely durable and sturdy material that is used to make everything from belts to wallets, to handbags and luggage. Leather luggage tags are usually engraved with the owner's name and address, making them easier to identify at an airport or bus station. You can make your own leather luggage tags with a few simple tools and a little bit of patience. This easy project is perfect for anyone who wants to add a touch of class and personalization to their travel bags. All you need are some simple materials and you’ll be gliding through the airport in no time.
DIY Luggage Tag

Making your own luggage tag to mark your bag is super easy. It will make you stand out from the crowd and allow you to find your bag in a second! There are many ways to make a luggage tag, but this one is the easiest and quickest. It involves leather, so it will be sturdy enough to withstand the test of time. The leather isn't going to tear or rip easily like paper tags, and the cord is thin enough that it doesn't get caught on a lot of things. This project requires basic sewing skills. If you don't know how to hand sew, then check out this beginner's guide first (or just use a sewing machine).
Homemade Luggage Tag

A bag tag, luggage tag, baggage tag, travel bag, or suitcase tag is a travel luggage identifier attached to items or to a carry-on bag. A typical bag tag includes a luggage strap for attachment, a printed identification card, and a detachable flimsy (paper) part with a printed bar code. The bar code is encoded with the same information printed on the identification card. The best part of this luggage tag is that it's a soft material rather than a traditional plastic or leather tag. It won't make any noise when you're trying to wheel your bag through the airport, and it's machine washable if any dirt gets on it. Best of all, you can use any fabric you want!
DIY Luggage Tag Using Duct Tape

DIY luggage tags are a great way to make sure that no one picks up your luggage by mistake. They also make your luggage stand out so you can easily identify it in the airport baggage carousel. Making your own luggage tag is easy and inexpensive, especially if you use duct tape. In the event that your luggage is lost in transit, you want to make sure that it has as many ways to be identified as possible. In addition to filling out an ID tag with your contact information and attaching an address label, you can also decorate your luggage with decorative tape. This tutorial learn how to make a luggage tag using duct tape.

Luggage tags are a wonderful way to identify your suitcase at baggage claim. You can make one from recycled blue jeans, or any other denim material. These are easy ways to customize your luggage or backpack. It’s stylish, sturdy, and easy to make, so you can go from zero to travel-ready in no time! This luggage tag is made from denim and features a handy vinyl window for inserting an information card. The large size is perfect for full-size suitcases but can be scaled down to fit a carry-on bag or laptop case by reducing the size of the cut fabric.
Skill level: advanced
DIY Laminated Luggage Tags
Luggage Tags are the perfect accessory for all your luggage, travel bags, and even your backpack. But they're not very durable or secure. You can't write your contact information on them, which means you're stuck with hunting down a pen and writing your info on the back. And if it rains? Forget about it — the ink will run off, leaving you with illegible scribbles on the back of your tag. So you can make some new ones — and added a laminate to protect the paper from water damage and make them last longer. These DIY luggage tags are laminated, so they're waterproof, sturdy, and easy to read. The best part is you can make them in just a few minutes, with materials you probably already have at home!
DIY Typographic Luggage Tags

sarahhearts
There's nothing worse than getting to your destination and having to wait around a carousel while you try to spot your luggage. One of the best ways to make sure that doesn't happen is to make your bags stand out from the crowd with these DIY typographic luggage tags. The best part about this project is that you can use any font you have available and customize the text to say anything you like. It's the little things that can really make a space yours. These luggage tags are a fun and easy way to add a personal touch to your room. You can choose your own phrases, colors, and fonts to make them totally unique!
DIY Fabric Luggage Tag
This DIY Fabric Luggage Tag is a great way to identify your suitcase. It's easy to make and adds a touch of stylish flair. You can use any fabric or ribbon you want, so it's easy to match your luggage tag to the rest of your luggage or bag. This is simple to make. It only takes a few minutes, and it’s a great way to customize your luggage! Sewing your own luggage tag is a great way to add a personal touch to your bags. This is fun and easy to make, and it adds a pop of color to an otherwise boring piece of luggage.
Make Your Own Watercolor Luggage Tags

abeautifulmess
If you’re worried about losing your luggage, make sure to write down your address and phone number on the tag so you can be reached. There are a few ways to ensure your bag gets back to you if you misplace it or leave it behind at the airport, but they all require you to put some sort of identifying info on your luggage. And who wants something boring and business-like on their vacation bags? So, these cute luggage tags use washi tape and watercolor paper which are great for adding a pop of color and personality to your bags. And don't forget, besides looking super cute, these DIY luggage tags will also make it easier for someone to identify and return your lost bag should you ever need them.

Make your luggage stand out from the crowd with this easy-to-make Homemade Luggage Tag. You can get super creative with this project and make a statement with your luggage tag. You could also make these for family members as gifts for any occasion. This is actually super easy to make and it will add a unique touch to your luggage. These are so much fun, you'll want to make one for each of your bags. Making your own tag is a fun and inexpensive way to add some personality to your suitcases, backpacks, or beach bags. This tutorial shows you how to use an old gift card to make a durable, attractive luggage tag.
How To Make A Luggage Tag
Don't let your luggage be confused with that of another traveler. Make a special tag that will let you spot your bag right away. Most luggage tags have the same boring design that looks like a business card, but there's no reason yours needs to be like that. You can make your own tag that reflects your personality, or an unusual shape or color scheme that will make it stand out in a crowd. You can solve the problem by making leather tags, perfect for giving your bag some personality. These DIY leather luggage tags are also great gifts for travelers, and they make excellent stocking stuffers. The best part about this project is that you can use anything for your design.
DIY Quilted Luggage Tag
Luggage tags are very easy to make once you get started. They are a great way to use up some of your fabric scraps. You can make them any size you want, and you can use any type of fabric you like. Quilted luggage tags make great gifts and are wonderful to use yourself. They are easy to sew, even if you are a beginner. This tutorial is a quick and easy way to make a luggage tag using fusible webbing, so there is no need to pin all your layers together. This luggage tag can be made out of any fabric, just be sure it is thick enough that your information on the back won't show through. You can use some scraps of quilting cotton, but you can also use canvas or leather if you would like.

There’s nothing like packing up your bags and taking a little trip. Whether it’s for vacation or an extended stay. This luggage tag has a little bit of flair with a fun design you can quickly sew up before your next trip. It’s made from 100% cotton fabric, so it’s durable and will hold up on any journey. The backside is laminated to protect the information on the card inside. It would be fun to make a handmade luggage tag for each of your family members' suitcases. Not only does this DIY make our bags super easy to identify, but it allowed you to add a unique, personal touch that helps us stand out in a sea of black bags.
How To Sew DIY Luggage Tags

When you're traveling, it's hard to keep track of your luggage. You may have a cool suitcase, but it's always helpful to have something that makes your bag easily identifiable. If you're going on vacation or even for a long weekend, you should make these easy luggage tags! They're simple to make and will help you keep track of your things. With a few basic sewing supplies, you can make easy luggage tags for your next trip. They’re also a great way to cover up old stains or marks on your bags. In this tutorial, I'll show you how to sew DIY luggage tags using scrap fabric remnants!
DIY MDF Luggage Tags

These luggage tags are made using MDF (medium-density fiberboard), which is a wood composite material that's easy to cut and sand. Some companies carry pre-cut and laser-etched shapes for DIY projects that can be finished however you like. You can use these tags on luggage or as gift tags for friends who love to travel. This is a great way to personalize your luggage and make it easier to spot at the baggage carousel. Plus, these fun luggage tags are made with a few items you probably already have on hand. It's so easy to work with and paint, and it takes a design to the next level with its smooth surface.

There's nothing like heading off on a vacation. Whether you're jetting to a faraway destination or just driving down the road to visit family, it's always fun to pack your bags and getaway, even if only for a few days. But all too often, you end up standing at the baggage carousel recognizing everyone else's luggage before yours comes around. You've tried everything, from bright ribbons to colorful luggage tags. Well, here are some DIY luggage tags you can make that will help you spot your luggage a mile away. They're easy and inexpensive (or even free) to make, and they'll help you spot your stuff in no time at all.
How To Make A Luggage Tag In Leather
A luggage tag in leather is an easy but useful thing to make. It can be used as a key ring, bag tag, or luggage tag. There are many ways to make a luggage tag, but if you want to make something that is durable and can withstand the challenges of travel, leather is your best choice. Leather goods such as luggage tags can last for years, even when used as frequently as you might use a luggage tag. The most important thing is to make sure you have a great leather strap and a nice brass plate. The strap is so important because it will be the first thing people see when they look at the luggage tag. So, make it look good!
Leather Luggage Tags DIY
These leather luggage tags are super easy to make and a great way to personalize your suitcase. You can also use them as gift tags for birthdays, or name tags for those little ones in your life. This luggage tag is not only beautiful but also very practical. They're durable and easy to spot on a crowded bag carousel. They also can carry your contact information so finding you if your bag is lost is easier. Most people use business card size paper, but leather is more durable and classier. Once your letters are firmly attached, punch the holes for the rope and attach a small clasp so it's easier to open and close.
How to Make Rustic Wooden DIY Luggage Tags

At the end of a long vacation, there’s nothing scarier than standing at baggage claim, waiting for your bag to come around, and then seeing every other bag on the conveyor belt but yours. But that doesn’t have to happen if you make your own luggage tags! You could buy some at your local drug store ... but they’re not very personal, and they’re certainly not as fun as making your own. You can make your own luggage tags from wood, so they’re not only easy to make but also durable enough to last through all of your travels. It's easy to customize with the traveler's name and destination, and it has cute vintage-style hardware for an added touch of style. And best of all, it can be created from materials you likely already have at home
Easy DIY Luggage Tags

100directions
Luggage tags can be a bit boring. You could go for the store-bought ones, but why not have some fun with it and make your own? This DIY is cheap, easy, and will make your luggage stand out from the crowd. Even if you don't check your luggage, it's a good idea to tag it with your name and contact information. That way, if it accidentally gets left on the plane or picked up by someone else, you've got a better shot at getting it back. This is such a simple project and you can make them as colourful and patterned as you like.
DIY Shrinkable Plastic Luggage Tags

lovelyindeed
This is the perfect solution for anyone who travels with a lot of luggage. It's also the first step to becoming a true DIY luggage tag-making project. The most important thing about luggage tags is that the information (name, address, phone number) is durable and not easily removed. This DIY shrinkable plastic luggage tag project requires just a few basic materials and is easy to complete in under an hour. You may already have some of these materials on hand at home. Make sure that your luggage is easy to spot at the airport baggage carousel with these fun luggage tags. These are made from clear shrinkable plastic and feature a colourful tag design.
Conclusion:
These DIY luggage tags are great for when you're on the move, whether you're travelling for business or pleasure. If you've ever had your luggage gets lost in transit, you know that it's a huge hassle to get it back. Luckily, these clever luggage tag ideas will help ensure your bag makes it to its final destination — and back again! Never lose your luggage again with these easy-to-make DIY luggage tags. Think outside the box and create luggage tags for the kids' backpacks, gym bags, computer cases, school notebooks, and more.

More Crafts

Sharing is caring!
16 DIY Luggage Tag Ideas
:max_bytes(150000):strip_icc():format(webp)/IMG_20180624_160710_544-5b69ee6b46e0fb004ff36248.jpg "travel tag diy")
Damask Love
Whether you’re destined for a quick weekend away or a two-week vacation, your luggage is an essential piece of your trip, and it’s not only what’s inside that counts. A festive set of luggage tags can not only brighten up your packing experience, it makes it easier to spot your things at baggage claim post-flight.
Style your bags with an eye-catching luggage tag or two, and take solace in the fact that a lost bag could more easily find its way home with an informational tag. Peruse the do-it-yourself luggage tag ideas below, then get started crafting (and planning your next exciting trip).
Shrinkable Plastic Luggage Tags
Lovely Indeed
Draw a cute piece of fruit (or slice of cake, or ice cream sundae) onto shrinkable plastic, and add your personal information before shrinking in the oven. These end up being so adorable that you’ll want to pop them on your daily handbag or backpack to match your luggage.
Shrinkable Plastic Luggage Tags from Lovely Indeed
Typographic Luggage Tags
Sarah Hearts
Get wordy with your DIY luggage tags, and apply bold lettering to a bright base. Using pre-made tags, try stenciling on your own quirky message, or if you’re brave, go freehand. Either way, be sure to spray a clear coat over top of your lettering for staying power.
Typographic Luggage Tags from Sarah Hearts
Blank Form Luggage Tag
Maggie Holmes Design
Source a blank standard information form (try a scrapbooking store, a paper shop, or even your local post office), then see this tutorial for turning a regular form into something adorable. Feel free to add your own hand-drawn designs or stickers.
Blank Form Luggage Tag from Maggie Holmes Design
Watercolor Luggage Tags
A Beautiful Mess
All it takes for these adorable monogrammed tags are wooden circles, paint, and hardware. A Beautiful Mess shows you how to put all of these supplies together into luggage tags that are worthy of being used on stylish handbags too.
Pro tip: Use balsa wood (or a similar soft wood) for this craft so that you can use a standard hole punch to attach the hardware.
Watercolor Luggage Tags from A Beautiful Mess
Easy Printable Luggage Tags
The Idea Room
We love how simple this luggage tag DIY is from The Idea Room. We recommend making a coordinating set for all your suitcases (or your entire family’s’ cases) for easy, quick identification on the conveyor belt.
Easy Printable Luggage Tags from The Idea Room
Luggage Tags for the Sweet Tooth in You
The Small Adventurer
Who knew felt could be so cute? These luggage tags look good enough to munch on. Design a trio of sweet treats for a complete set. When working with felt, always use a sharp pair of scissors for a super clean finish.
Felt Sweets Luggage Tags from The Small Adventurer
Monogrammed Luggage Tag
My Thrifty House
Repurpose a plastic name badge holder as a DIY luggage tag protector a la My Thrifty House in this clever tutorial. We also love the idea of how easy it is to trade out the insert with the season (or to coordinate with a different suitcase).
Monogrammed Luggage Tag from My Thrifty House
Painted Leather Luggage Tags
While this one is definitely easier with the help of a Cricut machine, crafters can achieve a similar effect with a sharp pair of scissors or leather working tools. Experiment with a variety of eye-catching patterns to paint, and opt for hot glue as opposed to a needle and thread for assembly if you’re not confident with your stitching.
Painted Leather Luggage Tags from Damask Love
Wood Burned Luggage Tags
Anika’s DIY Life
This project is a great option for beginning wood burners, just stick to a bold, graphic design. Watercolor corners add a hint of interest, and this DIY looks great when used as a homemade gift tag too, so don't hesitate to create a big batch of wooden tags. See the tutorial for all the details you need.
Wood Burned Luggage Tags from Anika’s DIY Life
DIY Cactus Luggage Tag
We’re Going to Make It
Reluctant to print personal information on your tags? Shape your tags in an eye-catching, easily describable and recognizable design instead. If your bag gets lost, it can be easily distinguished by airline personnel, and it’ll look extra cute while in transit with a bit of cactus-shaped flair.
DIY Cactus Luggage Tag from We’re Going to Make It
Foiled Luggage Tags
Lia Griffith
Add a little sparkle to your checked bag, carry-on, and personal item with this metallic iron-on foil tutorial. Tropical trees work well for setting your sights toward a beach vacation, but any simple pattern will pop against a neutral leather base.
Foiled Luggage Tags from Lia Griffith
Hand Sewn Luggage Tags
Sew Very Crafty
Break out the sewing machine for this DIY tag, but don’t be intimidated, it actually comes together pretty quickly and without too much tricky stitching. Try using different complementary patterns of fabric on the front and back of each tag for a funky contrast effect.
Hand Sewn Luggage Tags from Sew Very Crafty
Rustic Wooden Luggage Tags
Ideas for the Home by Kenarry
Scrap wood is the perfect media for a rustic, homemade luggage tag. Try staining in a medium to light tone, so that the wood will still allow for decorative paint and stamped letters overtop. See the full tutorial to make these ultra chic tags.
Rustic Wooden Luggage Tags from Ideas for the Home by Kenarry
Brushstroke Luggage Tags
Almost Makes Perfect
You'll be shocked to find out that this stunning do-it-yourself project is super simple and quick to create. The full tutorial will show you the technique and supplies you need for making these pretty marble tags. The more abstract the art, in this case, the better.
Brushstroke Luggage Tags from Almost Makes Perfect
Decoupage Luggage Tags
Modge Podge Rocks
Capture nostalgic documents, photos, or art in a more tangible place than a scrapbook with this lovely DIY. The full tutorial will show you how to perfectly decoupage a hefty piece of cardstock or balsa wood to your liking.
Decoupage Luggage Tags from Modge Podge Rocks
Neon No-Sew Luggage Tag
Lovely Indeed
Not only will you see your bag from a mile away, but the bright luggage tag DIY shown here will help bring a little bit of sunshine back from your vacation. The best part is it's super simple and there's no sewing required.
How to Make a No-Sew Luggage Tag from The Spruce
More from The Spruce Crafts
- 13 Free Dollhouse Plans
- How to Make a No-Sew Leather Luggage Tag
- 7 Printable Gift Tag Designs for All Occasions
- 15 Gift Tag Ideas for Making Your Presents Pop
- 73 Inexpensive Homemade Gift Ideas
- 11 Free DIY Craft Table Plans
- 15 Free Plant Stand Plans
- 29 Pineapple DIYs to Make This Summer
- 24 DIY Father's Day Gift Ideas
- 17 DIY Sharpie Projects Everyone Will Love
- 16 DIY Bathroom Vanity Plans
- 14 Cute DIY Christmas Stockings
- 25 Amazing Homemade Graduation Gifts
- 31 Cactus-Inspired DIY Projects
- 20 Creative Ways to DIY Flip Flops
- 14 Lovely Mother's Day Cards You Can DIY
- Skip to primary navigation
- Skip to main content
- Skip to primary sidebar
- DIY Projects
- Woodworking
- Modern Decor
- Color Schemes
How to Make a Luggage Tag (20 Easy DIY Luggage Tags)
Set off on your next travel adventure with the confidence of never losing sight of your luggage. Learn how to make a luggage tag with our easy and creative DIY luggage tags guide, perfect for adding a personal stamp to your bags. These 20 DIY luggage tag ideas not only ensure easy identification but also infuse your gear with a touch of your own style. Dive into crafting something unique that is both a practical tool and a reflection of your personality.
Elevate your travel experience by making DIY luggage tags that stand out. Our step-by-step instructions make it simple, using materials like fabric scraps, leftover leather, and even wood pieces. Enjoy the process of creating something one-of-a-kind, and get ready to easily spot your luggage on any busy carousel. Continue reading to discover how these tags can enhance your journey and become a cherished part of your travel essentials.

Why Make Your Own DIY Luggage Tags?
Making your own DIY luggage tags comes with a host of benefits that cater to both practical needs and personal expression. Here’s why crafting your own tags can be a game-changer for your travels:
- Easy Identification : With a unique luggage tag, your bags will easily stand out from the sea of similar suitcases on the baggage carousel, reducing the time you spend searching.
- Theft Prevention : A distinctive luggage tag can deter thieves. It signals that you are attentive to your luggage and can easily spot it, making it less likely to be taken by mistake or intentionally.
- Personal Style : DIY tags allow you to infuse your personality into your travel gear. Whether you prefer vibrant colors, quirky designs, or elegant simplicity, your tag can be a reflection of your personal taste.
- Cost-Effective : Crafting your own tags can be significantly cheaper than purchasing pre-made designer tags. Plus, it can be a fun use of materials you already have at home.
- Durability : By selecting sturdy materials and employing robust crafting techniques, your DIY tags can outlast many store-bought options.
- Customization : Need to update your contact information? No problem. DIY tags can be easily modified, so your details are always current.
- Gift-Giving : Handmade luggage tags make for thoughtful and practical gifts for friends and family who love to travel.
- Lost Luggage : In the unfortunate event that your luggage goes astray, a custom tag with your contact information can facilitate a quick reunion with your belongings.
By taking a little time to make your own luggage tags, you’re setting yourself up for a smoother and more personalized travel experience.
How to Make Your Own DIY Luggage Tags
Making your own DIY luggage tags is a fun and practical way to personalize your travel experience. Whether you’re an experienced crafter or new to DIY projects, this guide will help you design unique tags that make your bags easily identifiable and add a personal flair to your travel gear.
Step 1: Gather Your Materials
Before you start, ensure you have all the necessary materials on hand. Here’s what you’ll typically need:
- Base material for the tag (e.g., leather, fabric, wood, plastic)
- Decorating supplies (e.g., paint, markers, vinyl, washi tape)
- Clear vinyl or laminating pouch for protection (if using paper or fabric)
- Cutting tools (scissors or craft knife)
- Hole punch or grommet tool for attachment point
- Fastening accessory (e.g., keychain ring, ribbon, or string)
- Contact information card or paper
Step 2: Choose Your Tag Design
Decide on the shape and size of your luggage tag. You can make it classic and rectangular, or get creative with shapes like hearts, animals, or travel-themed icons. Draw or trace your design onto your chosen material.
Step 3: Cut and Decorate
Cut out your tag using scissors or a craft knife. If you’re using a material like wood, you might need more specialized tools. Decorate your tag to your liking with paint, markers, or stick-on vinyl. Let your creativity shine!
Step 4: Add Your Contact Information
Print or write out your contact information on a small card or piece of paper that will fit within the tag. If you want it to be more durable, you can laminate this information or cover it with clear vinyl.
Step 5: Assemble the Tag
- If using a grommet , attach it to the hole you punched to make a reinforced attachment point.
- Secure the contact information inside the tag. If you have a pouch or sleeve, slide it in. If not, you can use clear packing tape to laminate it directly onto the tag.
- Attach the fastening accessory , like a keychain ring, ribbon, or string, through the hole or grommet.
Step 6: Attach to Your Luggage
Fasten the tag to your suitcase handle or strap securely. Make sure it’s tight enough not to come off during handling but still visible for quick identification.
Tips for Success:
- Use bold colors and designs to make your luggage tag stand out.
- Waterproof your tag if using paper or fabric by laminating or covering it with clear vinyl.
- Update your contact information as by having a replaceable card.
- Consider durability ; choose materials that will withstand the wear and tear of travel.
- Make extras in case you need to replace a lost tag or want to coordinate with different luggage sets.
Making DIY luggage tags is not only a useful way to mark your belongings but also a fun activity to express your style. With these simple steps, you’ll be ready for your next adventure with a personalized touch!
Frequently Asked Questions About DIY Luggage Tags
What materials do i need to make diy luggage tags.
To make DIY luggage tags, you’ll typically need:
- Base material (such as leather, fabric, wood, or plastic)
- Decorating supplies (paint, markers, vinyl, washi tape)
- Clear vinyl or laminating pouch for protection
- Cutting tools (scissors or a craft knife)
- Hole punch or grommet tool
- Fastening accessory (keychain ring, ribbon, string)
- Paper or card for contact information
How can I make my DIY luggage tag stand out?
To make your luggage tag stand out, use bold colors or unique designs that reflect your personal style. Consider adding a monogram, fun graphics, or patterns that are easy to recognize from a distance.
Can I make a luggage tag if I don’t know how to sew?
Yes, there are many no-sew luggage tag options available. You can use materials like leather, wood, or even pre-made tags and customize them with paint, vinyl, or markers without the need for sewing.
What is the best way to secure my contact information on a DIY luggage tag?
You can print or write out your contact information on a card and laminate it, or cover it with clear vinyl to protect it from wear and tear. Make sure to place it securely within the tag, so it remains visible and intact.
How do I attach a DIY luggage tag to my bag?
Use the fastening accessory of your choice, such as a keychain ring, ribbon, or string, and secure it through the hole or grommet on your luggage tag. Attach it to your suitcase handle or strap, ensuring it’s visible and firmly in place.
Can DIY luggage tags help prevent theft?
Distinctive luggage tags can act as a deterrent for theft since they show that you can easily identify your bag. A unique tag might discourage potential thieves from targeting your luggage.
Are DIY luggage tags a good gift idea?
Absolutely! Handmade luggage tags are a thoughtful and practical gift for anyone who enjoys traveling. They add a personal touch to luggage and can be customized to suit the recipient’s taste.
How can I waterproof my DIY luggage tag?
If your luggage tag is made of paper or fabric, you can waterproof it by laminating it or covering it with clear vinyl. This will help protect it from damage due to moisture and handling.
How often should I update the information on my luggage tag?
Update your contact information whenever it changes to ensure that you can be reached if your luggage is lost. With DIY tags, it’s easy to swap out the information card whenever necessary.
Remember to keep your luggage tag information current and always double-check that your tag is securely attached before traveling to avoid any mishaps. Enjoy crafting your unique luggage tags and have a safe and pleasant journey!
20 Easy DIY Luggage Tags
Discover 20 simple and fun DIY luggage tag ideas to personalize your travel gear. Make your bags stand out and add a personal touch with these easy-to-make tags. Perfect for any traveler!
1. DIY Shrinkable Plastic Luggage Tag

Ready to add a personal touch to your travel gear? Lovely Indeed offers a fun DIY project to make your own shrinkable plastic luggage tags. With simple materials like shrinkable plastic paper, colored pencils, and a few tools, you can craft unique tags that stand out on the baggage carousel. Start by drawing and coloring your design, then bake it to watch it shrink into a durable and vibrant tag. Cut, cool, and attach it to your luggage for a custom touch on your adventures. Perfect for crafters of all levels, these luggage tags are a creative way to kick off any trip.
2. How to Make Typographic Luggage Tags

Making personalized luggage tags is a snap with Sarah Hearts ‘ DIY guide. With a Silhouette or Cricut cutting machine and some heat transfer vinyl, you can craft vibrant, typographic tags that make spotting your suitcase a breeze. The tutorial is straightforward, offering a list of supplies and step-by-step instructions to transform plain leather tags into unique travel accessories.
The process is simple: download the free SVG cut file, cut the vinyl, weed out excess material, and iron on the design. It’s a fun project that adds a pop of color and a personal touch to your travel gear. Plus, with the added convenience of a mini iron, applying designs to leather has never been easier. Get ready to travel in style with your own set of custom luggage tags from Sarah Hearts.
3. Summer Camp Luggage Tag for Kids

Get ready for summer camp fun with a personalized touch! Merriment Design offers an engaging and easy-to-follow tutorial for crafting a DIY luggage tag that’s perfect for kids heading off to camp. This cost-effective project requires simple supplies like card stock, markers, and a laminating pouch, ensuring your child’s belongings stand out with a unique and colorful tag.
With helpful instructions and a creative opportunity for kids to express themselves, this activity not only prepares their gear for adventure but also makes for a memorable pre-camp craft. Keep those camp bags easily identifiable and add a dash of homemade charm with this delightful luggage tag DIY.
4. DIY Watercolor Luggage Tags

Get ready to elevate your travel gear with a personalized touch by making your own watercolor luggage tags. Kara Whitten guides you through a simple, engaging DIY project that transforms ordinary leather rounds into vibrant, one-of-a-kind accessories for your suitcases.
With a few basic supplies like watercolor paints, a paintbrush, and a keychain clasp, you can design tags that reflect your style. This craft not only adds flair to your luggage but also makes a thoughtful and quick gift for friends who love to travel. A Beautiful Mess provides the full tutorial, ensuring your luggage stands out with a splash of color and creativity on your next adventure.
5. Cute Luggage Tags Tutorial

Make your own DIY Luggage Tags with ease using this simple guide from The Idea Room . These tags are perfect for adding a personal touch to your travel gear, ensuring your bags stand out on the carousel. All you need are free printable tags, plastic luggage tag sleeves, a glue stick, scissors, and optional letter stickers for monogramming. Simply print the designs, cut them out, glue back-to-back, and slide them into the sleeves. Attach them to your bags, and you’re ready for your next adventure with unique and durable luggage tags.
6. Sweets-Inspired Luggage Tags

Add a touch of whimsy to your travels with DIY Sweets-Inspired Luggage Tags, a fun and simple craft project featured on the blog. Ideal for personalizing your baggage, these tags come in delicious designs like chocolate bars, fairy bread, and ice cream. The tutorial provides a list of materials, such as felt, acrylic paint, and cardstock, and guides you through each step with clarity.
Perfect for adding a unique flair to your luggage, these tags also make thoughtful handmade gifts for friends who love to travel. Engage in this enjoyable crafting activity and make your suitcase stand out on the carousel with these super easy luggage tags. The Small Adventurer
7. No Sew DIY Fabric Luggage Tags

Ready to add a personal touch to your travel gear? The Polka Dot Chair offers a creative and straightforward DIY guide to crafting your own fabric luggage tags without the need for sewing. This project is perfect for those who adore fabric and enjoy customizing their belongings. You’ll need simple materials like fabric, Heat N Bond Ultra, clear vinyl, a grommet, and ribbon to get started.
The process involves fusing fabric pieces together, making a clear window for your contact information, and finishing it off with a stylish ribbon. It’s an engaging way to ensure your luggage stands out, and the clear instructions make it a breeze to complete. With these handmade tags, your bags will be easy to spot on any carousel.
8. Make Your Own Leather Luggage Tags

Planning your next getaway? Add a personal touch to your travel gear with custom DIY Leather Luggage Tags, easily crafted with the help of a Cricut Explore. Damask Love offers a step-by-step guide on making durable and stylish tags to distinguish your bags with flair.
All you need is some tooling leather, a deep cut blade for precise cutting, and leather paint for decoration. Follow the simple instructions to cut, paint, and stitch your way to a unique luggage tag that will last through many adventures. With a bit of creativity, your luggage will stand out, making it a breeze to spot on any carousel. Happy crafting and safe travels!
9. Wood Burning Luggage Tags Beginner Project

Delve into the world of DIY with Anika’s DIY Life , where you can master the art of wood burning by making personalized monogrammed tags. Ideal for sprucing up luggage or adding a bespoke touch to gifts, this project is a fantastic starting point for those new to woodcraft. Anika Gandhi guides you through the process with clear, step-by-step instructions, ensuring a rewarding and enjoyable crafting experience.
Gather your MDF scraps, a wood burning tool, and a dash of creativity to transform simple materials into charming, custom tags. With Anika’s expert tips and your newfound skills, you’ll craft a piece that’s both functional and stylish.
10. Making a Luggage Tag That Talk

Transform your travel experience with personalized luggage tags you can craft at home! Lydia from Lydi Out Loud shares a simple yet creative DIY project for making eye-catching luggage tags that convey a clear message to anyone who might accidentally pick up your bag.
With a few affordable supplies like printable vinyl and a Cricut machine, you can design and make unique tags featuring fun images like cacti and donuts. These tags not only add a personal touch to your bags but also serve as a precaution against mix-ups at baggage claims. Follow Lydia’s step-by-step guide to ensure your luggage stands out and stays safe on all your adventures.
11. DIY Foiled Tropical Luggage Tags

Ready to add a touch of elegance to your travel gear? Lia Griffith guides you through making stylish foiled tropical luggage tags that are not only eye-catching but practical too. Perfect for any trip, these tags can house your business card, ensuring your belongings are easily identifiable. With a simple set of tools and materials, such as leather scraps, tacky glue, and a gold paint pen, you can craft a personalized accessory for your suitcase.
Follow the step-by-step instructions to cut, glue, and foil your way to a chic luggage tag that stands out at baggage claim. Plus, the added tassel detail brings a hint of luxury to your travel essentials. Crafting with Lia Griffith means accessing a trove of high-quality DIY projects that simplify and beautify your crafting experience.
Are you planning for a vacation? Check out these great DIY backpacks that are simple to make for children and adults.
12. How to Sew a Luggage Tag

Embarking on your travel adventures with unique luggage tags just became easier with Sewverycrafty ‘s step-by-step guide on crafting DIY luggage tags. Sewing enthusiasts can now make eye-catching tags that are not only functional but also add a personal touch to their bags.
The tutorial is designed to be simple and accessible, ensuring that anyone with basic sewing skills can produce durable and stylish tags. By using vibrant fabrics and following the clear instructions, your luggage will stand out on any carousel. Dive into this project and add that extra flair to your travel gear with custom-made luggage tags from Sewverycrafty.
13. Rustic DIY Wooden Tags

Add a touch of personality to your travel gear with these rustic wooden DIY luggage tags. Ideal for anyone keen to spot their bags easily at the airport, these tags are not only durable but also customizable to reflect your style. With a simple list of supplies like plywood, stain, and leather cording, you can make these tags in no time.
Follow the step-by-step guide on Ideas for the Home by Kenarry ® to sand, cut, and decorate your way to a set of unique luggage identifiers that will last for many adventures to come. Plus, they make thoughtful gifts for friends and family who love to travel. Get crafting and make your next trip a little more you!
14. DIY Luggage Tags That Make a Statement

Ready to add a personal touch to your travel gear? Mod Podge Rocks offers a fun and engaging way to make your own DIY luggage tags. With just a few supplies like MDF wood, scrapbook paper, and Mod Podge Matte, you can craft tags that are not only unique but also durable. This step-by-step guide is perfect for crafting enthusiasts looking to add a splash of color and personality to their luggage.
The process is simple: cut, sand, decoupage, and decorate. These tags are ideal for ensuring your bags stand out, and they make fantastic gifts for friends who love to travel. Grab your materials, and let’s start making those eye-catching luggage tags today!
15. DIY Luggage Tag Using Duct Tape

Making a unique luggage tag with duct tape is a fun and easy DIY project that adds a personal touch to your travel gear. Instructables offers a step-by-step guide to crafting a durable and distinctive tag that stands out on the baggage carousel.
With just a few materials and a bit of creativity, you can ensure your luggage is easily identifiable, reducing the chance of mix-ups. This practical accessory not only serves a functional purpose but also lets you express your style. Follow the tutorial to make your custom luggage tag and travel with confidence knowing your bag is marked with your handmade creation.
16. Best Fabric Luggage Tag Ideas

Discover how to make personalized luggage tags with a touch of DIY flair at Hearth and Vine . This instructive guide provides step-by-step instructions on crafting durable tags using your preferred fabric patterns and iron-on vinyl. It’s an ideal project for anyone eager to add a unique and easily recognizable touch to their travel gear. The process is straightforward, making it accessible for crafters of all skill levels.
By following the helpful tips and using simple tools, you’ll be able to produce a practical and stylish accessory that stands out on the baggage carousel. Plus, these handmade tags make for thoughtful gifts for friends and family who love to travel. Get ready to enhance your luggage with a homemade tag that showcases your fabric favorites!
17. DIY Leather Luggage Tags

Make your own stylish leather luggage tag with a simple DIY project from The House That Lars Built . In just 15 minutes, you can fashion a personalized and colorful tag to adorn your suitcase, making it stand out and easily identifiable. Perfect for frequent travelers or a one-time trip, this craft not only adds a personal touch to your luggage but also ensures your contact information is clear and accessible. Follow the engaging and easy-to-understand instructions to enhance your travel gear with a touch of handmade charm.
18. Pom Pom Leather Luggage Tags

Add a touch of personal flair to your travel gear with DIY pom pom leather luggage tags! Sugar & Cloth presents a creative and colorful way to distinguish your bags with this easy craft project. Learn how to combine vibrant yarns for custom pom poms and cut leather into stylish tags, complete with your name.
With simple tools like a rotary cutter, leather punch, and eyelet setter, you can make durable and eye-catching accessories for your luggage. Ideal for school bags, baby bags, and overnight totes, these handmade tags are not just functional but also a cheerful addition to any item you carry. Follow these instructions to enhance your travel style or gift a set to your globetrotting friends.
19. DIY Leather Travel Tags With Transfer

Looking to add a personal touch to your travel gear? Eclectic Trends offers an instructive guide on making your own leather travel tags with a transfer technique. This engaging DIY project not only enhances luggage security but also allows for a unique expression of style.
The process is simple: design, print, cut, glue, and transfer onto leather. Perfect for sprucing up suitcases or even as chic key hangers, this craft is adaptable and fun. With clear steps and helpful tips, anyone can make their travels a bit more bespoke. Dive in and personalize your journey!
20. How to Make Luggage Tags

Looking to add a unique touch to your travel gear? A Princess and Her Pirates presents an easy-to-follow DIY Luggage Tags tutorial that can help you make personalized tags for your bags. With simple materials like a vinyl cutting machine, opal vinyl, and cardstock, you can craft luggage tags that not only make your bags stand out on the carousel but also reflect your style.
Dive into this engaging guide and learn how to design, cut, and assemble your very own travel accessories. These tags aren’t just for suitcases—they’re perfect for teacher gifts, backpack identifiers, and organizing bins in classrooms or offices. Get crafting and elevate your luggage with a custom flair!
Conclusion:
In conclusion, making your own DIY luggage tags is an enjoyable way to infuse personality into your travel essentials. Our guide on “ How to Make a Luggage Tag ” has armed you with twenty creative and easy DIY ideas that not only make your bags easily identifiable but also showcase your unique style. From simple no-sew fabric tags to elegant leather creations, these custom tags can enhance your travel experience, reduce the risk of luggage loss, and offer a perfect opportunity for a handmade gift. So grab your materials and get ready to add that personal stamp to your bags for your next adventure!
- Skip to primary navigation
- Skip to main content
- Skip to primary sidebar
- Skip to footer
Party Games, Holidays, Paper Crafts, DIY Room Decor, and Gifts!
10 DIY Luggage Tags to Make
Crafts & DIY luggage
Keep your luggage properly identified with these luggage tags to make for the Traveler this holiday season. These handmade luggage tag ideas are perfect for business trips, family fun vacations, or a romantic getaway. Some of the tutorials include fabric, leather, vinyl, embroidery, duct tape, and printable tags.
Your luggage will be easy to spot with your own customized luggage tag . So be sure to check the Tip Junkie community for travel information or to upload your own vacations and travel tips! {wink} {knuckle bumps}
How to Make Custom Luggage Tags
Treat your bags like VIPs with personalized luggage tags that fit your tastes and personality. Make your own personalized luggage tags! These make great gifts for friends, family or colleagues.

1. DIY Fabric Luggage Tags ~ Send a friend off in style with one of these chic luggage tags. It will make it easy to spot their suitcase at the baggage claim, plus they are much more durable than the cheap paper ones. Don’t forget to slide a little notecard in wishing them a good trip!

2. Applique Luggage Tags {free template} ~ Learn how to make appliqued luggage tag holders from sturdy fabric and the free pattern. You won’t have any problems spotting your luggage with this adorable personalized tag. {wink}
Printable DIY Luggage Tags Template
Whether you’re going for a hike or a weekend getaway, our free DIY luggage tags template will help you put a creative twist on your travel accessories. This is a printable template of blank luggage tags that you can customize by hand or by scanning into your computer. Yes, definitely no sew luggage tags for you!

3. Children Luggage Tags {free printables} ~ Going on vacation with the kiddies for the holidays? Then you’ll definitely want to get your hands on these cute no sew printable “Globe Trotter” and “Jet Setter” travel luggage tags!

4. Fabric Luggage Tags with Free Printables ~ Make unique, adorable, and personalized luggage tags from these free printables. You’ll learn how to print the tags on fusible printable fabric.
Easy Handmade Leather Luggage Tags
If you’re going to travel, you might as well look stylish doing so. Not sure how to do that? Well, maybe this quick how-to on handmade leather luggage tags can help. It’s a stylish DIY luggage tags template!

5. DIY Leather Luggage Tag ~ Whether you are getting out of dodge or staying home over the holidays, this personalized luggage tag can serve you well. The window flap is a great feature to not publicly display your address. Bon voyage!
DIY Homemade Luggage Tag Holders
Luggage labels can be expensive and cumbersome. This makes them a pain to use at the airport and to take on travels. Why not try doing some DIY luggage tags instead? Here’s how you can make your own luggage tag holders out of household materials.

6. DIY Luggage Tag Holder ~ A great tutorial for sewing your own fabric luggage tags. A great party gift, or also super for back-to school. The kids can attach them to their shiny new backpacks.

7. Travel Wallet with Luggage Tag ~ This cute travel wallet has a place for your travel tickets, photo ID, and passport, as well as a matching tag for your luggage. What a sweet Bon Voyage gift this would make!

8. DIY Luggage Tag Tutorial ~ Easily spot your luggage with a custom made luggage tag. How to make custom luggage tags? For durability, make it with vinyl or leather. Follow the simple no sew tutorial to make your own cool DIY luggage tags template.

9. DIY Embroidered Luggage Tags ~ Dress up your lugggage with some fun geometric tags. How to make custom luggage tags? Use a paper template and embroidery thread for simple custom tags.

10. Duct Tape Luggage Tag ~ How to make custom luggage tags? Here’s an easy luggage tag idea: make luggage tags from fun duct tape patterns! Definitely an easy, no sew DIY luggage tag!
More Travel Tips from Tip Junkie:
- You’ll love these Thoughtful Gifts for the Traveler ideas!
- These Universal Studios Ride and Insiders Secrets printables are a perfect gift for movie fans and travelers!
- Checkout these Traveling with Kids Tips & Road Trip Ideas to get you prepped on your next family trip.
- Here are some very helpful Thanksgiving travel tips you need to take note of.
- These craft kits for travel with kids will help your kids fight boredom during long travels.
- Planning for a travel-themed party? Check out these fun travel themes for the best birthday parties !
Time Tip: If you’re looking for something specific, type in any word in the Search Box and you’ll receive tons of creative DIY and how-to make tutorials.
. Join 200,000 Creative Women! Sign up for weekly inspiration and FREEBIES! EMAIL:
P.S. Join the conversations over on the Tip Junkie Facebook page . It’s a great place to ask questions on how to make things or for specific tutorials you need.
Reader Interactions
Leave a reply cancel reply.
Your email address will not be published. Required fields are marked *
Tip Junkie promotes creative women through their products, services, and crafty DIY tutorials. Our creative community loves to learn how to create moments that matter for our friends and families!
Occasionally, Tip Junkie participates in affiliate programs, like Etsy or Amazon, to earn fees by linking to products. However, never at any additional cost you and I’ll always disclose if used, check out the disclosure policy here .
Your Free Gift!

What Tutorials Can I Help You Find?
- Activities for Kids
- DIY Decorating
- Free Printables
- Homemade Gifts
- Paper Crafts
- Party Ideas
- Style and Beauty
Username or Email Address
Forgot password?
Enter your account data and we will send you a link to reset your password.
Your password reset link appears to be invalid or expired.
Privacy policy, add to collection.
Public collection title
Private collection title
No Collections
Here you'll find all collections you've created before.
- Skip to primary navigation
- Skip to main content
- Skip to primary sidebar
Positively Splendid {Crafts, Sewing, Recipes and Home Decor}
Handcrafted. Splendidly.
How to Sew a Luggage Tag
July 6, 2022 By Amy @ Positively Splendid

Few things are worse than losing luggage while traveling! Although you can’t entirely eliminate that risk when flying, you can make some DIY tags with my free luggage tag pattern to ensure you’re doing all you can to locate your luggage if it doesn’t arrive when you do. When you make luggage tags with bright, fun fabrics, they can also help you identify your luggage from the rest of the heap in the baggage claim area. If you’ve got traveling in your future (or if you want to make a nice gift for a jet-setter in your life), keep reading for my free luggage tag pattern. You’ll also want to download the printable information tags (available below) to slip into your luggage tags once they’re finished!

This post contains affiliate links. Thanks for your support!
This luggage tag pattern is a fantastic way to use scraps of fabric from your stash. And if you’re interested in even more scrap sewing projects, I’ve got you covered!
Quick and Easy Fabric Coasters
Easy scrunchie pattern, diy portable first aid kit, zipper pencil pouch, to sew a luggage tag with this free luggage tag pattern, you will need…, luggage tag pattern pdf (click link for free download).
- Fabric scraps or fat quarters
- Medium-weight fusible interfacing (Pellon 931TD)
- Clear vinyl (2 gauge)
- Extra wide double fold bias tape (1/2″)
- Coordinating thread
- Sewing machine
- Sewing shears
- Point turning tool
- Other essential sewing tools (see my recommendations here)
Luggage Tag Pattern Instructions
(Note: A printable version of these instructions is available below)
Make Your Cuts
- Download the luggage tag pattern. Print and cut out each of the pattern pieces.
For each luggage tag, cut the following:
- 2 body pieces (can use the same fabric for front and back, or mix and match different fabrics)
- 1 pocket piece (Create a small notch on the top center of the pocket piece where indicated on the pattern piece)
- 2 body interfacing pieces
- 1 pocket interfacing piece
- 1 vinyl piece for the tag window
- 1 4.5″ piece of bias tape
- 1 12″ piece of bias tape

Prepare Pieces for Sewing
Place the body pieces face down on your ironing board. Center the body interfacing pieces onto the wrong side of the body pieces. Carefully flip over the pieces, making sure the interfacing remains in place, so that the right side of the body piece is facing up. Press on the fabric to fuse the interfacing pieces to the fabric, using a dry iron for 10-15 seconds.
Fuse the pocket interfacing piece to the pocket piece using the same steps detailed above.

Carefully snip each of the four corners on the inside of the pocket piece window, cutting the fabric just to where it meets up with the interfacing, as shown.

Fold the pocket window edges toward the back side of the piece and press firmly into place.

Assemble the Luggage Tag Pocket and Strap
Center the vinyl piece over the pocket window on the back side of the piece. Use sewing clips (or hair clips) to secure the vinyl in place. On the front side of the piece, top stitch 1/8″ around the outside edge of the window to finish the window edge and secure the vinyl to the piece.

Center the 4.5″ section of bias tape along the notched edge of the pocket piece so that the wider edge of the bias tape is on the wrong side of the pocket. (A small amount of the bias tape will overlap on either side.) Use sewing clips (or hair clips) to anchor the bias tape in place. With the pocket piece right side up, stitch along the open edge of the bias tape to secure it to the pocket. Trim away the excess bias tape on either side, and set the pocket aside.

With the wider edge of the 12″ bias tape facing down, stitch on the open edge of the tape to form a strap.

Assemble and Sew the Luggage Tag
Place the front body piece facing up on your work surface. Align the pocket piece on the front body piece, so that the wrong side of the pocket piece is facing the right side of the body piece and the lower corners of each piece are precisely aligned. Pin. Baste 1/8″ around the outer edge of the pocket to secure it to the body piece. Remove pins.
Center the strap piece along the top edge of the right side of the front body piece, so that the ends of the strap overlap the edge of the front body piece by about 1/2″. Pin. Baste 1/8″ from the edge of the front body piece to anchor the strap into place. Remove pins.

Align the back body piece on top of the assembled front/pocket, so that the right sides of the front/pocket piece and the back piece are facing. Make sure the strap piece is out of the way before pinning all layers together. Use 1/4” seam allowance to stitch around the pinned pieces, leaving a 2” opening along the bottom edge of the luggage tag for turning, as shown.

Clip the corners of the luggage tag, and turn right side out through the bottom opening, gently using the strap to help as you pull. Use the point turning tool to thoroughly turn each of the corners. Fold the unstitched seam edges inside the opening. Press. Top stitch 1/8″ around the entire perimeter of the tag, closing the bottom opening as you sew.

Your DIY luggage tag is complete!

This luggage tag pattern is the perfect size for holding a business card, or you can print off and fill out my printable luggage tag labels to slip into the pocket of your luggage tag.

Luggage Tag Pattern Tips
What types of fabric are best for this pattern? Scraps of quilting cotton are great for sewing luggage tags, and fat quarters are a great option, too. I don’t recommend using heavier fabrics like home decor fabrics for this project, since the bulk can make turning the project right side out more challenging.
Where can I find interfacing for this project? Interfacing is usually found near the utility fabrics in fabric stores.
Can I use lightweight or heavyweight interfacing instead of medium weight if that’s what I have on hand? Lightweight interfacing can be substituted, but keep in mind that your finished luggage tag will be less sturdy and won’t hold up to travel wear and tear as well. I do not recommend using interfacing heavier than a medium weight, since turning the project right side out is challenging with that additional bulk.
Is there a way to personalize the luggage tags? Yes! Add embroidery or iron-on vinyl designs to the back body piece before ironing on the interfacing in the first step. Names and monograms are great design options.
How do I attach the finished luggage tag to my bag or suitcase? Secure the luggage tags around the handle of your bag with a slip knot, as seen below. Easy peasy!

Download and print this luggage tag tutorial for handy reference as you sew!

Luggage Tag Pattern
- Sewing Machine
- Sewing Shears
- Point Turning Tool
- Other essential sewing tools (refer to my recommended tools linked in the blog post)
- Luggage Tag Pattern PDF click link in blog post for free download
- Medium-weight fusible interfacing Pellon 931TD
- Clear vinyl 2 gauge
- Extra wide double fold bias tape 1/2"
Instructions

Having grown up in a home brimming with sewing notions and paintbrushes, Amy has a deep love for all things creative. On any given day, you’ll find her knee-deep in her latest creative endeavor, with projects ranging from sewing and crafts to home decor and kid-friendly ideas. Amy believes that everyone, regardless of skill level or experience, possesses the ability to create something beautiful, and Positively Splendid was born of her passion for helping others harness their innate creative potential.
EVEN MORE GREAT IDEAS JUST FOR YOU!
Privacy preference center, consent management, necessary cookies, performance cookies, targeting cookies.
When you visit any web site, it may store or retrieve information on your browser, mostly in the form of cookies. This information might be about you, your preferences or your device and is mostly used to make the site work as you expect it to. The information does not usually directly identify you, but it can give you a more personalised web experience. Because we respect your right to privacy, you can choose not to allow some types of cookies. Click on the different category headings to find out more and change our default settings. However, blocking some types of cookies may impact your experience of the site and the services we are able to offer.
Privacy Policy
These cookies are necessary for the website to function and cannot be switched off in our systems. They are usually only set in response to actions made by you which amount to a request for services, such as setting your privacy preferences, logging in or filling in forms. You can set your browser to block or alert you about these cookies, but some parts of the site may not work then.
Cookies Used
These cookies allow us to count visits and traffic sources, so we can measure and improve the performance of our site. They help us know which pages are the most and least popular and see how visitors move around the site. All information these cookies collect is aggregated and therefore anonymous.
These cookies are set through our site by our advertising partners. They may be used by those companies to build a profile of your interests and show you relevant ads on other sites. They work by uniquely identifying your browser and device. If you do not allow these cookies, you will not experience our targeted advertising across different websites.
A Subtle Revelry
DIY Luggage Tag Template + My Secret Packing Trick
May 23, 2018, 10:50 am
Summer travel season is a upon us and Matt and I have big plans! We have a trip to Scotland in the works for late summer and a couple quick weekend jaunts in between. We created this fun DIY luggage tag template and a pretty leather backed holder for it that will make all our summer travels a little more organized and pretty. And speaking of staying organized as we travel, in partnership with Downy Wrinkle Releaser Plus who is obviously coming along for the ride… I have the best packing trick to share with you!

As a busy working mom, my packing – even for big trips tends to be a matter of tossing what’s clean and still fits into a bag. HA! Can you relate?
But as you pack with little time and lots of adrenaline you want to land fresh where you are going. You know that feeling when the plane takes off and you finally relax? That’s the feeling I want my clothes to have too!
When we land I want everyone and everything I’m traveling with to be smooth and happy. To accomplish this, I’ve started using Downy Wrinkle Releaser Plus when I travel. I’ll show you how it works for me to make traveling 100% better without any extra work.

DIY Luggage Tag Template
The first element to making sure all the baggage gets to where we are going smoothly is by ensuring it doesn’t end up lost on the way! To keep your bags safe while in route download our pretty luggage tag template right here. The luggage tag template pdf is quick to print and can be used on it’s own or in a luggage tag.
I’m partial to our design which I’ll give you all the steps to create below. I love it mostly because it’s a pull out design – meaning our DIY luggage tag template and all the personal info on it will not be hanging off our bags for the entire world to see.

Since we love packing quickly and with ease, I use Downy Wrinkle Releaser Plus as I pack and unpack for clothes that look iron fresh without the chore of ironing, because what’s a vacation with chores???

My Secret Luggage Trick
Here’s my secret packing trick, before putting the clothes I grabbed that are clean and still fit ;) into my suitcase. I spray each with the Downy Wrinkle Releaser Plus . By following the instructions (spray, tug and smooth), it gives me an iron fresh appearance to each dress and skirt I’m bringing and takes barely any time! Bonus? My clothes smell amazing too!

When I start with no wrinkle clothes, I get there with no wrinkle clothes that are happy and as ready to get this vacation going as we are!

The travel-size Downy Wrinkle Releaser Plus can be packed right in with our clothes so that when we land a quick spritz is all that’s needed for a wardrobe that doesn’t even remember the chores back at home. (And the travel size is even safe for carry-on bags!)
I especially love this when we are traveling to the beach, camping, or for staying in little bed & breakfasts across Scotland where I’m not sure what the ironing (or laundry) capacities will be anyway. This travel trick has saved me so much hassle and makes sure my clothes are as ready to relax as I am, and stay looking fresh and smelling great.
Peek-A-Boo DIY Luggage Tags
Here’s how to make our peek-a-boo DIY luggage tag template, you will need:
- Leather fabric
- Felt fabric
- Sewing machine (plus thread)
- Fabric paint
- Adhesive vinyl
- Small hole punch
- DIY luggage tag template printable

Instructions for making the DIY luggage tag with our printable template:
1. Print the DIY luggage tag template right here and cut out the fabric template and luggage tag.
2. Pin the template to the leather fabric and felt fabric and cut out.
3. Paint the leather fabric. We splattered coordinating color but you could do stripes or a mix of colors. Have fun with it! Let dry.
4. Using your sewing machine, sew an inch along the top, turn at the corner, and sew down along the side. Repeat along the other side.
5. Cut out a piece of vinyl the same size as the luggage tag and stick to the back. This adds a little stability to the paper.
6. Using a hole punch, make a hole for the ribbon to slide through.
7. Cut a length of ribbon. Fold in half, slide the loop through the tag hole, slide the ends of the ribbon through the loop and pull tight.

Take the ends of the ribbon and slide through the two layers of the fabric luggage tag. Feed through the slit at the top of the luggage tag, hiding your information inside.
Then just knot the ribbon around your luggage and Bon Voyage.
Between pretty luggage tags on the outside and vacation ready clothes on the inside, packing for summer trips will be a breeze! Download our diy luggage tag template and grab your own Downy Wrinkle Releaser Plus for a vacation ready bag that will land as happy as you feel.
PS. My favorite trip we’ve ever taken .
This post is done in paid partnership with Downy Wrinkle Releaser Plus , a product I love to use while traveling and at home. All opinions and text my own.
I love Downy Wrinkle Releaser Plus & use it often. It works well & smells great!!!
I guess this product would be a great addition to my products in my RV. I don’t have an iron for winkles or a dryer.
Great idea love knowing there’s a product like this available to all of us can’t wait to try it
Just another traveling tip. We always put a tag with our name, address, phone number and so on in case the outside ones come off. It’s an easy thing to do, but helps with issues if needed. Thanks for your template and tips.
Your luggage tag design is the best- fast and easy to make- and it is private! I plan on making mine with hand felted wool pieces. Thanks for the idea and template! Will make great small Christmas gifts for my traveling girlfriends!
Leave a Reply Cancel reply
Your email address will not be published. Required fields are marked *
Save my name, email, and website in this browser for the next time I comment.
©2023 A Subtle Revelry. All Rights Reserved.
Username or Email Address
Remember Me
Forgot password?
Enter your account data and we will send you a link to reset your password.
Your password reset link appears to be invalid or expired.
Privacy policy.
To use social login you have to agree with the storage and handling of your data by this website.
Add to Collection
Public collection title
Private collection title
No Collections
Here you'll find all collections you've created before.
- Sewing Projects
- _Sewing Tutorials
- _Bags & Purses
- _Holiday Sewing
- _Kitchen & Home
- _Quilts and Pillows
- _Sewing for Kids
- _Sewing for Women
- _Sewing eCourse
- _Sewing Patterns
- _Sew Simple SVGs
- Cricut & Crafts

No Peek - DIY Luggage Tags
.jpg "diy luggage tags")
How do you make luggage tags at home?
.jpg "how to make luggage tags")
What do I put on a luggage label?
.jpg "sew luggage tags")
How do you make a fabric luggage tag?
.jpg "Follow along with this easy tutorial and free sewing pattern and learn how to Sew DIY Luggage Tags.")
How to Make DIY Luggage Tags
- No Peek Luggage Tag Pattern - find the peach button at the end of the post
- 1/4 yard cotton fabric - fat quarters work great for this
- 4 x 4" square clear vinyl
- 5"matching or contrasting bias tape
- Fusible interfacing
- Safety pin or bodkin
- Tissue Paper
- Printable Luggage Labels - Get at the end of the post
.jpg "diy luggage tags")
Chelsea, you have me thinking...Since I am probably the only seamstress in this Retirement Center, this idea would work for those residents who use walkers!! Bet you did not realize how many lose theirs or mix up with others in each day. LOL You always delight me with your ideas.

I love this idea! It would be a great way to distinguish between items. So creative
Forgot to mention I make colorful lanyards for the residents and staff to wear around their neck to hold their apt keys. I am 86 and still using my 1950's sewing machine which I love.
The old machines are just better! Mine is from the 70's
I'd love to hear from you!

Site Disclaimer/Privacy Policy
© Sew Simple Home Designs - All Rights Reserve

- Current Home
- North Carolina | 2-Story (Camp Lejeune)
- Virginia (Fort Belvoir)
- California (MCAS Miramar)
- North Carolina | Cape Cod (Camp Lejeune)
- Kansas (Fort Leavenworth)
- Virginia (MCB Quantico)
- California (MCRD San Diego)
- Okinawa (Camp Courtney)
- Room By Room
- Shop Our Homes
- Decluttering
- Kitchen Organization
- Toy Organization
- Paperwork Organization
- Room Makeovers
- DIY Home Decor
- Rental Solutions
- Furniture Makeovers
- Cricut Projects
- Cricut Labeling
- Cricut Design Space Cheat Sheets
- Machine Guide
- Coffee Breaks
- Military Life
- All Projects
- Amazon Favs
- Shop Organizing Printables
How to Make (Super Chic) Luggage Tags with a Cricut
DIY luggage tags are not only super simple to make, but are perfect for labeling and accessorizing your suitcase (and even bins and baskets around your home). They come together in mere minutes thanks to the help of a Cricut machine, and can be easily customized to suit any style. This is a really fun DIY craft project, so let me show you how they come together!

These simple custom luggage tags are made of faux leather , which is an easy-to-cut, no-fray material that comes in a wide range of colors, textures, and patterns.

Thanks to a simple, classic design, these can be easily cut with any Cricut machine; and they are held together with some basic adhesive, which means no sewing is required!

My free pattern pieces are available in SVG format (so they are ready to upload to Cricut Design Space right away!), and include both the landscape and portrait orientation. When combined with a chic snap and Cricut-drawn label , your luggage will be ready for your next vaca in no time!
Table of Contents
Supplies Needed
These DIY luggage tags looks professional, work seamlessly, and require just a few budget-friendly supplies! Here is what you need:

Faux Leather | Clear Plastic Windows | Snaps | Gorilla Glue
- Faux Pebble Leather – This lightweight, easy-to-cut material is amazing for luggage tags, but you could also make them with other non-fray fabric such as suede , felt , etc.
- Clear Plastic Sheets – I have a whole stack of clear workbook covers, but these smaller ones would work perfectly!
- Snaps – I am totally smitten with this inexpensive kit since it includes everything you need to make super stylish clasps.
- Gorilla Glue – You can certainly use any other strong adhesive (including hot glue), but this clear gel is the strongest and easiest to control with no bubbles or drips.
- Printer Paper or Cardstock – For the label inserts.
- Luggage Tag SVG File
- Fine-Point Blade – The one that comes with your machine.
- StandardGrip Cutting Mat
- Iron or Cricut EasyPress Mini
- Small Hammer
- Home Printer or Cricut Pens – To make the label inserts.
How to Make Luggage Tags with a Cricut
Step 1 – upload the luggage tags svg file.
Once you download my FREE SVG file , you will need to upload it to your machine software. If you are a Cricut user, you can use my tutorial here: How to Import Your Own Images In Cricut Design Space .
Once the file is placed onto your design canvas, you will notice there are three layers for each luggage tag:
- Top Layer (light blue tag with the cutout window) – to be cut from faux leather
- Middle Layer (light grey rectangle) – to be cut from clear plastic
- Bottom Layer (dark blue tag with single line) – to be cut from faux leather
IMPORTANT! Although the luggage files are sized and designed to be cut as is, you will need to first Attach the straight line to the bottom layer so they are cut together (see below).

Step 2 – Cut the Materials
Cutting the luggage tag pieces.

Cut the top and bottom layers out of faux leather using your Cricut machine:
- Place the faux leather, face down, onto a Standard Grip Mat .
- Select “Faux Leather (Paper Thin)” from the Custom Materials Menu.
- Use a Fine-Point Blade to cut out the luggage tag designs.

Cutting the Clear Window Piece
To cut the middle rectangle layer from a clear plastic sheet:
- Load a plastic sheet onto a StandardGrip Mat.
- Select “Plastic Packaging” from the Custom Materials Menu.
- Use a Fine-Point Blade to cut out the rectangle shape.
- Before unloading your mat, check to make sure the plastic was cut through. If not, re-cut it as many times as needed (just hit the flashing Cricut button) before unloading.

Step 3 – Assemble the DIY Luggage Tags
When the faux leather luggage tags come off the mat, they will likely be all curled up. Although not necessary, I suggest lightly pressing them with a low-temp iron or an EasyPress Mini to make for easier assembly.

To assemble the luggage tags, make a sandwich with the three layers, as shown below:
- Bottom layer, wrong side up
- Middle clear layer
- Top layer, right side up

Start by using a light line of Gorilla Glue along the very outside edge of the tag (bottom layer). Do your best to not get any glue on the slit opening. Working quickly, place the clear rectangle onto the glue, lining up the edges all the way around.

Next, place another light line of Gorilla Glue around the frame opening of the top of the tag. Place it down, right side up, onto the clear rectangle, again lining up all the edges.

Finally, use more glue to secure the top and bottom straps to each other, lining up the two holes and edges all the way around.

Unlike hot glue, you might find that the Gorilla Glue is not immediately tacky enough to hold your tag together (but I promise, it will hold once it’s fully dry!) You may want to sandwich your tags in between heavy books as they dry to really secure all the layers together.

Step 4 – Apply the Snaps
The next step is to secure snaps into the two holes on the assembled luggage tags.
Friends…I used to hate working with snaps. I could never get them to stay on my projects tight enough without warping or damaging the snapping mechanism itself. After loving these rivets so much on my faux leather keychains , I ordered this coordinating kit of snaps and they are the most user-friendly snaps I’ve ever used! Just use the included instructions and a few strong whacks of a hammer to put chic and functional snaps on your tags, as shown below!

Step 5 – Create Label Inserts
Your DIY luggage tags are pretty much done, but the final step is to create the label inserts to go inside the plastic window. There are lots of different ways you can do this, but if you want to make labels using your e-cutter, here is how I recommend doing it:
- Place another top layer luggage tag image onto the design canvas.
- Use the Contour tool to turn off the luggage shape and turn on the interior window shape.
- Add text or pictures for whatever you want your luggage tag label to say. Then Attach the label and text together before sending it to your machine.
Want some fancy letters? Learn how to make your own monograms for your Cricut !
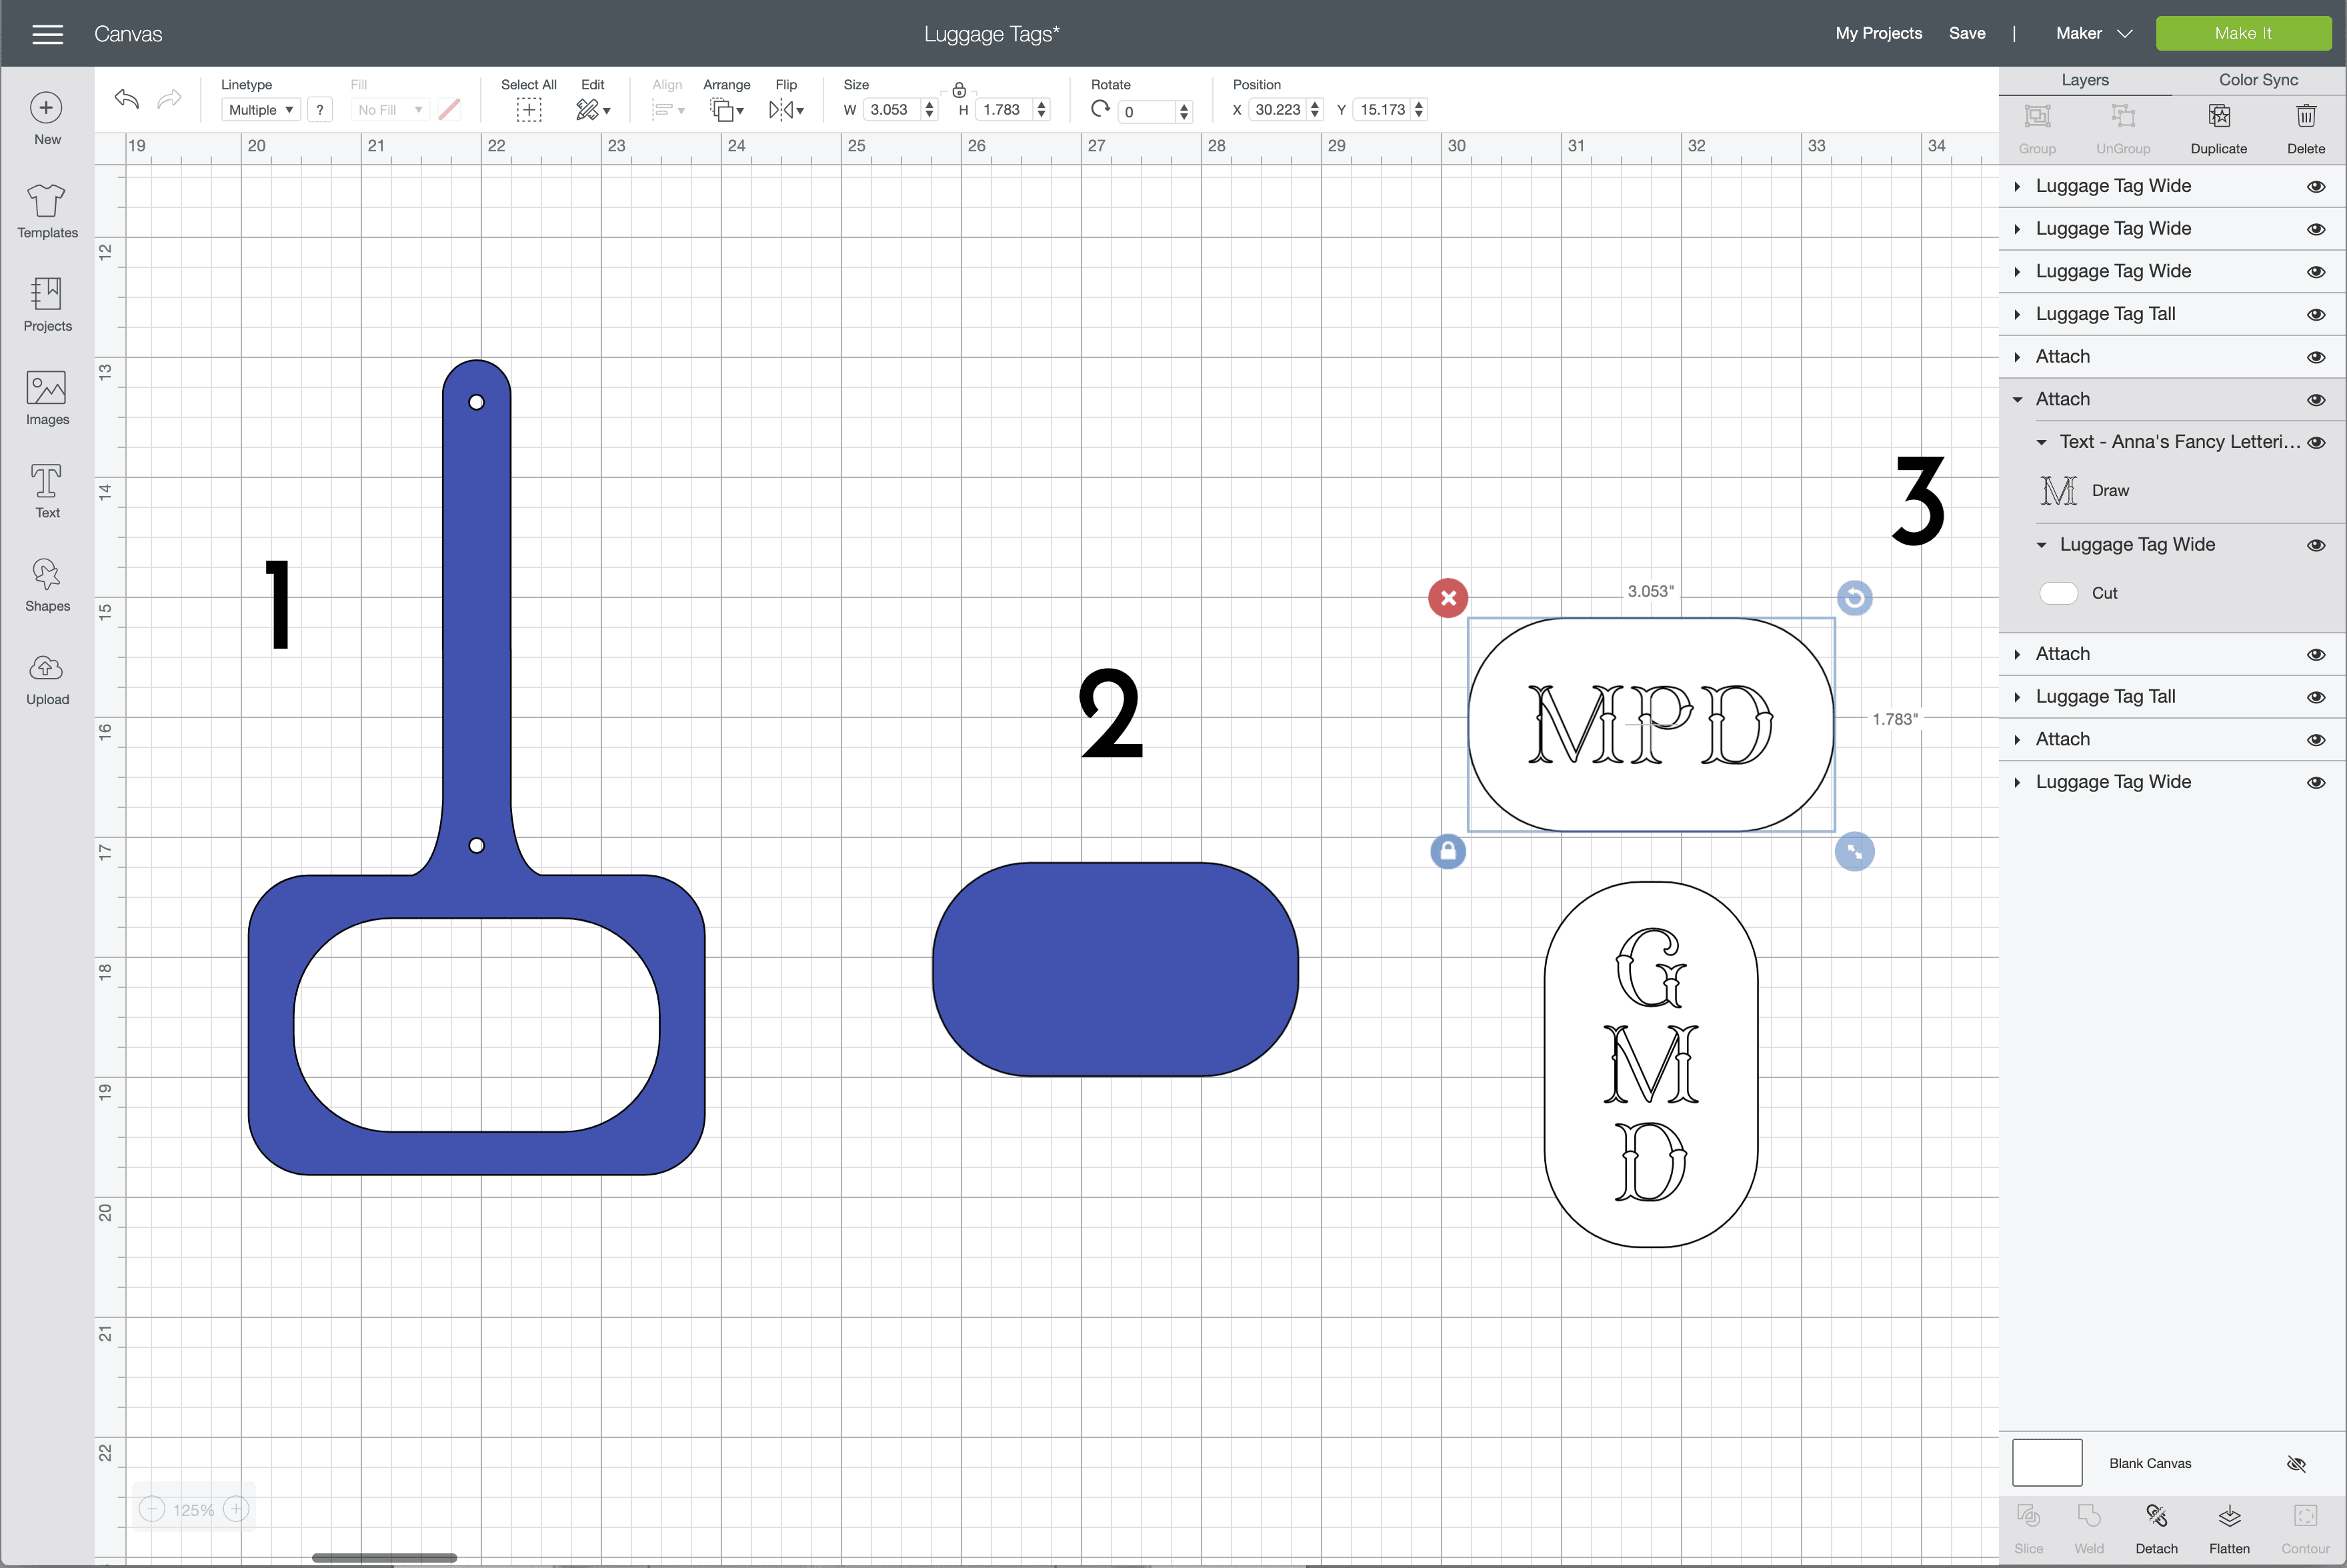
For this project, I chose to use a basic black Cricut Pen and Fine-Point Blade in my Cricut Maker to make the labels out of white cardstock. You could also use the Print-the-Cut function to make your labels.
Here are some tutorials that can help you:
- How to Use Cricut Pens to Make (Gorgeous) Custom Labels
- A Guide To Making Labels with Cricut Print Then Cut

Once you have the inserts cut and ready to go, slide them into the open slit along the back of the luggage tag and line them up with the open window.
TIP! Don’t feel like fussing with Cricut labels ? You can also create similar monograms with letter stickers, markers, pencils, crayons, iron-on/HTV, or even embroidery.

Now your bag tags are all ready to snap onto your favorite travel items so you can quickly and easily find them on the luggage carousel!

Although I technically designed these labels for luggage, I couldn’t resist trying them as basket labels on my favorite baskets with some printed toy labels . Man, I might need to find some baskets to use these luggage tags on because they look ah-mazing!
More Great Cricut Labeling Projects
- Make Vinyl Labels with a Cricut
- Make Labels Using Cricut Pens
- Make Labels with Cricut Print Then Cut
- Make Waterproof Labels with a Cricut
- How to Label Fabric with Iron-On Vinyl
- Iron-On Clothing Labels with a Cricut
- Toy Bin Labels with a Cricut
- Pantry Labels with a Cricut
- Dresser Drawer Labels with a Cricut
- Luggage Tags with a Cricut
- Return Address Labels with a Cricut
- Fast Labels with the Cricut Joy App
- Make Easy Round Closet Dividers with Cricut Vinyl
- Custom Drawstring Backpacks with Cricut Iron-On

I mean it when I say these homemade luggage tags come together in a snap (ha!) They really are easy enough to pull together for your next family vacation (even if it’s next week) or label and an entire playroom’s worth of baskets. They also make great gifts, party favors, or a craft group project!
(And if you have leftover faux leather, just use it to whip up a bunch of matching faux leather keychains or DIY cord keepers while you’re at it! 😉)
CRICUT DESIGN SPACE
CHEAT SHEETS
You May Also Like
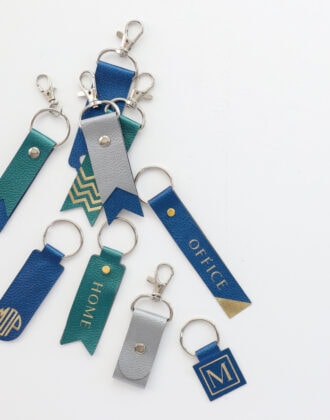
DIY Faux Leather Keychains with a Cricut
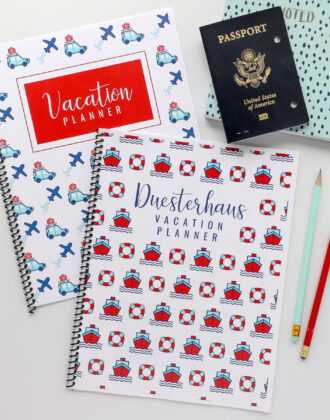
Printable Vacation Planner

Easy DIY Cord Keepers (With FREE SVG File!)
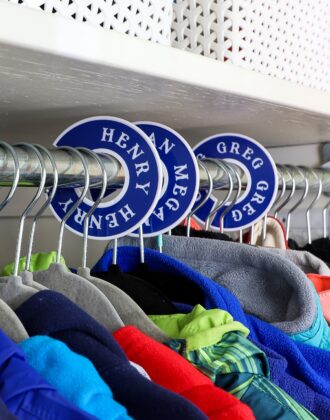
Round Closet Divider Labels with a Cricut (+ SVG File)
Leave a reply cancel reply.
Your email address will not be published. Required fields are marked *
8 Comments on “How to Make (Super Chic) Luggage Tags with a Cricut”
Cute! Where did you get your font?
When I tried to download the SVG file, it came up as a regular image and will not upload into the Cricut software. It says “unsupported” file. Is there another way that we can download? Such a cute tag and loved your tutorial!
Hmmmm…it’s downloading just fine (into an SVG) for me and uploading into Cricut Design Space without issue. Maybe try again? HERE is the link.
Keep me posted, Megan
Hi Megan I have just gotten mine and had the same problem as Lyndee. It just comes up as an image, not an SVG file.
These look really nice and it is wonderful that you provide such good resources for materials that work in addition to your proven pattern. Why has it become fashionable to call vinyl faux leather, or pu leather, or even worse – leather?? It is vinyl!!
Hi Kim! Hmmm…I guess it depends on what you consider “vinyl.” Yes – faux leather or PU are a lot like “marine vinyl” from the fabric store. But many crafters think of “adhesive vinyl” (the stretchy, sticky, contact paper-like stuff) when you say “vinyl”…which this product is not. Faux leather is much more like fabric than “adhesive vinyl” and acts more like leather. Cricut’s “official” name for the product is faux leather, so that’s why I chose to use it! Hope that helps a bit!Megan
Love the idea of the bins. I have some fabrics sorted by color in the cube shelving with the bins. I could use these to attach the color in the keychain. The plastic labels I’m using now always pop off. This would be perfect. Thanks for the idea.
Ooooo, I love that idea, Martha!
If you give it a try, be sure to let me know how they turn out!
to get new posts delivered to your inbox
You did it! Now check your email to confirm your subscription.
There was an error submitting your subscription. Please try again.
latest on Instagram

- ^ Back to Top
- Disclosure & Privacy Policies
©2024 The Homes I Have Made Design by Purr .
I am an Amazon Associate and earn from qualifying purchases.
- Skip to primary navigation
- Skip to main content
- Skip to primary sidebar
Want to pack light but don't know where to start? Let's find the perfect size bag using this quiz !
Her Packing List
Packing Light
Diy luggage tag tutorials: 3 fun ways to mark your bags.
We often tell you where to buy your travel gear at Her Packing List , but we thought it would be cool to add a monthly post about how you can actually make some instead. And for the first of this edition, we’re going with DIY luggage tags .
Although I’m not the best crafter on the market, I do consider myself a lover of craft and anything that you get to construct or create on your own. I happen to hoard fabrics, paper and ribbons like they are going out of style, so I decided to rummage through my box today and come up with a few fun luggage tag tutorials for you all to play around with.
DIY Fabric Luggage Tag

Supplies: 2 Rectangles of fabric – about 11cm x 8cm 1 Rectangle of felt – same size as fabric 1 Piece of vinyl – same size as fabric 1 String or Ribbon Pins Scissors Sewing Machine

Pin your your squares of fabric together, inside out, with your piece of felt on the outside. Sew around the fabric about 1/2 cm or more from the edge, but only finish 3 of the sides. Clip the corners off with your scissors and trim the felt closer to the seam.

Turn your tag inside out and iron flat.

Insert your ribbon or, in our case, leather strip, into the side of the tag that is still unsewn. Then simply sew it up.

You’ll then want to sew the piece of vinyl onto one side of your tag. If you use a sewing machine, you’ll need to place a piece of tissue paper or wax paper on top so the vinyl won’t stick to the machine. In the middle of sewing this, my sewing machine decided to be difficult and so I decided to finish it off by hand. Just remember to only sew along 3 sides so you can slide your name/address paper in!

Trim vinyl down to size, insert a piece of paper with your contact details on it, and you’re done!
DIY Decoupage Luggage Tag

Supplies: Spare magazine 1 Square of sturdy poster board – not the flimsy kind Craft Glue – a modpodge or PVA glue is a great option Sponge brush for the glue Ribbon or leather strip Hole punch

Glue pieces of the magazine onto the square of poster board being sure to seal in the project with an extra layer of glue.

Once that dries, cut the card down to a luggage tag size. Flip over and write your contact details on the back. Punch a hole and insert your ribbon. Easy!
DIY Laminate Luggage Tag

Supplies: 2 Luggage tag print-offs – one front, one back with contact details 1 Piece of index card for sturdiness Contact paper or laminating sheet Tape Hole punch Ribbon or leather strip

I designed my luggage tag print-off using Canva . After printing them off, I taped one side to the index card before cutting it down to size. The back print-off is taped to the other side. This tag is then wrapped in contact paper to seal it in. Once trimmed, a hole can be punched in the top and the leather strip threaded through. Done and done!
There you go! Which of these 3 DIY luggage tag tutorials will you be putting to the test?
Written by Brooke
I run the show at Her Packing List and love packing ultralight. In fact, I once traveled for 3 entire weeks with just the contents of a well-packed 12L handbag . When I'm not obsessing over luggage weight, I'm planning adventures or just snuggling with my pet rabbit, Sherlock Bunz.
More posts you may like

Ultralight Packing List: I Traveled for 3 Weeks with a 12L Handbag

Top Travel Dresses for Every Trip + How to Pack Them Right

How to Successfully Travel with Contact Lens Solution

The Best Convertible Travel Clothing for Women: Pack Less & Do More
Gear we use.

Speakeasy Hidden Pocket Scarves

Splice Reversible Jaisalmer Tunic

Eagle Creek Compression Packing Cubes

Tom Bihn 3D Organizer Cube

Sea to Summit Ultra-Sil Daypack

Turkish Travel Towels
Travel resources, hpl learnables.
H PL Packing Method – Learn to pack your lightest bag ever in this revolutionary packing course by HPL founder, Brooke.
Book Your Trip
Viator – Enhance your trip experience by booking from thousands of tours across the globe.
Booking.com – Search for hotels, hostels, and apartments using this one resource. Use it for flights, car rentals, and airport taxis as well.
Trusted Housesitters – Save money on travel accommodation by becoming a housesitter. Housesitters often have extra duties, like caring for pets and gardens.
Reader Interactions
November 18, 2013 at 2:42 am
I work for an airline and you definitely need some kind of tag or decoration to make your bag stand out, especially because everyone seems to carry a black bag. Great post.
Leave A Reply Cancel reply
Downloads, Courses and much more!
- About Me and Privacy Policy
- Crafts For Kids
- Crafts For The Home
- Scan N Cut & Free SVG Files
- Sublimation
- Kids Summer Fun Activities
- Photography
- Bread & Soup
- Breakfasts, Smoothies & Drinks
- Desserts & Appetizers
- Mains & Pasta
- Salads & Vegetables
- Free PDF Patterns
- Sewing 101 Lessons
- Sewing For Kids & Babies
- Sewing For Women
- Sewing Home Decor & Accessories
- Serger Basics: Everything you need to know
- Skip to primary navigation
- Skip to main content
- Skip to primary sidebar
- Skip to footer
Life Sew Savory
sewing, crafts, food, family
DIY Luggage Tags – With Embroidery
Posted on March 22, 2019 by Emily Leave a Comment . This post may contain affiliate links. Clicking and purchasing through them helps to keep the great content coming your way, thanks! Find all my favorite items in my Amazon SHOP HERE . Posts written in collaboration of Brother as a Brother Brand Ambassador.
inside: learn how to create easy DIY luggage tags with this free template and the photo tutorial. You can add machine embroidery like I did or just make a plain tag.
We love to travel, if you read this site you know that we’ve taken our kids all over the world. {you can find our more about our travels here } And with these DIY luggage tags I’m adding to my list of sewing projects for travel. If you scroll all the way to the bottom of this post I will share a few other sewing projects that are great for travelling. I love how these embroidered luggage tags turned out and I’m excited to share this tutorial so you can make some cute personalized tags too.
Do you have a black suitcase that blending into the sea of black at the airport? These embroidered bag tags can set your bag apart the next time you travel. You don’t even have to put your name on it to set your bag apart from the others.

DIY Luggage Tags – Tutorial and Template
Ok, so I have to start off this post with a bit of a story.. I originally wrote this tutorial for the Brother Sews blog. I write at least one post a month over there… Have you check out my tutorials over there? Anyway, I was in a bit of time crunch so I went on Amazon and {thought I} ordered Cork..
I wanted to make these tags out of cork. Well.. When the package arrived it was fabric that looked like cork… not exactly what I wanted… So I ended up finishing my DIY luggage tags with a zig-zag all the way around, but if I actually had cork I would have just stitched the edge. I will give the directions for both below.
Here is the cork FABRIC I bought.
Here is the cork I actually wanted. Or this one or this one . I think these embroidered tags with be SO cute in real cork. Next time!!

For now, let’s move ahead with the tutorial using my lame cork “fabric” {haha}
You can download my luggage tag template HERE . Print and use to create your own amazing diy luggage tags for your next trip. Gather your supplies. In addition to the cork you also need some clear vinyl , cording and iron on interfacing . {although if you are using ACTUAL cork you will not need the interfacing}

If you are added machine or hand embroidery I would do that on the cork or fabric before you do anything else.

Next, iron interfacing on a piece of fabric big enough to cut one tag. Don’t cut yet, but prep the fabric.

Now, cut two tags with window hole. One should have the interfacing on the back and the other just fabric. If you are using actual cork I would only cut one of this side of the template. You would not need two. Use the rectangle from the window cut out and cut out a piece of clear vinyl. Make it at least .5″ bigger on all sides for seam allowance.

We will now get ready to sew. Make a sandwich with the vinyl. Place the wrong sides of the fabric together with the vinyl centered in the window. Pin or clip all sides to hold in place. If you are using CORK you will not zig-zag I would just use a straight stitch to go around and hold the vinyl in place around the rectangle.
Set your machine for a tight zig-zag for the make your own luggage tags fabric version. Here are my settings.

Sew around the window rectangle. Again if you are using CORK that will not fray I would just sew around this window with one layer of cork and one layer of vinyl and a straight stitch.
Here I have two layers of fabric with the vinyl in the middle for a finished look.

We will now make another fabric sandwich. Place your embroidery design face down on the table, then another full tag with the wrong sides together. On top of those two place the window piece you already created. {note – you can see that I left the embroidery stabilizer on the fabric to add to the stiffness of the tag.

Before you sew it all together you can stick you address/name or other identification in the window. Like I said above you actually can just use this as a way to find your bag quickly and not even add your address… up to you!

Sew around with the tight zig zag again. If you are using CORK just use a straight stitch around the edge.

Use a metal grommet or a button hole to make a circle for your ribbon or cord to thread through.

Add your tags to your bags and get out and see the world! Yeah!!!! I think they look pretty great!

Here are some other travel related sewing tutorials-
Lap Top Sleeve Sewing Tutorial

Ipad Sleeve

Zip Pouches

Sewing tutorials for travel

Related Posts:

Subscribe for the latest
TIPS, TUTORIALS AND MORE STRAIGHT TO YOUR INBOX

Reader Interactions
Leave a reply cancel reply.
Your email address will not be published. Required fields are marked *
This site uses Akismet to reduce spam. Learn how your comment data is processed .
Partners we've worked with

Welcome, I'm Emily!
So glad you stopped by. I’ve been creating this little space online since 2008. I love to teach others how to sew as well as share tips, tutorials and more. Stick around and check out some of the crafts, recipes, tutorials and more!
The Idea Room

08/20/2018 · 4 Comments
DIY Luggage Tags
Uncategorized
Looking for a fun and unique luggage tag? Check out how to make your own DIY Luggage Tags. Great for travel and an easy craft idea!

LUGGAGE TAGS
Hello, there Idea Room Readers! My name is Melissa Mortenson and I’m the girl behind the Polka Dot Chair blog! I’m the mom of 3, a Maker, and licensed fabric designer. One of my first loves is design. I adore designing rooms in my home, projects for my blog and designing fabric. I’ve had the privilege of designing several fabric lines and today I’m excited to be sharing a few of those designs with you in the form of these fun printable luggage tags!

DIY LUGGAGE TAGS
Our family traveled quite a bit last summer, and somehow we kept finding ourselves in need of luggage tags. The ones we had were cheap and kept falling off of our suitcases. About halfway through the summer, I decided that I’d design a set of tags for us to use. That way they would not fall off of our bags and we’d be able to spot our bags quickly on the carousel (since odds were no one else had the same tags that we did).

I designed this set of luggage tags to fit inside plastic luggage tags that you can buy online. All you need to do is print out the tags and insert them into the purchased plastic tags. If you don’t want to buy the plastic tags, you can always laminate the luggage tags yourself after you print them out.

LUGGAGE TAGS SUPPLIES
- Free Printable Tags – download on my site for free
- Plastic Luggage Tag Sleeves
- Scissors or Paper Cutter
- Letter Stickers if you wish to monogram your tags
HOW TO MAKE LUGGAGE TAGS

- Cut the tags out. You have 1 print out of the front of the tags and one for the back of the tags.

- If desired add letter stickers to the front of your tag to make your own custom monogrammed tags.

- You can use the attachments that came with the tags or you can use a bit of ribbon to tie them to your suitcase. That’s it!
Happy Travels!
Traveling with the kids? Check out some of our related activities!
- Road Trip Activities for Kids
- Road Trip Games
- Printable Car Travel Games
JOIN OUR NEWSLETTER
Would you like more Recipes, DIY, Printables and Organization Ideas?
Subscribing to the newsletter will enable us to periodically send you creative content exclusively for Idea Room subscribers.
*View our Privacy Policy here .
Success! Now check your email to confirm your subscription. Once confirmed, the e-book link will be sent to you in a few minutes.
There was an error submitting your subscription. Please try again.
Sharing is caring!
- Pinterest 414

Amy Huntley is the owner/author of The Idea Room. A mother of five, who enjoys sharing her love of all things creative in hopes of inspiring other women and families. Never miss a creative idea that she shares by connecting with her here , or read more of her posts .

09/19/2018 at 8:03 am
Soooo cute!! My daughter’s initials are Mam too!

09/19/2018 at 2:28 pm
Laura- So fun! Glad you like this.

01/10/2021 at 8:18 am
where do you get the clear tags?
01/11/2021 at 5:55 am
I think I got them at TJ Maxx, but I know you can get them on Amazon too.
Leave a Reply Cancel reply
Your email address will not be published. Required fields are marked *
This site uses Akismet to reduce spam. Learn how your comment data is processed .
Join our newsletter
Featured In

theidearoom

Privacy Overview
Want To Get Your Home Decluttered and Organized?
Check Out Our FREE 25 Day Organization Challenge

- Skip to primary navigation
- Skip to main content
- Skip to primary sidebar
- Drawing And Sketching
- Free Crochet Patterns
- DIY Projects
- DIY Automotive
- DIY For Pets
- Kitchen organizing
- Tie Dye Projects
- Modern Footer
Home » DIY Crafts
20 DIY Luggage Tag Ideas To Find Your Bags Easily
Published: May 30, 2022 · Modified: Jul 18, 2023 by Tijasar · This blog generates income via ads
Handcrafted luggage tags are the perfect accessory for your next trip. Whether you’re headed out to a weekend retreat or a two-week vacation, these little tags can help you find your bag and personalize it simultaneously. They’re also great for identifying similar-looking suitcases when traveling with friends and family. Create your custom, personalized tags using materials right out of your craft closet, or pick up a pack of blank ones at the dollar store. Get inspired by our collection of DIY luggage tag ideas , and go ahead and make them yourself!
Baggage tags are little pieces of identity inserted into suitcases and travel bags that help identify your luggage from others. DIY Luggage tag ideas come in any color, shape, or size. One popular style is the plastic card that stands on its side for easy reading of information. For example, these cards will have a place for you to write down where the owner will be flying out to and from, along with their full name, flight number, date of travel, and hotel name if traveling internationally.
DIY Luggage Tag Ideas
Many of us travel frequently, and if you are one of the people, you must know how important it is to keep track of your belongings . One way to do this and make your luggage stand out from the rest is by adding a unique and original ID tag to them. In this article, we have compiled some of the best DIY luggage tags that you can DIY from the comfort of your home and without having to spend too much on materials. With this handy guide, you can create your DIY Luggage Tag ideas easily and save money rather than purchasing them in stores.

How To Make A Luggage Tag
DIY Luggage Tag Sewing Tutorial
If you are looking for a lightweight and durable luggage tag that you can easily personalize, this DIY tutorial is for you! These easy-to-sew luggage tags will last for years, and the simple design makes it easy to switch out your contact information when you're headed to different destinations. The tutorial includes everything you need to know to complete the project in just four steps, using materials easily found around the house.
DIY Quilted Luggage Tag
DIY Personalized Luggage Tag
DIY Luggage Tags

These luggage tags are easy for you to make and customized for your family. Cut two tag shapes out of faux leather, cut holes or windows in one of the tags, and glue the three sides together. Slip an information card and acetate sheet in, then loop a piece of leather cording through the hole and tie a knot. Attach this tag to your luggage before you travel to help make sure no one accidentally grabs it by mistake! Slip an info card inside and add an acetate sheet between the two leather pieces to create a see-through window.
hallmarkchannel
DIY Duct Tape And Leather Luggage Tag
Duct tape is a great way to create a unique DIY piece for your luggage. This luggage tag is made out of three duct tapes with two pieces having contrasting colors and one-piece being clear; once the pieces are cut out and placed together, you flip over and add another layer of tape on top, creating a sturdy, durable luggage tag. Travel like a pro with this DIY Duct Tape and Leather Luggage Tag. You can easily make this beautiful piece of luggage in less than 30 minutes. The amazing thing is, that it won't fall off or get damaged in transit even if you travel by plane!
DIY Embossed Leather Luggage Tag

This leather luggage tag is handmade, then embossed for a rustic, textured look. This leather accessory can be custom personalized with your name or initials, then tied to an existing piece of luggage with the included cord loop. The buckled leather strap makes it easy to attach and remove from a suitcase, backpack, or duffel bag. Non-toxic, waterproof, and easy to write on using permanent markers or sharpies, these embossed leather luggage tags add a professional touch to any bag or suitcase. They make great gifts too!
Click for more details
Leather Luggage Tags DIY

It's a smart idea to make your personalized luggage tag; you don't want your bags to be confused with someone else's. Create an extra personal touch by using leather, which can be stamped with your initials or a distinctive pattern. This wristlet is easy to make and looks great. You can make this fun leather luggage tag with a design of your choice. It's easy to do and makes a great gift that the recipient will use again and again on travel bags.
DIY Luggage Tag

This luggage tag is a great way to personalize your suitcase and protect your belongings. The DIY Luggage Tag includes a template that you can trace to create the shape, then cut out the pieces and glue them together to form a traditional luggage tag. Use any color leather or even multiple colors in the same piece! Glue the front and back pieces together with hot glue, then wrap contrasting embroidery floss around the top part of the strap to add some visual appeal. Slip in some printed information about yourself, thread it through a hole on top of the tag, then slide in all your essentials for trip making.
Homemade Luggage Tag

This travel tag is a great way to make your suitcase stand out among the crowd. It's soft and durable, with an iron-on patch so that you can change it as often. With room for a name and address, plus slots for four more tags, this tag will ensure your bag gets back to you. This basic tutorial for a felt luggage tag shows you how to sew your tags and insert address paper into the fold. It's easy and quite satisfying. In addition to sewing gifts or clothing, you'll find that making your luggage tags makes a great party activity.

These denim luggage tags are an affordable and quick DIY project that will help you keep track of your bags. Cut your labels on denim fabric, sandwich stabilizer between two pieces of denim, then affix to a grommeted vinyl tag. To make it easy for someone to find your bag quickly, we suggest a strip long enough for you to write your name and address on. If you don't want the additional step of dealing with leather or fabric, try pairing this with one of our pre-made lines!
DIY Luggage Tag Using Duct Tape

This luggage tag is a creative but easy crafts project that will make your suitcase stand out from the crowd. With simple step-by-step instructions and basic tools, you can have a new bag tag in hand within just an hour or two. The outer shell is made of two strips of duct tape folded together with a flap on top with velcro attached. Inside, there is a piece of clear plastic to protect the paper information you want to write down and the velcro flap, which protects it from getting lost while traveling.

This luggage tag is a great way to personalize your bag while protecting against theft and damage. You can easily print out a design and word of choice on printable vinyl. Use transfer tape to apply letters first to the tag, then do the same with the design. Make your luggage stand out in the crowd with these personalized luggage tags. Using vinyl and decoupage, you can create a custom tag that is durable, waterproof, and easily identifiable. This simple and modern design is great for anyone who doesn't want to create something too flashy but still wants to express their style.
DIY Laminated Luggage Tags
This vegetable-tanned leather is a great choice for luggage tags. They are durable and won't crack or fade in the sun, plus they will wear beautifully over time. One of the secrets to excellent leatherwork is to punch your holes before you cut. By doing this, you can avoid cutting your thread and leather hole simultaneously. All leather projects allow for some flexibility on size, so if you need to add a little extra length to your strap or loop, simply use an awl or sharp knife to open up new holes on your project after attaching it all.
DIY Fabric Luggage Tag
You’ve checked the weather, planned your trip, and packed your bags. How will you identify your luggage when it comes off the conveyor belt? DIY Fabric Luggage Tags are an easy-to-make craft project that will give you something personalized to use. This set of four lightweight tags can be made in an afternoon, making them perfect for last-minute gifts ! Use any leftover fabrics from your scrap bin to customize these inexpensive luggage tags to your travel style, whether traditional black & white stripes or bold floral prints.

By simply printing address details on cardstock, then drawing the tag shape on printed paper and applying fabric mod podge to the back of it, you can make your personalized luggage tags! Create your fabric luggage tag that identifies your bag easily and allows you to personalize your suitcase. This 3-step DIY video tutorial shows how to make a fabric luggage tag by printing conveniently on copy paper, cutting out the shape, gluing the cardstock to fabric (using the mod podge technique), and adding a piece of string.
How To Sew DIY Luggage Tags

Create your DIY luggage tags by following these fun and easy steps. This is a great way to personalize and customize your luggage! These self-adhesive luggage tags make it easy to identify your bags! It can get confusing as you add pockets and cards to your luggage. These handy little tags will help everyone know whose bag is whose. And you'll always know where it is! This guide will teach you the basics of how to sew, starting with a pattern and ending in an adorable tag that you can use on your next trip.
DIY MDF Luggage Tags

How To Make A Luggage Tag In Leather
Creating a leather luggage tag is a simple task that can be as unique as you want. Begin by tracing a pattern onto the leather, then cut it out. Once you have an outline of your luggage tag, apply glue evenly to the smoother side of the leather and place it on another piece of leather of a longer length. This technique will create a grainy look similar to an old-fashioned photo. For an extra touch, give the top edges a triangular look using your thumb and burnish (rub with something small and hard) them well, so they stay in place when you saddle stitch all sides together. Finally, attach a fastener to one end of your finished piece to make it functional and ready for travel!
More DIY Crafts

Sharing is caring!
- Pinterest 183
diy leather luggage tag
i love brown leather anything but can’t sew – so i decided to do the easiest and quickest way to make a luggage tag for my trip. all it requires is cutting and gluing, could that be easier? don’t think so.

i was a little afraid of doing a no sew attempt, and i had no idea if the super glue was going to be sturdy enough for the leather. but it’s been a few weeks and it seems to be holding up just fine.

DIY LEATHER LUGGAGE TAG
a piece of leather hide (i bought mine from the local shoe repair store) super glue a ruler an xacto knife scissors a sheet of thick or no bleed paper a sheet of vellum or transparency paper *
* i like how the vellum fogs up the contact info a little, it looks kind of … chic to me! but transparency paper would work just fine as well.

the CUTTING
STEP ONE cut two pieces to your desired size, with about a half an inch extra length wise
STEP TWO line them up on top of each other and trim to finesse. mine definitely weren’t perfect, but similar is good (you can do it a little at the end too)
STEP THREE cut the top of one of your pieces to make a trapezoidal eyelet
STEP FOUR one of your pieces, carefully cut three sides for the opening that folds up for the card
STEP FIVE cut a matching rectangle within your eyelet
STEP SIX cut a long thin strap that fits within in the hole and make sure you have a fairly large loop when you bring the ends together

the GLUING
STEP ONE cut a piece of vellum or anything that’s transparent to fit in your cut out
STEP TWO carefully superglue the edges to your front piece, being very cautious of not getting glue on the flap
STEP THREE once it’s dry, make sure the flap still folds up but the vellum feels secure
STEP FOUR glue the back piece to the front piece, going from one side down, LEAVING THE TOP SIDE AND EYELET unglued
STEP FIVE once dry, cut a piece of paper with your contact info and slide through the top side
STEP SIX glue the ends of the looped strap together, once dry, you can tie around your bag by looping it through

Share this:
Similar posts.

diy wedding binder with free printables

diy sea salt spray + printable labels

diy holiday gift boxes

printable galentine’s chocolate bar wrapper
Diy triangle mirror.

diy vintage rose jewelry box
Leave a reply cancel reply.
Your email address will not be published. Required fields are marked *
Save my name, email, and website in this browser for the next time I comment.
36 Comments
I love this! It looks great on that bag, too. Thanks for sharing!
beautiful! just in time for travel season (: thank you for sharing. may i ask where that gorgeous bag is from?
+ thanks jack! the bag is by obey, i bought it about a year ago from urban.
Beautiful! I love the no sew approach 🙂
Lovely blog! The steps to making this luggage tag seems straightforward enough, i might try it one day myself! I’m passionate about handmade products and am currently running a blog-centered social media campaign that aims to encourage individuals to support independent jewelry designers and their handmade items. You can check out my blog here: http://www.beadthechange.wordpress.com 🙂
Love this! I did a luggage tag DIY too- but with a ready made one 🙂 So I only had to stick on stuff 🙂 Just wanted to ask if you’ve tried this yet and if the superglue held? I’ve had some problems with superglue projects in the past, especially when sticking metal on metal 🙁
I use Supertite Fusion-Tack Adhesive it’s industrial strength, clear, permanent for leather, glass, wood, fabric, more.
- Pingback: 17 DIY Leather Projects for Guys - Dukes and Duchesses
- Pingback: DIY Holiday Gift Guide: FOR HIM | Life by Ky
- Pingback: 21 DIY Projects Your Boyfriend (Or Husband) Wishes You Would Make ⋆ The NEW N!FYmagThe NEW N!FYmag
I know this is a few years later, but I was wondering how the tag has held up! I want to make one for my fiance for his birthday, and I don’t have a sewing machine, so it’s either the by-hand approach, or glue!
Thanks so much!!
I’ve made leather holders for hunting licenses. Punch holes around edges that will be closed with a leather punch awl or sturdy ice pick; whip stitch through the holes on 3 sides leaving 1 short end open to insert an ID card. Supertite Fusion-Tack Adhesive for leather and the see-thru window with heavy clear acetate.
- Pingback: diy leather luggage tags (2.0) | almost makes perfect
- Pingback: 21 DIY Projects Your Boyfriend Wishes You Would Make
- Pingback: 21 DIY Projects Your Boyfriend Wishes You Would Make | Body Building Blog
- Pingback: 21 DIY Projects Your Boyfriend Wishes You Would Make | SOCIOSCENE
- Pingback: 21 DIY Projects Your Boyfriend Wishes You Would Make | BulletNova Rocks!
- Pingback: 25 DIY Leather Gifts for Men
- Pingback: DIY To Make Traveling So Much Easier | WORLD Warotter
- Pingback: 23 Easy DIY Ways To Make Traveling So Much Better | Vietnam Luxury Travel Blog
- Pingback: 23 Easy DIY Ways To Make Traveling So Much Better - Seatbelt Guitar
- Pingback: 21 DIY Projects Your Boyfriend Wishes You Would Make | BYDIYHOME
- Pingback: 21 DIY Projects Your Boyfriend Wishes You Would Make - Rumor Scandal Scoop - SHARING FUN
- Pingback: 21 DIY Projects Your Boyfriend Wishes You Would Make - The Best of Goods and Services Online
- Pingback: DIY Gifts for Men - DIY Joy
- Pingback: 18 regalos por hacer para el con tutoriales | La Cantatrice
- Pingback: 21 DIY Projects Your Boyfriend Wishes You Would Make |
- Pingback: 21 DIY Projects Your Boyfriend Wishes You Would Make - Viral Turn
- Pingback: 21 DIY Projects Your Boyfriend Wishes You Would Make – AbsExtreme.com
- Pingback: diy leather luggage tags - almost makes perfect
- Pingback: 21 DIY Projects Your Boyfriend Wishes You Would Make | Best Home Market Online Shopping
- Pingback: 21 DIY Projects Your Boyfriend Wishes You Would Make – Live Strong Forever
- Pingback: 25 DIY Boyfriend Gifts For All Kinds of Celebrations
- Pingback: Cool DIY Boyfriend Gifts - DIYCraftsGuru
- Pingback: DIY Gifts for Your Boyfriend - DIY Projects for Teens
- Pingback: 21 DIY Projects Your Boyfriend Wishes You Would Make – Effects Of Anxiety
my current fave things
Look around a bit.

kids things
Amazon storefront.
- Skip to primary navigation
- Skip to main content
- Skip to primary sidebar
- Skip to footer
Scratch and Stitch
DIY and Sewing inspiration for creatives.
Bags , Refashion/Upcycle , Sewing , Sewing Patterns , Upcycle 09.20.2019
DIY Luggage Tags Made From Jeans

This post may contain affiliate links.
Vacation mode starts now! Travel in style with a set of upcycled denim DIY luggage tags. They are durable enough to hold up to the wear-and-tear of traveling. Plus, they’ll help you spot your black suitcase among the sea of other black cases.

These denim luggage tags are intended to include frayed edges for a casual and trendy look. A small piece of vinyl creates the window for the information card. Use a strip of a felled seam and a metal grommet for hanging.

Denim Upcycling Ideas
Upcycle your denim jeans and make them into something new. There’s DIY denim fashion, DIY denim home projects and, DIY denim accessories.

HEY FELLOW CREATIVE!
Sign-up for my newsletter to get more inspiration right to your inbox!
I’m on a quest to use up materials I already have on hand before buying anything new for DIY projects. While my pile of denim jeans and fabric stash is being reduced, the number of denim upcycling ideas continues to increase. These denim DIY luggage tags are a great way to use up some of the smaller scraps as well as the felled seams that run down the legs of a pair of jeans.
Free Denim Luggage Tag Pattern
Download the pattern and print at 100%.
Enter your email to get the free pattern in your inbox.
By submitting your email address you will be added to the Scratch and Stitch email newsletter. You can opt-out at any time :)
- denim luggage tag pattern (download above)
- denim fabric (enough fabric to cover approximately an 8.5″ x 11″ sheet of paper)
- 12″ strip of denim for hanging – I recommend using the felled seams from a pair of jeans or create your own strip (instructions below)
- stabilizer – approximately 10″ x 3″ I recommend ByAnnie’s Soft & Stable . Stiff felt or quilt batting will also work
- clear vinyl – 4″ x 2.5″ – shower curtains, sheet sets, or other packaging are a great place to find clear vinyl to upcycle
- 1/4″ metal grommet
- basic sewing supplies
- sewing clips (pins will leave permanent holes in the vinyl)
How to make Denim DIY DIY Luggage Tags
Download the denim luggage tag pattern (download above). Print the paper pattern at 100% and cut out the pieces.

Transfer the pattern to the denim fabric and cut out. You will have four pieces of denim. **Do not cut the window opening from the denim, this will help keep the shape of the luggage tag from stretching or warping while sewing. The window will be cut out in a later step.
Cut out the one piece of clear vinyl.
Cut out two pieces of the stabilizer.

Transfer the window pattern marks from the pattern onto the stabilizer by laying the paper pattern on the cut stabilizer piece, poke the four corners of the window with a pin to create a hole, mark the corners with a marker ensuring that the marks transfer through. (see image above)

Connect the four corners and cut out the window.

Sandwich the solid piece of stabilizer in between two pieces of denim. Pin or clip around the edges and sew with a 1/4″ seam allowance. Set aside.

Sandwich the window stabilizer and vinyl piece in between the remaining two pieces of denim. Clip around the edges and sew with a 1/4″ seam allowance.

On the window portion of the denim luggage tag, transfer the window markings onto one side of the denim using the same method as described above. Before cutting out the window, sew 1/4″ around the outside of the window.

Draw a 2″ line just above the window for inserting the information card. Stitch a rectangle around the marked line. Fold the piece in half and carefully cut in between the stitching, making sure not to cut into the stitching. (see image below)

Carefully cut out the inside of the denim window, taking care not to cut into the vinyl window. Leave plenty of space inside the stitching for fraying. This portion of the denim is intended to be a frayed edge and can be trimmed shorter later if desired.

On the backside (the part that will be the inside of the luggage tag) cut out the window and trim the edges a bit closer to the stitching. (see image below)

Pin or clip the front and back portions of the luggage tags together. Stitch around the perimeter with a 1/4″ seam allowance. You should be able to follow the existing stitch line.

Mark a dot where you want to place the metal grommet. Carefully cut out the hole and install the grommet with a grommet setting tool.
I order my metal grommets and grommet setting tools shown from BuckleGuy.com . I highly recommend them for metal hardware and zippers! They have high-quality products that are worth the cost. I used them in several of my DIY projects, including my Grommeted Sleeve Shirt Refashion .

Create a loop for the denim luggage tag to hang from a bag. I like to use the felled seam from the sides of the legs of jeans. These are heavy-duty and look good with the rest of the denim tag. These should be at least 12″ long, and this will give enough room to loop onto a suitcase handle.
If you don’t have any felled seam scraps, cut a piece of denim approximately 2″ by at least 12″. Fold the denim in half and then half again, pin or clip to hold, and sew a couple of lines down the strip.
Thread the felled seam or denim strip through the grommet hole, overlap the ends 1/2″, and sew together. Repeat with several stitches to ensure a strong hold.

The last step to complete these denim luggage tags is to start fraying. I use a pair of tweezers, my seam ripper, and a lint roller for fraying denim.
The same fraying method was used for the DIY Denim Coasters and Round Denim Placemat .

I’ve included an information card in the pattern download that is the correct size for your info, but you can insert your own card with the information you want to include. The size should be 3.25″ x 1.75″ to fit correctly in the luggage tag.

Travel in style with your very own handmade luggage tags. Not only is this a great way to upcycle some denim scraps but they look very designer made.

This upcycled denim project won’t be my last. There are still plenty of denim scraps to use up, so I’m adding it to the list of recent DIY denim projects: denim coasters , denim placemats , and an upcycled denim toddler backpack .

The frayed denim looks great with my refashioned weekender bag too.
Refashioned Duffle Bag
Update the look and style of a bag with iron-on patches.

With denim being all the rage recently, there are going to be a lot of jeans that get worn out. Why not upcycle parts of those jeans into something new? Check out my 30 Denim Upcycling Ideas for more inspiration.
Where will you be taking your new DIY luggage tags?
Reader Interactions

10.8.2019 at 9:46 pm
What an absolutely adorable idea! Thank you so much for sharing! May I use this pattern to make items for our quilt guild’s boutique? I think they will go over quite well!

10.9.2019 at 2:28 pm
Thanks! Glad you can enjoy them. Yes, go for it. Send me pics, I’d love to see how they turn out. :)

11.18.2019 at 10:40 am
Love this! So happy to know I’m not the only one with a stacks of jeans waiting to be repurposed. Thanks for sharing!
11.18.2019 at 8:01 pm
The stack may be larger than I should admit :)

05.9.2021 at 12:00 pm
Where could you find all the other materials other then the Jeans?
05.9.2021 at 2:31 pm
Hi Samantha, I’ve listed everything with links and other tips in the materials list in the post. :)

07.26.2021 at 11:31 am
I made them and used them once and someone liked my work so much, they were stolen off my luggage. I was sooo mad, time down the drain, that I can’t get back and they didn’t pay for them! I had an extra, put it on my suitcase and attached a note, “Steal this tag and you’ll go to hell!” It’s still on there 5 months later.
07.27.2021 at 7:57 pm
I’m so happy to hear that you’ve made them. Twice! They really are that cool. :)

06.10.2023 at 10:38 am
I loved the pattern and ease of making the luggage tag. I was unsuccessful in posting a picture of the finished product but it is so cute. I think the next one will have a patch sewn on it. Thanks for sharing.

08.26.2023 at 9:36 am
Hi there, I just found this luggage tag pattern, its so cool! I want to print the instructions, but I’m not seeing anywhere to click to print them only without all the ads etc. Please help! Thanks!
08.27.2023 at 1:58 pm
Hi Jayne – Thanks for your kind comments. :) At this time, I do not have a print option for my free sewing patterns. All of the instructions are available on my site.

11.30.2023 at 3:32 pm
I did it 12 times for chrismas gift. Super tuto. Love it
12.4.2023 at 8:32 am
What a great idea!

01.3.2024 at 8:01 pm
Hi,I love your work it’s amazing I am just mad i don’t have a sewing machine.
01.18.2024 at 10:06 am
Sounds like it might be time to invest in a machine! I recommend checking out local thrift stores or FB marketplace for a sewing machine.

01.15.2024 at 11:26 am
Hi Cathi I love your pattern. It was easy to follow. I’m taking it to Mexico next week!
I’ll send a photo by email.
Leave a Reply Cancel reply
Your email address will not be published. Required fields are marked *
Save my name, email, and website in this browser for the next time I comment.
Home » Creative » Crafty
Easy DIY Luggage Tags
Personalize your luggage with a quick and easy luggage tag you make yourself. You need only a few supplies and about 15 minutes. When you’re finished, you’ll have a fun accessory to help you spot your bag among the crowd.

It’s CRAFTWEEK! March is National Craft Month. So I’ve partnered with some of my favorite creative bloggers to share some crafty ideas with you all week long!
With all the travel I’ve been doing, I thought it would be fun to showcase some travel inspired projects.

This quick craft is just one of the fun DIY ideas I’m sharing for CRAFTWEEK. All week I’ll be featuring some fun and easy crafts you can create yourself. Plus you’ll find more craft ideas from other bloggers below PLUS each day this week we will be sharing a link to a giveaway.

How To Make Your Own Luggage Tags in Minutes
Usually, I tie a big ribbon around the handle of my checked bags. It helps me easily spot each suitcase quickly, especially in crowded or busy baggage claim areas. But, I thought it would be fun to make a little tag that we can personalize however we like.
I’ll show you the quick steps and then you can make your own bag tags with whatever supplies you have. Today I’m using my new Adhesive back paper I designed for Cricut. You can use your own favorite papers or grab some of mine!

The key to a good luggage tag
- Easy to attach to the bag.
- Stays in place on your bag.
- Unique enough to help your bag stand out from the crowd.
Use your favorite paper patterns to create unique luggage tag designs or create your own art paper .

Instructions
- Cut two pieces of cardstock the same size and shape. This will be the front and back of your tag. I cut mine about 2″ x 3″. About the same size as a business card.
- Cut two pieces of ribbon, about 8 inches long.
- Layer the paper and ribbon to create a sandwich of materials with the paper on the outside and the ribbon on the inside. Glue the layers together. If you’re using adhesive-backed paper, you don’t need glue, just lay the ribbon in the center of the paper and then layer the papers together, adhesive sides facing each other.
- Add any embellishments or extra decorations to your tag. You can add contact info if you’d like or maybe your favorite quote. I wrote my own words on a second strip of paper and applied it as another paper layer.
- Seal the tag. This is optional but will help it last longer. I applied a layer of clear plastic laminate over mine. You can also use packing tape or even a layer of Mod Podge.

Get creative with your luggage tags. Draw, create a collage, use photo print outs of your favorite places or use pretty printed papers. You can add all kinds of ribbons and extra bling if you’d like. Be careful not to add too many extra pieces, you don’t want your tag to get stuck in any of the baggage equipment.

Related Posts You Might Like:
- Craft Room Tour - a look inside my creative work space
- Easy Personalizing with Cricut EasyPress Mini
- Creative Fix - use Velcro for a broken box latch

About Jen Goode
Jen is Passionate about Creativity. She is the owner and "doodle in charge" of JGoode Designs, a Denver based design studio. She is an illustrator, mixed media artist and creative lifestyle blogger. Jen has been a creative professional since 1998 but says she's been an artist since she was old enough to eat glue.
Get tutorials, free file downloads and project ideas right in your email.
Leave a Comment Cancel reply
Save my name, email, and website in this browser for the next time I comment.

- Pop Culture
- DIY Classes
- Brit+Co Picks
- Relationships
This Week’s Stories
Sydney sweeney and glen powell totally tricked us during anyone but you press run, this is the best time to stretch during your workout, can't figure out what to watch try these top 5 trending shows, the 54 most-anticipated spring movies for 2024, "challengers" review: zendaya's sexy new movie is addictive, sophia bush shared how she and ashlyn harris actually fell in love, mama kelce wants taylor swift’s life advice after "the tortured poets department", the "bridgerton" season 4 couple is coming even sooner than expected.
11 DIY Luggage Tags for Your Next Adventure

So you’ve gotten your vacation inspiration , chosen your destination , downloaded all the appropriate travel apps and even bought new luggage . Looks like you’re all set for your vacay, minus one very important piece: a luggage tag. Use a fun, bright tag to help your bag stand out in baggage claim and lead you back to your suitcase should it ever get lost . And while there are plenty of tags out there to buy, we always prefer the DIY route. So we’ve rounded up a few of our favorites to get you inspired. Bon voyage!
1. Vintage : Looking for a tag that stands out and is easy to spot? This tag does just that and lets you make use of an extra scrap paper at the same time. (via Maggie Holmes Design )
2. Leather + Pom Pom : This tag packs the leather punch we love with an added bonus: pom poms . (via Sugar & Cloth )
3. Polka Dot : This DIY comes together in a snap because it’s a simple upgrade to the basic, boring tag you’ve probably already got laying around the house. And how cute are those polka dots ? (via Lovely Indeed )
4. Leather + Travel Quote : You won’t find a more timeless look than a classic leather tag. Personalize it with an inspirational quote that will travel with you. (via Eclectic Trends )
5. Scrapbook : Use those extra scrapbook goodies to DIY yourself a unique and oh-so-colorful tag. (via Tater Tots and Jello )
6. Monogrammed : It’s no secret we’re big fans of all things monogrammed , and this tag ensures your bag stands out from the rest. (via Ginger Snap Crafts )
7. Colorful Leather: Follow these step-by-step instructions to create a one-of-a-kind leather tag that looks store bought. (via Home Depot)
8. Watercolor : This free printable gives you just what you need to make a stellar watercolor luggage tag that’s totally on trend. (via Design*Sponge )
9. Geometric : The geometric trend is huge right now, so there’s no better time to hop on board and purchase this DIY leather tag kit to show your luggage some geo love. (via Maker Crate )
10. Fabric : Looking for a way to use up that scrap fabric ? Create these fab luggage tags for all those future vacations. Resourcefulness FTW! (via Twirling Betty )
11. World Traveler : A really sweet suitcase calls for a stand-out tag. Outfit your luggage with this vintage pick and you’ll be itching for your next stylish vacay. (via One Charming Party )
How do you identify your luggage? We’d love to hear about your favorite travel DIYs below!
Trending Stories
Trending topics.
- Blake Lively + Taylor Swift
- Starbucks Spring Menu
- Easy Potluck Ideas
- Interior Design Style Quiz
- Join our Newsletter
- Indian Food Recipes
- B+C Classes
- Selfmade Business Accelerator
- Crockpot Recipes
- Easy Lunch Ideas
- Healthy Dinner Ideas
Awesome Truth's First World Tag Team Title Defense Leads To Cracks In DIY On WWE Raw

Many longtime fans of "WWE NXT" have the rivalry between Tommaso Ciampa and Johnny Gargano at or near the top of their list for the most memorable stretches in the brand's history. Judging by Ciampa's reaction following #DIY's loss to The Awesome Truth on "WWE Raw," we might get to see that rivalry revisited on the main roster here before too long.
The Miz and R-Truth managed to retain the World Tag Team Championships by hitting a Truth-Crushing Finale on Gargano to get the pin. After the match, Gargano shook the hands of the champions and encouraged Ciampa to do the same, only for the latter to angrily shrug off the gesture and leave the ring. Moments prior, #DIY appeared poised to earn their first main roster gold following a Meet In the Middle and a pin attempt by Gargano but just prior to the referee counting three, Miz yanked him off of Truth and out of the ring. When Ciampa responded, Miz tossed him over the barricade, giving the champs the opportunity they needed to retain.
Whether or not Ciampa and Gargano revisit their legendary feud on "Raw" or "SmackDown" remains to be seen, and certainly the upcoming WWE Draft will play a factor there, but after missing out on two chances for tag team gold of late, tonight and in the Six-Pack Ladder Match at WrestleMania , it does appear that a change could be in order.
Recommended
Every product is independently selected by (obsessive) editors. Things you buy through our links may earn us a commission.
- I Only Packed One Outfit for My Weeklong Vacation

Whenever I go anywhere, I end up bonding with one thing — that thing you wear the most on a trip — but before I go, I don’t know what that’s going to be. For our trip to St. John, I was only packing a backpack , and I knew it would need to be light or else I’d be grumpy carrying a heavy bag around. So I tried to figure out what the item I’d bond with would be before the trip and edit down based on that. About a week before the trip, I saw a shirt and I just knew that was going to be the one. Same thing with my shorts : I ordered them, and when I tried them on, I was like, Oh man, these are going to be the ones. And then I found the sandals in my closet — and I ended up bonding hard with all of them. Those three things were literally what I wore every single day.

When I last went into the Wythe store, I saw this and was like, Oh man, that’s a great khaki shirt . The fabric has the softness of cotton with a little bit of the nice texture of linen. It breaks in so awesomely: It kind of stretches out a little bit. The weave is a little loose on this thing, and it just gets looser. So it was the perfect beach shirt, and after six days in a row, this thing was soft as butter. What I like to do is I’ll take something — if it’s new — I’ll dump it in the salt water so it gets crusty, and then I rinse it out. I did that with this, and then it acted as a safety blanket. Sun protection. Headwrap. When your shoulders are sunburned, you lay this thing over yourself and put your bag over that so it doesn’t rake against your sunburn. This was like a Swiss Army Knife shirt. I felt like Magnum P.I. in this shirt.

Oh man, these are tremendous. The quality of nylon is enough to be structured but not feel heavy. And these are their shorty shorts. These are super-short — risky short — but I loved that about them. It made them that much more comfortable. They were like not-even-wearing-shorts short, but again, I wore these every single day. I would swim in them, snorkel in them, and then go to lunch in them. That was the uniform right here. I like the solid black, especially with the khaki — it feels sophisticated, but not at the expense of comfort or chillness.

Bedrock is just a great outdoor-sandal brand. They really care about their product and what they make. Wearing these was like not wearing anything at all. They’re made with a Vibram sole but it’s like an eighth of an inch thick. They’re so thin and feel like being barefoot since the straps are thin, too. They were my beach sandal and hiking sandal — I would do mileslong hikes in these up hills and on rocks. You definitely can feel things through the sole, but they’re awesome and super-versatile.

I get asked about this bag every time I use it. For the money, it’s pretty valuable. It’s not a cheap canvas tote, but it’s not luxury priced. You can dress it up; you can dress it down. At the end of our trip, I landed from St. John at 11 o’clock at night, got home, and had to be on a flight to New York the next day. This thing went from St. John to the city, and it was filled with sand at the bottom from the beach. It was pouring that day in New York, so I was like, Oh man. Three days ago I was on a beach with this thing, and now I’m trudging through pouring rain in New York.

My friend Jenny Olson’s mom started this cookie company Sweet Martha’s, and they sell them at the Minnesota State Fair. They started making merch for the fair, and this hat is from that. I just love it. It’s my favorite thing. It started out as navy blue and then faded to this weird sort of tie-dye-looking purple color. People love Sweet Martha’s so much, and now the hats have this weird cult following.
Note: The hat is currently sold out, but you can sign up to be notified when it’s back in stock on Sweet Martha’s website.
The Strategist is designed to surface the most useful, expert recommendations for things to buy across the vast e-commerce landscape. Some of our latest conquests include the best acne treatments , rolling luggage , pillows for side sleepers , natural anxiety remedies , and bath towels . We update links when possible, but note that deals can expire and all prices are subject to change.
- the strategist
- this thing's incredible
- men's fashion
- men's apparel
Every product is independently selected by (obsessive) editors. Things you buy through our links may earn us a commission.
Deal of the Day
Micro sales, greatest hits, most viewed stories.
- The Very Best Body Washes
- All of My Friends Have These Trompe l’oeil Sweatpant Jeans
- What Chanel Iman Can’t Live Without
- The 15 Very Best Under-Eye Concealers
Today’s Top Clicked

Woman tried to board flight at Memphis Airport with 56 pounds of marijuana: Reports

Before a 21-year-old Memphis woman could board an United Airlines flight, Memphis International Airport Police found 56 pounds of marijuana in her luggage, according to multiple reports.
The woman was charged with possession of a controlled substance with the intention to manufacture, deliver or sell, Shelby County jail records show. This charge is a felony offense that "carries harsh penalties," the Law Office of Bernie McEvoy , an attorney in Nashville, Tennessee, said.
The woman is now free after posting a $5,000 bond, according to Shelby County jail records.
TSA best catches: Naruto throwing knives, weed diaper, projectile and more
Woman allowed airport police to check her luggage, had name tag on bags, according to reports
Memphis airport police caught the woman Sunday after finding her luggage "busted open" on a United Airlines bag cart, WMC-TV reported. The woman's name tag was attached to the bags, the Memphis, Tennessee-based TV station said.
After locating the woman's luggage, she gave airport police permission to search her bags, WMC-TV said. Once the drugs were found, she was subsequently arrested.
USA TODAY contacted Memphis International Airport Police on Thursday and was told the department is working to provide a police report.
How much would 56 pounds of marijuana go for on the street?
When a St. Paul, Minnesota man was arrested for possessing 56 pounds of marijuana in May 2013, now-retired Dakota County Attorney James Backstrom estimated the drugs had a street value between $171,000 and $342,000, WCCO , branded CBS Minnesota, reported.
More recently, the Butler County Sheriff's Office seized 56 pounds of marijuana from a property in El Dorado, Kansas in July 2021 and valued the drugs at $180,000, the Wichita Eagle reported.
IMAGES
VIDEO
COMMENTS
Making your own DIY luggage tags can transform your travel gear from mundane to unique and easily identifiable. This guide offers 25 innovative homemade luggage tag ideas that cater to all levels of DIY skills. From gathering the materials needed to personalizing your creation, we cover every step to ensure your luggage stands out in style. Not only is this a fun project, but handmade tags ...
A bag tag, luggage tag, baggage tag, travel bag, or suitcase tag is a travel luggage identifier attached to items or to a carry-on bag. A typical bag tag includes a luggage strap for attachment, a printed identification card, and a detachable flimsy (paper) part with a printed bar code. The bar code is encoded with the same information printed ...
Scrap wood is the perfect media for a rustic, homemade luggage tag. Try staining in a medium to light tone, so that the wood will still allow for decorative paint and stamped letters overtop. See the full tutorial to make these ultra chic tags. Rustic Wooden Luggage Tags from Ideas for the Home by Kenarry. 14 of 16.
15. DIY Luggage Tag Using Duct Tape. Making a unique luggage tag with duct tape is a fun and easy DIY project that adds a personal touch to your travel gear. Instructables offers a step-by-step guide to crafting a durable and distinctive tag that stands out on the baggage carousel.
Luggage Tag Sewing Pattern. With this free pattern and luggage tag tutorial, You can learn step by step how to make a simple luggage tag. no tricky turning o...
7. Travel Wallet with Luggage Tag ~ This cute travel wallet has a place for your travel tickets, photo ID, and passport, as well as a matching tag for your luggage. What a sweet Bon Voyage gift this would make! 8. DIY Luggage Tag Tutorial ~ Easily spot your luggage with a custom made luggage tag.
Remove pins. Center the strap piece along the top edge of the right side of the front body piece, so that the ends of the strap overlap the edge of the front body piece by about 1/2″. Pin. Baste 1/8″ from the edge of the front body piece to anchor the strap into place. Remove pins.
Regular scissors (if using vinyl) Sewing machine. Grommet and grommet punch. 1. Cut out your pattern pieces. Cut out all pattern pieces from your fabric of choice (and clear material if using). You should have three pieces of your main fabric measuring 4 x 6" and one piece measuring 3 ½ x 5 ½ ". 2. Create the front of the luggage tag.
Instructions for making the DIY luggage tag with our printable template: 1. Print the DIY luggage tag template right here and cut out the fabric template and luggage tag. 2. Pin the template to the leather fabric and felt fabric and cut out. 3. Paint the leather fabric. We splattered coordinating color but you could do stripes or a mix of colors.
Instead, be prepared every time you travel with this DIY luggage tag tutorial. It is a fast project and great scrap buster idea. Plus, you can make coordinating tags for family and friends traveling with you. ... Another benefit of a DIY luggage tags, you set your luggage apart from others. When you go to pick up your bags, you'll have a tag ...
Materials. Tools. How to Make Luggage Tags with a Cricut. Step 1 - Upload the Luggage Tags SVG File. Step 2 - Cut the Materials. Step 3 - Assemble the DIY Luggage Tags. Step 4 - Apply the Snaps. Step 5 - Create Label Inserts.
Ribbon or leather strip. Hole punch. Glue pieces of the magazine onto the square of poster board being sure to seal in the project with an extra layer of glue. Once that dries, cut the card down to a luggage tag size. Flip over and write your contact details on the back. Punch a hole and insert your ribbon.
Use the rectangle from the window cut out and cut out a piece of clear vinyl. Make it at least .5″ bigger on all sides for seam allowance. We will now get ready to sew. Make a sandwich with the vinyl. Place the wrong sides of the fabric together with the vinyl centered in the window.
Step 1: Cut the leather using the luggage tag pattern templates. I cut mine using my Cricut. I used the rotary blade with a standard grip mat with the smoothest side of the material facing down. Since this design is symmetrical, there is no need to mirror the image. If you need to cut this with a blade, I would recommend using the strong grip mat.
Cut the tags out. You have 1 print out of the front of the tags and one for the back of the tags. Use a bit of glue to hold the tag front and back together, wrong sides facing. If desired add letter stickers to the front of your tag to make your own custom monogrammed tags. After you're done, just slip the tags into the sleeves.
Get inspired by our collection of DIY luggage tag ideas, and go ahead and make them yourself! Baggage tags are little pieces of identity inserted into suitcases and travel bags that help identify your luggage from others. DIY Luggage tag ideas come in any color, shape, or size. One popular style is the plastic card that stands on its side for ...
️ Link to Printable Pattern Pieces: https://www.etsy.com/listing/1101399418/easy-luggage-tag-sewing-tutorial-sew
STEP FOUR glue the back piece to the front piece, going from one side down, LEAVING THE TOP SIDE AND EYELET unglued. STEP FIVE once dry, cut a piece of paper with your contact info and slide through the top side. STEP SIX glue the ends of the looped strap together, once dry, you can tie around your bag by looping it through. i love brown ...
How to make Denim DIY DIY Luggage Tags. Download the denim luggage tag pattern (download above). Print the paper pattern at 100% and cut out the pieces. Transfer the pattern to the denim fabric and cut out. You will have four pieces of denim. **Do not cut the window opening from the denim, this will help keep the shape of the luggage tag from ...
Use your favorite paper patterns to create unique luggage tag designs or create your own art paper. Patterned Paper pack by Jen Goode. Instructions. Cut two pieces of cardstock the same size and shape. This will be the front and back of your tag. I cut mine about 2″ x 3″. About the same size as a business card.
6. Monogrammed: It's no secret we're big fans of all things monogrammed, and this tag ensures your bag stands out from the rest. (via Ginger Snap Crafts) 7. Colorful Leather: Follow these step-by-step instructions to create a one-of-a-kind leather tag that looks store bought. (via Home Depot) 8.
See all the materials to make this project on my Subblime page: https://subblime.com/xperpetualmotion/diy-luggage-tag-supplies/See more photos of the luggage...
World Heavyweight Champion Damian Priest's came face-to-face with his Backlash challenger Jey Uso. A sneak attack by The Judgment Day's JD McDonagh went bad and led to Priest getting superkicked by Uso. Awesome Truth def. #DIY in a World Tag Team Title Match After The Miz pulled Johnny Gargano out of the ring to stop his pin attempt and sent Tommaso Ciampa over the ring
The Miz and R-Truth defend their World Tag Team Championships for the first time against Johnny Gargano and Tommaso Ciampa. Catch WWE action on Peacock, WWE Network, FOX, USA Network, Sony India and Awesome Truth vs. #DIY - World Tag Team Title Match: Raw highlights, April 22, 2024 | WWE
The Miz and R-Truth managed to retain the World Tag Team Championships by hitting a Truth-Crushing Finale on Gargano to get the pin. After the match, Gargano shook the hands of the champions and ...
640K likes, 3,603 comments - meganfox on April 24, 2024: " don't cry tears we cry diamonds".
Strategist readers get an exclusive deal on Lunya's lightweight, cotton and modal blend robes. The $250 Long Robe is $120 and the $198 Short Robe is $103 with code FOR-STRATROBE.
Next up in our mini DIY travel series, we made these personalized luggage tags. Never lose a bag again by bringing your info on the go! Even if you aren't tr...
Designer and brand collaborator Aaron Levine shares the outfit he wore for six days straight on vacation in St. John. It includes a Wythe khaki shirt, CDLP swim shorts, Bedrock sandals, and an ...
The woman's name tag was attached to the bags, the Memphis, Tennessee-based TV station said. After locating the woman's luggage, she gave airport police permission to search her bags, WMC-TV said.