- Skip to primary navigation
- Skip to main content
- Skip to primary sidebar
- SEWING TUTORIALS
- FREE SEWING PATTERNS
- CROCHET TUTORIALS
- FREE CROCHET PATTERNS
- OTHER CRAFTS

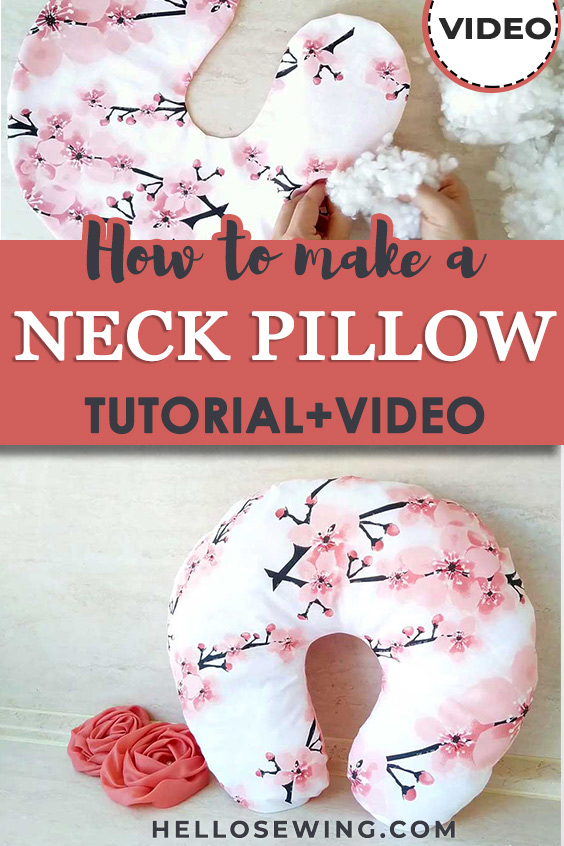
DIY Travel Pillow {Neck Pillow} - Free Pattern
Modified: Mar 1, 2023 by Treasurie
Are you planning a plane trip or long car ride? Make yourself a soft, comfortable DIY travel pillow to make your journey enjoyable and memorable. These neck pillows can be made in under 30 minutes and are a great beginner sewing project. DIY travel pillows are great to give for gifts and can be made in colorful fabrics that coordinate with luggage.

DIY Travel Pillow - Supplies
- FABRIC - ½ yard (0.45m) of cotton fabric - Choose a soft fabric that will breathe and not make you sweat. I used a soft quilting cotton. Since this will be next to your face, make sure you prewash the fabric before you start sewing. This will eliminate shrinkage and remove any chemicals the manufacturer may have added.
- STUFFING - Polyester stuffing is best. This is the kind you use for stuffed toys.
- SEWING MACHINE
- NEEDLE - Hand needle and thread
- PATTERN - Your DIY travel pillow pattern. Download the free pattern . (Link will open in a new window). Just trim the boxes and stick the 2 pages together.
>> Download the free pattern
Table of Contents

DIY Travel Pillow - The Video
Hooray! There is a video to go with this tutorial. Like all my videos, it is just a few minutes long, so grab a piece of chocolate and relax for a short while. Don't forget to subscribe to my YouTube channel for more weekly videos.
>> PRESS PLAY BELOW
DIY Travel Pillow - Instructions
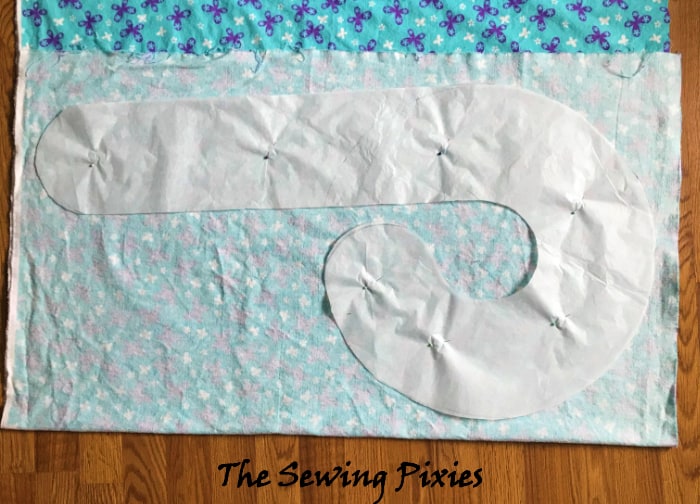
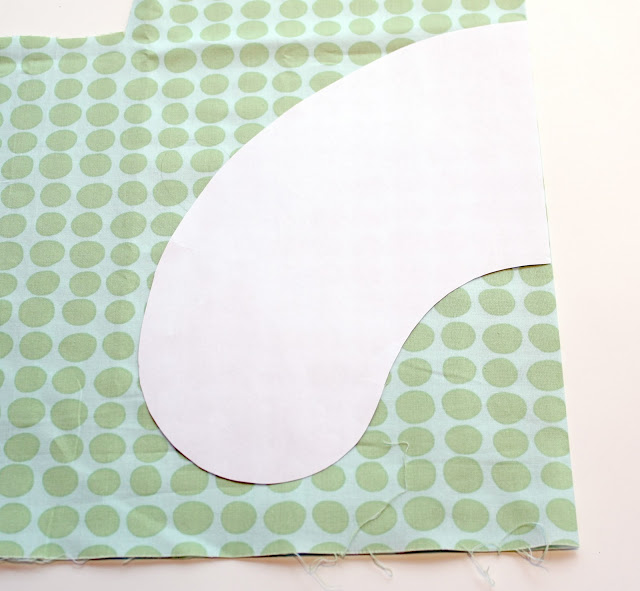
Step 1 - cut fabric.
Place your pattern on the fold of your fabric and cut 2 pieces. One will be for the front and the other for the back. If you have larger scrap pieces use one color for the front and another for the back
Step 2 - Stitch
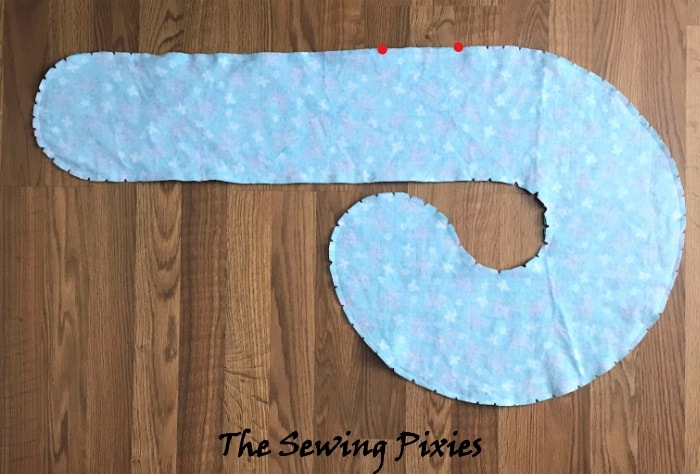
Put the fabric pieces with right sides together and stitch all the way around, leaving a 1 ½ inch (4cm) gap on the outside as shown. Use smaller straight stitches. I recommend using a 2.0 length. If you are new to sewing curves then read my article >> Sewing Curves

Step 3 - Clip and Turn
Clip the curves, leaving the gap unclipped. Turn your DIY travel pillow to the right side through the gap.
Further Reading: Sewing Clipping

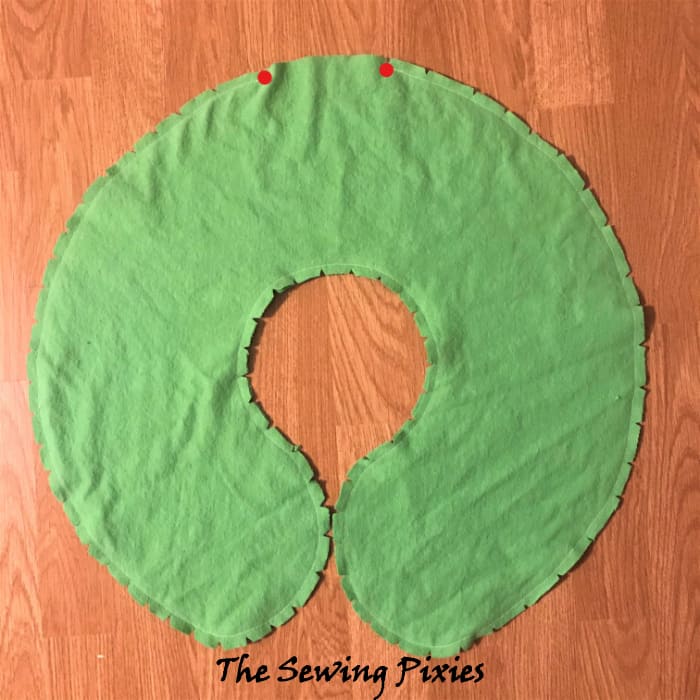
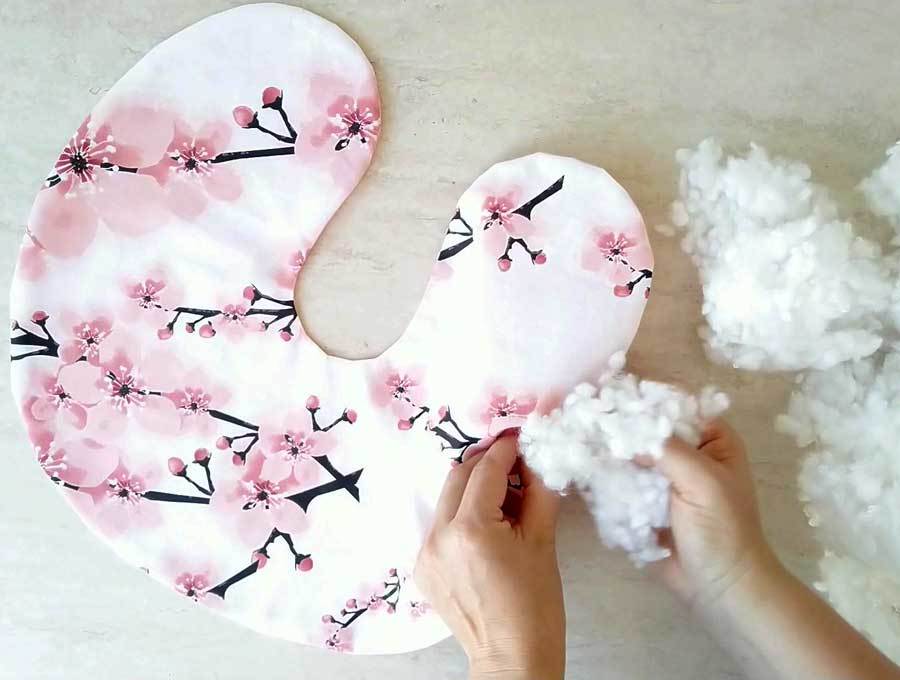
Step 4 - Stuffing
Give your pillow a good press and start stuffing. I made mine fairly hard but you can stuff it as much or little as you find comfortable. Keep in mind, the stuffing will squash down once you put your head on it.
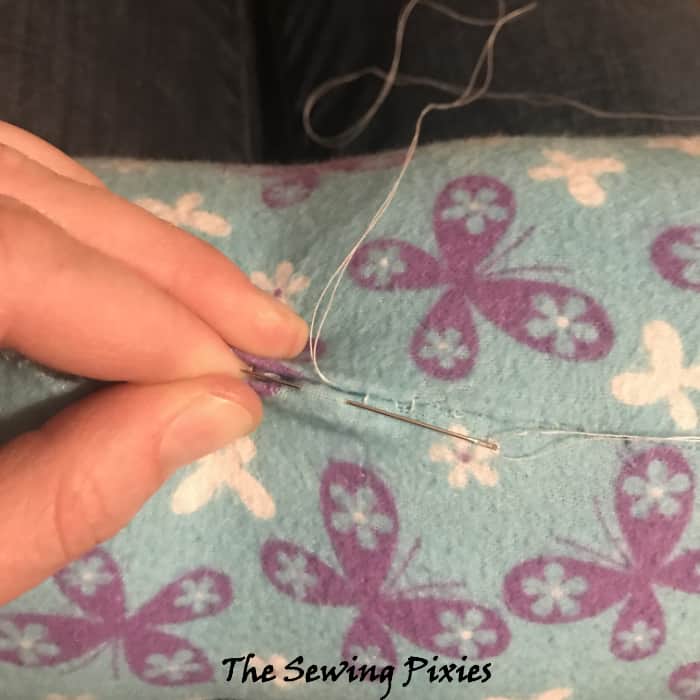
Step 5 - Stitch Gap
Close the gap with an invisible ladder stitch . This stitch goes through the fold and if you use a matching color thread, it will almost be unnoticeable.
Further Reading: How to Sew an Invisible Stitch

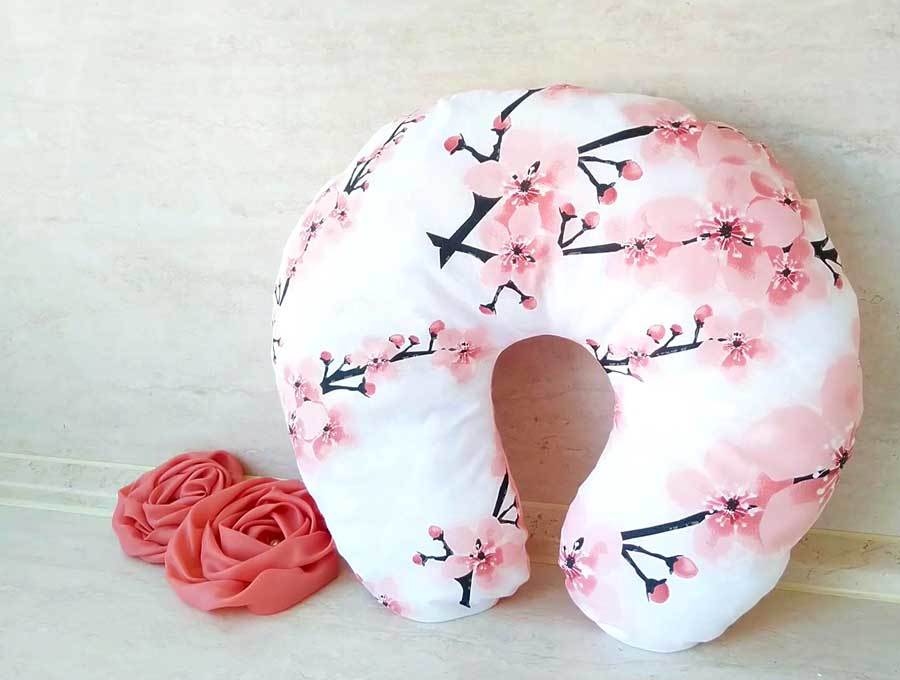
DIY Travel Pillow - In Conclusion
Your DIY travel pillow is all ready for a trip! I hope you are going somewhere exciting and have an amazing time.

More Pillow Tutorials
If you enjoyed this DIY travel pillow tutorial, you might like to sew some more pillows and cushions. Transform your house with some bright fabrics.
- Pillowcase Pattern
- How to Make A Pillowcase (with border)
- How to Make a Cushion Cover – Envelope Style
- Make a Cushion Cover with Piping
- Zippered Cushion Cover
- DIY Neck Pillow
- DIY Star Pillow
- Pom Pom Pillows
- Patchwork Cushion
- Reading Pillow Pattern
- Pillow Patterns
- DIY Christmas Pillows

DIY Travel Pillow
- Sewing Basics Sewing machine, needle, thread, scissors
- Fabric ½ yard (0.45m)
- Polyester Stuffing
Instructions

More Free Sewing Patterns & Tutorials

Reader Interactions
April 05, 2024 at 6:42 pm
Thank you for this pattern. I use a pillow this shape as my bed pillow. It fits my short neck and small person shoulders best. My ear is not crushed nor does my face get pillow wrinkles. It just cradles my head. It is filled with polyester fiberfil that doesn't clump, ever. It was purchased, and having a pattern without having to create my own is so nice. I'll be filling the new one with polyester fiberfil that doesn't clump as well. Perhaps I'll pack it slightly firmer than current to see if the slight tweak will be even better.
November 20, 2023 at 2:04 am
Thank you for this pattern! I used a zipper so I can stuff it with a few clothing items to 'carry on' the plane so I could have them easily accessible.
March 12, 2023 at 11:27 pm
Hi Beth, the gap works anywhere. I did it on the side as the seam is a little straighter so easier to close up at the end. Thanks for reading.
March 07, 2023 at 5:02 pm
I'm in the process of making a neck pillow using your pattern. Thanks for the excellent instructions. I have a question. Is there any reason not to make the closure spot at the back of the pattern instead of on the side? I'm thinking that it might be easier to stuff from the back as well as easier sewing it closed since it seems like the curve is a bit flatter at the back. Your thoughts? Again thanks for making the pattern available and for the detailed instructions.
February 03, 2023 at 6:43 pm
I just made this pillow - ultra easy! The stuffing was the biggest portion of the half hour duration! Lol! Thank-you for the pattern! Ooh! And I put a fabric loop on the back part so I can hook it on the tv tray latch on the plane 😉 or on a carabiner for on my carry on.
Violet Raven
December 29, 2022 at 7:35 pm
I made this for my grandma for Christmas, and she absolutely loved it!!
March 01, 2021 at 3:16 am
You can print the pattern and scale it down on your printer. Try 80% reduction.
February 12, 2021 at 8:32 am
Thank you for this pattern and tutorial! Do you think you'll have a pattern for child size anytime soon?
December 20, 2020 at 3:41 am
Hi Beverly, there is a link in the article above for the printable pdf. Thanks for reading.
Beverly Comley
December 18, 2020 at 9:41 pm
how do i get your pattern
September 14, 2020 at 9:44 pm
It is 3/8 inch (1cm) or the dotted line on the pattern
Stacey jeansonne
September 14, 2020 at 9:41 pm
Could you please tell me the seam allowance? Thank you
August 16, 2020 at 10:19 pm
I used fabric of dogs in sweaters, very cute!
August 16, 2020 at 10:17 pm
This is very cute! I am planning to make them for my family as Christmas presents. However, thick thread will work much better than thin.
November 14, 2019 at 7:59 pm
I'm sure they will love that you made it for them.
November 14, 2019 at 3:02 pm
My grandchildren often travel to visit us. I wanted to give them a personalized DIY gift to welcome them. I hope they will enjoy the pillows on the trip back. Thank you for the pattern and the video..
November 04, 2019 at 7:26 pm
Hi Diana, I appreciate the suggestion. I'll look into that.
November 03, 2019 at 11:00 pm
I’m not able to print this from my phone. If you could add a print button it would greatly appreciated.
nanawhatsnanamakingcom
June 13, 2019 at 2:06 pm
Thank you so much for sharing this. It is awesome which is why I featured it in my 10 awesome travel accessories post which you can check out here https://whatsnanamaking.com/travel-accessories-to-sew/ Beautiful fabric BTW
Leave a Reply
Your email address will not be published. Required fields are marked *
DIY Travel Neck Pillow Free Pattern
Learn how to diy travel neck pillow that also makes the child’s body comfortable during long car rides get my free neck pillow pattern and follow a detailed tutorial on how to sew a travel seat belt pillow, my diy travel neck pillow was inspired by the way my kids sleep during car rides. since my daughter graduated to a booster seat her sleeping position got even worse. as parents or guardians, you know that chauffeuring kids around comes with wobbly sleepy heads. it hurts my neck from just looking at them sleep. this post contains some affiliate links for your convenience (which means if you make a purchase after clicking a link i will earn a small commission, but it won’t cost you a penny more), as i was thinking about how to design the travel neck and body pillow for my daughter, i remembered how much the body pillow that i used during pregnancy benefited me. let’s take a look at the pattern and tutorial for the diy travel neck pillow with a combination of seat belt pillow, are you wondering how to sew that cute beanie hat my daughter is wearing then, check my post on sewing a beanie hat and a tube scarf to get the free pattern and tutorial., what you need for diy travel neck pillow, basic sewing tools, 1.25 yard 44” wide fabric – regular cotton or flannel will work perfectly, free pdf pattern for both travel neck pillows is ready to download at my resource library – to get the password, fill out the form at the bottom of this post, remember, always wash and dry fabric ahead of time to pre-shrink it., if you are looking for a great online store to buy fabric, i highly recommend fabric.com . they have a wide array of fabric colors and textures. in addition to fabric.com, i also shop at joann, either at my local store or joann.com for convenience., step 1. fold the fabric crosswise, right side together, and cut out the pillow piece, adding 3/8” for the seam..
Step 2 . Stitch the two pieces right side together, leaving about six-inch opening. Also, snip notches on all the curves.
Step 3. Turn the sewn travel neck pillow piece right side out through the opening.
Step 4. stuff fiberfill inside the cover and hand stitch the opening close..
Tip: Don’t be shy with the fiberfill. Make sure the travel neck pillow is stuffed firmly. Over time the stuffing may get squished and flat. In that case, you can rip the hand seam and stuff more fiber filling inside. Of course, hand stitch the opening close again. If you are very ambitious, you can sew in a short zipper in place of the opening.
So, here it is, you made a travel neck and body pillow. wasn’t that easy.

My daughter always thinks about her big brother and she makes sure he is not left behind. She said that Daniel needs a travel pillow too, to sleep enjoyably while during long car rides. Isn’t she cute or what? 😊
So, here it is, another travel neck pillow, but this time just for the neck., you will need the same materials as for the travel neck and body pillow listed above. also, the same steps will apply to make this travel neck pillow, as well., i have attached this image in order to help you remember to make the notches. it is important to do so, to make the seam on the outer side of the curved project look nice and smooth..
Done! You made another travel neck pillow.

As you see on the pictures the travel neck pillows are very useful.
(adsbygoogle = window.adsbygoogle || []).push({});, i hope you enjoyed sewing the travel neck pillows and your kids are loving them. if you are looking for an idea to keep kids occupied during car rides, check out my post on the travel activity table . also, check out the diy car seat organizer post to store travel activity supplies and make your car look nice and tidy., happy sewing, free pdf printable pattern for the diy travel neck pillows, get the password for the library with the free pattern here by filling out this form:, want to remember this save the diy travel neck pillow to your favorite pinterest board.

Leave a Comment Cancel reply
Save my name, email, and website in this browser for the next time I comment.

Kid’s travel pillow sewing tutorial
Sharing is caring!

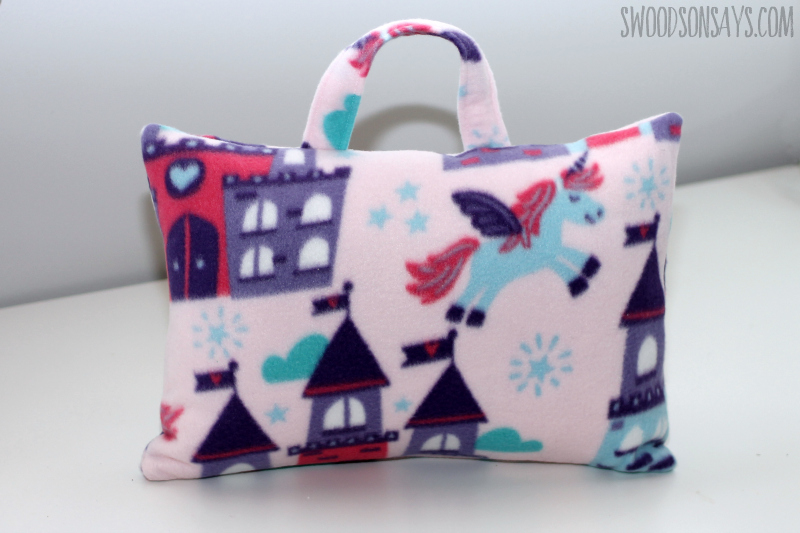
If holiday travel is in your future, I have the perfect fast gift to sew for you! I used one of JOANN’s adorable fleece prints for this kid’s travel pillow sewing tutorial. I’m excited to share that I’m collaborating with them to share this project. That means they compensated me for my materials and my time, but of course I only share products & stores that I already use and love, and all opinions are my own. With a handy pocket to store a book and a little handle for dragging along, I think it will be well received by any kiddo, and they are so fast to sew! There are a zillion prints to choose from which makes it easy to pick one that fits each kid’s personality.
Please note: this is sewn and written for fleece, which does not fray and has a touch of stretch. I have not tried it in quilting cotton; if you sew it as is, you will have a raw cotton edge and raw seams that would fray longterm if you’re washing it frequently. An easy fix to this would be to encase those raw seams with a single fold bias binding – maybe at some point in time I’ll rework this in cotton but proceed knowing those terms 🙂

We got a chance to test this out on a 13 hour road trip to Florida recently! I actually borrowed it for a nap, and I fully endorse it as a travel pillow for adults too. The fleece makes it “cozy” but this pattern would work with woven or knits as well.

The handle lets it slid on to a suitcase, or be carried over a little shoulder (or, fair warning, used to whip it at a sibling, ha!)
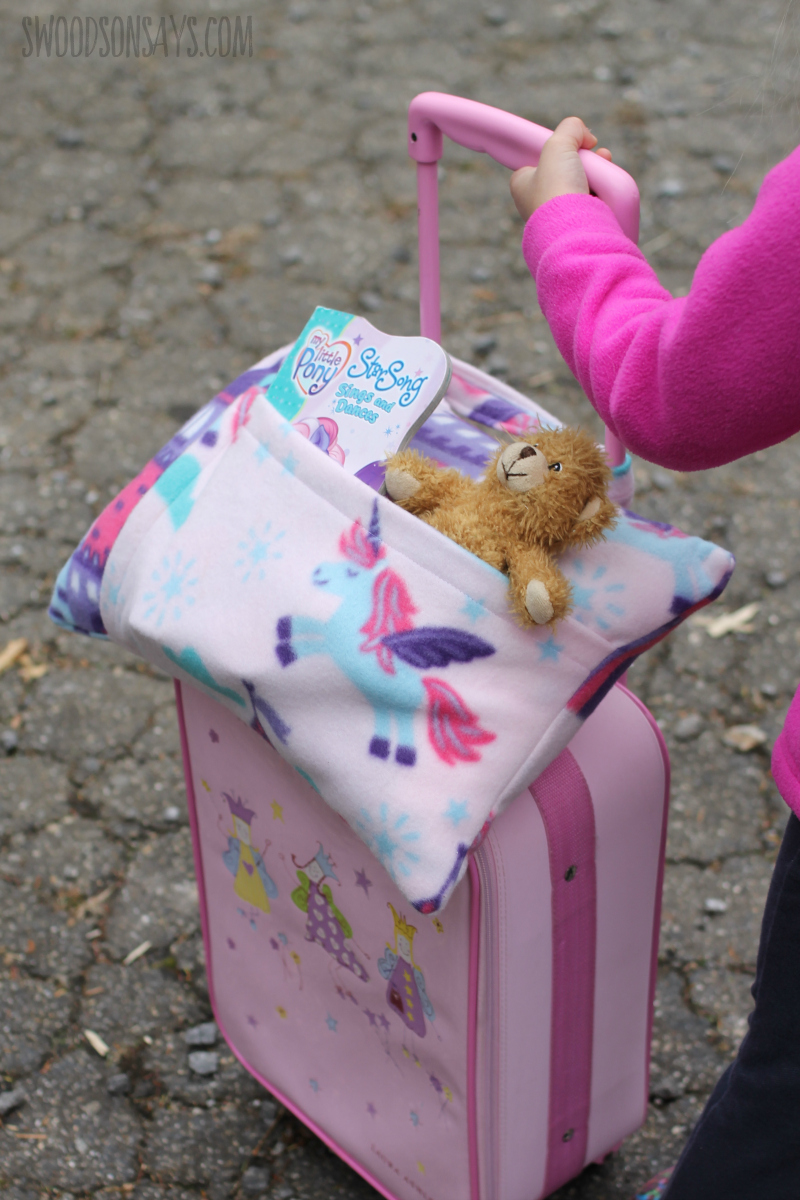
A small stuffed animal and book fit in just right, which is what we let them take on the road anyways! Otherwise we’d be buried under all their favorite stuffed friends.
Isn’t this print adorable? We have been all about castle, knights, unicorns, and dragons lately so I knew they would love it. I ordered the supplies online when I was thinking about them and picked them up in store, it was so simple. I appreciate that my kids still fit in a cart there, it makes it much easier to shop!

It is sewn envelope style, so no zippers to worry about, and great for beginners! Ready to make your own?
Pin this kid’s travel pillow sewing tutorial for later using this link or collage photo :

Kid’s travel pillow sewing tutorial
- 1 yard of one of JOANN’s adorable fleece prints
- 1 travel pillow form
- quilt ruler & rotary cutter
- Wonder clips
**Over time I’ve heard some comments it is hard to follow with this fabric, so I sewed up a quick second sample with different fabric, and added more step out photos**
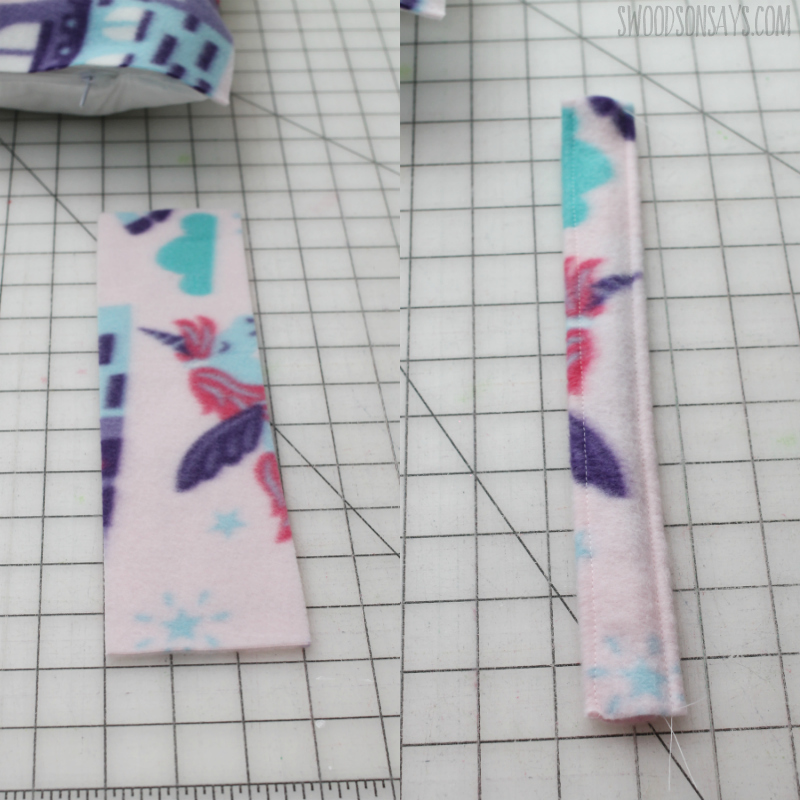
Step 1- Cut a rectangle 11″ tall by 3″ wide, fold it in half length-wise, right sides together and sew down the open long side. Turn it right side out and top stitch along both long edges, forming the strap.
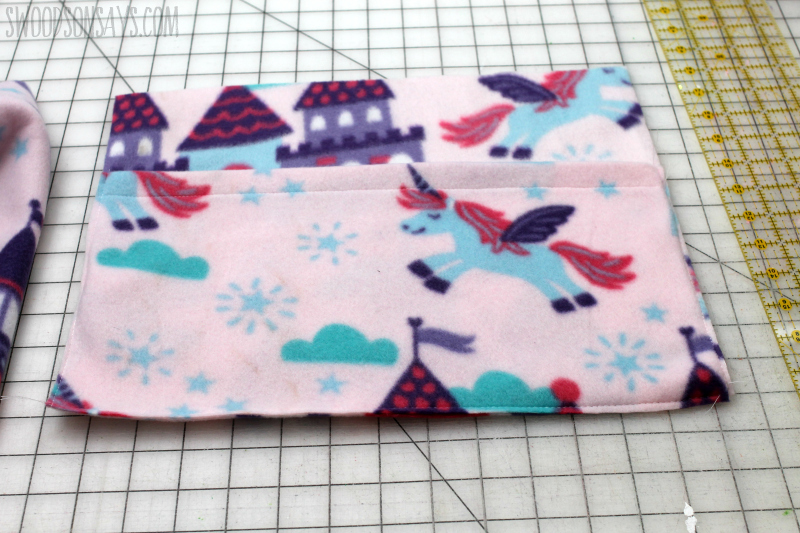
Step 2- Cut 1 rectangle of fleece 14″ long X 12″ tall. Cut another rectangle 14″ long X 9″ tall and hem one long side with 1″ hem, single folded. Layer the hemmed rectangle, right side up, on top of the 14″ long X 12″ tall rectangle, right side up, and sew along all 3 edges with a basting (long) stitch (shown above).

Step 3- With the same 14″long X 12″tall rectangle in step 2, hem the right, short side with 1″ hem, single folded. Just showing how everything lays in the bottom photo!
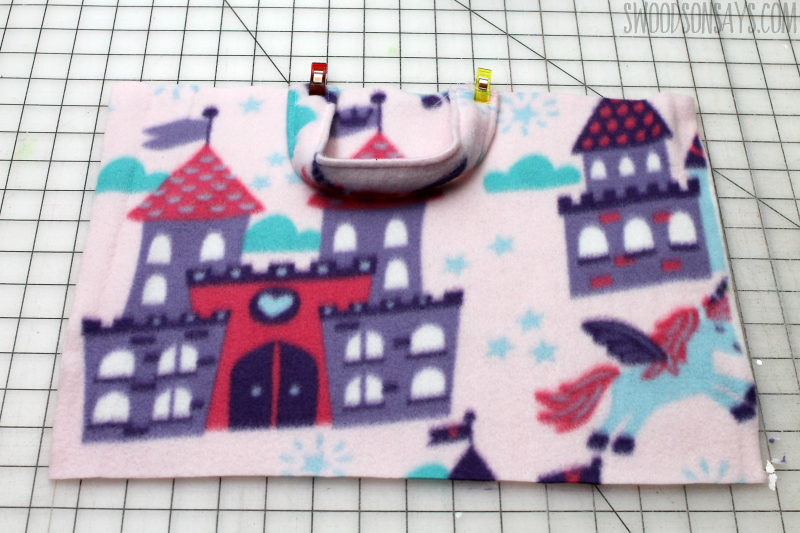
Step 3- Cut a rectangle 16″ long X 12″ tall and lay it facing right side up. Sew the handle on, centered and tucked down, away from the edge, as shown.
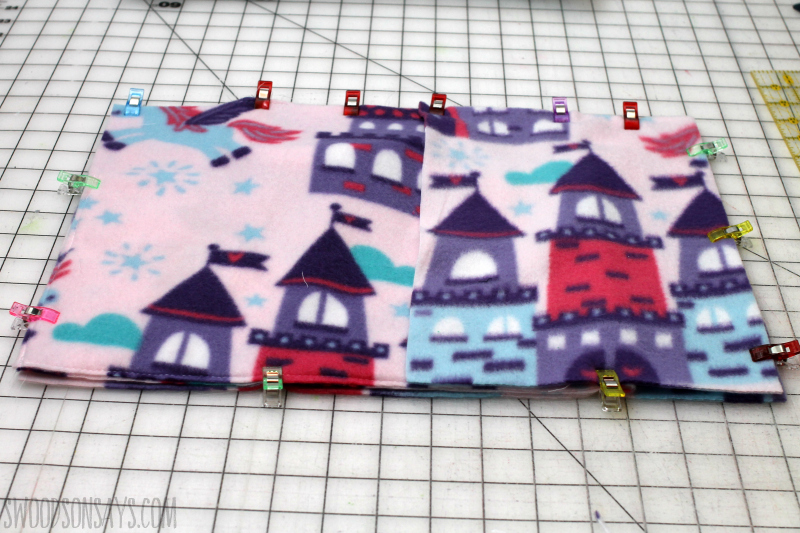
Step 4.1- Cut another rectangle 12″ long X 7.5″ tall.
4.2- Lay down the rectangle with the attached handle facing right side up, and then the rectangle with the hemmed pocket facing right side down.
4.3- Layer the 12″ long X 7.5″ tall rectangle on top (this is the rectangle you see on the top, to the right, in the photo). No need to hem its edge because we are using fleece; fleece doesn’t fray and the edge will be hidden.
4.4- Clip around the entire rectangle and sew around all 4 sides with 1/4″ seam allowance.
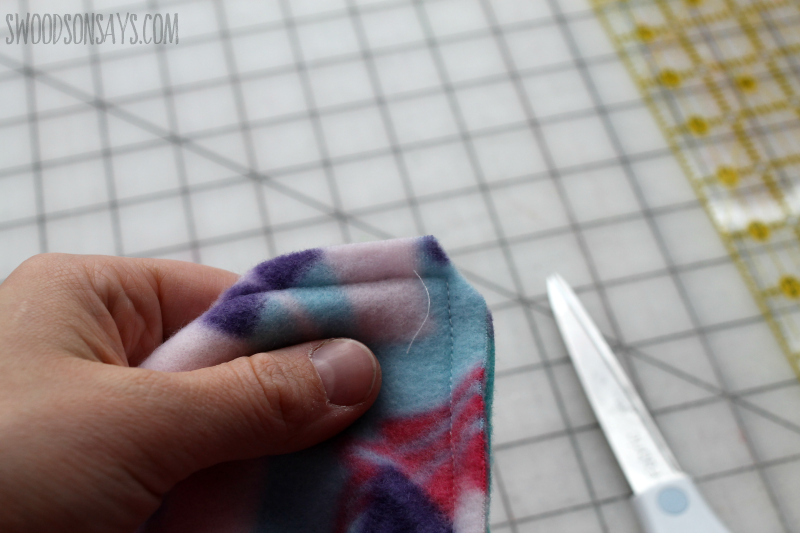
Step 5- Clip the corners off, turn right side out through the envelope opening, push the corners out with a pen and your pillow is ready!
This site uses Akismet to reduce spam. Learn how your comment data is processed .
Friday 16th of February 2024
The links to the travel pillow and JoAnn's fabric do not work?
Friday 13th of May 2022
I think step number two is missing information. The left side of the pocket is left unfinished.
Sunday 3rd of July 2022
Thank you. I’m wondering about the 12x7.5” piece. Should it be 12” tall and 7.5” long if the fabric is dimensional, the fabric would be sideways, right? I love this pattern and have made them for all my nieces and they love them. They make amazing gifts. 💓💓
Stephanie - Swoodson Says
Sunday 15th of May 2022
Chrissy, you're right! I feel awful about this, but I recently re-took more step out photos and fixed everything up. My sincere apologies.
Diana gardner
Thursday 10th of March 2022
I'm with Linda. I'm stuck on the final layering protocol. I can' t figure out how this goes together. Please help!
Chrissy Bouschor
Friday 22nd of April 2022
@Stephanie - Swoodson Says, when I flip mine right side out the left edge of the pocket piece is not hemmed like yours in the picture. It seems like maybe step 2 needs one more part?
Friday 11th of March 2022
Hi Diana! I'm so sorry, I had it on my list to take alternate photos with two-sided fabric and then had some family/health issues crop up and forgot. I'm going to try and do this tomorrow to help.
Sharon Stringer
Thursday 24th of December 2020
I love the pattern, very useful and creative! Question about the pocket on the front. Instructions say to run a basting stitch around 3 remaining edges - but this leaves a raw edge on the side that goes over the flap and it looks unfinished. The photo looks like it's hemmed on the side over the flap. Did I miss something?
Hi Sharon! I've realized that this pattern is harder to follow than I intended because fleece doesn't have a clear "wrong" side; but I wrote it for fleece so those edges can stay raw inside. I'm thinking I might revisit it with a different fabric in the new year so it is easier to follow! It's hard without seeing a photo of where you're at, but I'm wondering if with the two "envelope" pieces that overlap you put the wrong one down first? There should not be any raw edges visible once you've sewn it all together and turned it right side out.
Friday 24th of April 2020
I’m not understanding the layering of the 12”x7 1/2” piece to sew in for the envelope of the pillow. By the directions, I’d have a flap but the side would be sewn up. How do you layer it with the two large rectangles?
Sunday 10th of May 2020
Hi Linda, I'm so sorry, this got stuck in my blog's spam filter. Did you get this figured out? I know it was a while ago :(
Sharing is Caring
Help spread the word. You're awesome for doing it!
- Home →
- Projects & Tutorials
- → DIY Travel Pillow | Neck Pillow Pattern + VIDEO Tutorial

DIY Travel Pillow | Neck Pillow Pattern + VIDEO Tutorial
Traveling can get very uncomfortable at times, especially if you’re traveling by car or worse, bus. But if you have the right equipment for the trip, you can make it as comfortable as possible. What kind of equipment am I talking about? Neck pillows.
A well-made neck pillow can make a big difference during long trips during which you have no other options but so sit put.
Since I don’t really like those you can get in the stores, I came up with a cute and very comfortable DIY travel pillow design. It’s easy to make and it requires very little time. And I’m about to show you precisely how to make a travel pillow yourself. It makes a great gift and can be made in colorful fabrics to coordinate with your luggage or your fabric luggage tags !
Below you will find my step by step written tutorial with VIDEO instructions for all the visual learners.
We occasionally link to goods offered by vendors to help the reader find relevant products. Some of the links may be affiliate meaning we earn a small commission if an item is purchased.
How to Make a Travel Pillow
You don’t need all that much for this project, it’s likely that you even already have all of the essentials in your sewing supplies. First up you will need to download the free neck pillow pattern below – it’s a U-shaped design that is very comfortable.
Supplies and tools
- fabric – 1/2 yard cotton fabric (or 2 x 1/4 yard if you are using two fabrics)
- stuffing – polyester stuffing works best
- matching thread thread
- scissors (or rotary cutter and a cutting mat )
- pins or clips
- sewing machine ( these machines are great for pillows and home decor, or you can even hand sew this)
- iron and ironing board
- sewing clips or pins
DOWNLOAD : FREE Travel pillow pattern (PDF file)
Notes : You can use a variety of materials for the stuffing – I’ll cover the options at the bottom of this tutorial if you’re not sure what to use. use what you consider to be the most comfortable option.
Once you prepare all that, you can start making the travel pillow.
How To Sew a Travel pillow
Watch the diy travel pillow video first and then follow the written step by step instructions below. Please enjoy and don’t forget to Like and SUBSCRIBE over on YouTube to be kept up to date with new videos as they come out.
DIY Neck Pillow VIDEO TUTORIAL
INSTRUCTIONS:
Step 1: prepare the pattern.
Print out the travel neck pillow pattern you downloaded and cut it out. Make sure you print it as 100% (no scaling) on either a US letter or A4 paper. Cut it out and tape it together
If you don’t have a printer or you can’t use the downloadable pattern for some other reason, you can draw it yourself on a piece of paper.
Just draw one half of the usual travel pillow shape. Similar to a bean. Then cut it out.
STEP 2: Cut the fabric
Fold the fabric in half and align the edges. Then put the travel pillow sewing pattern on the fold, pin it and cut through both layers according to the pattern. The seam allowance is already included.
Do this two times, as you need two identical pieces of fabric – one for the front and one for the back. If you have larger scrap pieces – this is a great project to use couple of them!
STEP 3: Pin
Unfold both pieces of fabric and set them on top of each other, right sides facing each other. Align the edges and pin everything in place. Leave an opening for turning.
STEP 4: Sew
Stitch all around the edges using a 3/8 inch seam allowance. Leave a gap of about two inches unstitched so that you can turn the DIY neck pillow inside out.
Use your scissors to notch all around the pillow, snipping small triangles out of the seam allowance about one inch apart from each other. This will allow the pillow to form properly along the curves. Don’t notch the gap.
STEP 5: Turn inside out and press
Turn the whole pillow inside out through the opening you left unstitched earlier. Tuck the seam allowance of the opening inside and press it. Press the entire thing flat with an iron using a lot of steam.

STEP 6: Fill the pillow with the stuffing
Take the polyester stuffing you have prepared and fill the neck pillow with it. You can put as much stuffing as you wish, it’s your choice. If you like your pillows to be fluffier then put a bit more, just don’t overdo it so that it doesn’t become too hard.
STEP 7: Finish the DIY travel pillow
Once you have finished stuffing the neck pillow, all that’s left to do is to close up the opening on it. Take your needle and a thread and close the opening shut with a ladder stitch.
Psst… do you like the gorgeous roses in the image above. Here’s how to make them
NECK PILLOW STUFFING OPTIONS:
As I mentioned earlier, you can use whichever stuffing you prefer, but if you’re not sure, here are a few suggestions and their characteristics.

No products found.
- Option 5: Feathers
Light and soft, very comfortable, and it can be shaped easily. It tends to flatten often and it can get pretty hot during use.

I hope you liked this neck pillow tutorial and that you found it useful and interesting. Let us know what you think about it by sharing your thoughts with everyone in the comment section below. If you have some suggestions for improvement, do tell, your feedback is very appreciated!
Now go ahead and make a few of these DIY travel pillows for yourself and your loved ones, they’ll be grateful for sure!
Do you like this? Pin for later:
Wanna be friends? Click HERE and follow me on Pinterest
- DIY Luggage Tags
- DIY Sleep Mask
- Breathable face mask tutorial
- DIY Kimono from a scarf
OTHER PILLOWS THAT MAKE GREAT GIFTS:
- How to make a pillowcase
- Book pillow tutorial
- DIY phone pillow
- dog bone neck pillow pattern
- 1.8K shares
Related Posts
15+ Fox Plush Patterns – Fox Stuffed Animal Patterns
11+ Lap Quilt Patterns
12+ Dragon Plush Patterns [FREE]
15+ FREE Elephant Stuffed Animal Sewing Patterns – a Guide to Handcrafted Cuddles
such a great idea! thank you for tutorial – it makes me think I can try to sew my own travel pillow 🙂
Leave a reply:
Save my name, email, and website in this browser for the next time I comment.
Sure you can. It’s such an easy so, and the travel pillow is so comfortable
It turned out awesome, and thanks so much for sharing the great tutorial.
Thank you for your kind comment, Chas. I love it!
What a great tutorial, thanks for sharing with us at Handmade Monday
Thank you, Julie. It’s a pleasure to share my projects with you!
Thank you for sharing your post at this week’s #TrafficJamWeekend Linky Party.
Have a wonderful weekend!
Thank you for dropping by!
Thank you for the instructions. We need to get neck pillows for our next trip and this will let us personalize them.
Looking forward to travel is such a great treat…and then the memories are so sweet. Share photos of your creations with us! I love seeing items made with my patterns
This is fantastic! Absolutely cannot wait to be able to travel again! Maybe the time at home will give me time to make some of these as Christmas gifts! Thank you for linky up at Oh My Heartsie Girl’s Wonderful Wednesdays, I’m co-hosting at My Crafty Zoo!
Oh, how I miss traveling! These make wonderful gifts everyone would love to receive
Such a great tutorial and pattern, thank you for sharing on OMHGWW it will be featured this week. Please stop by and share again!
Have a great week!
I will. Thank you so much for the feature and hosting this wonderful party
I like your choice of fabric. It turned out so pretty. The tutorial is very detailed and easy to follow. Thanks for sharing. #HomeMattersParty
Thank you so much for the kind words, Donna. I love it!
So many times I have wanted one of these! I can quilt, but making 3D items is always more of s struggle. I think I can manage this though. Look for your neck pillow to be featured in this week’s Creative Compulsions.
Michelle https://mybijoulifeonline.com
It’s actually very easy, I’m sure you can manage it! Thanks for the feature, I’ll stop by this week
My daughter and I recently traveled on airplane and I was wishing I had a travel pillow. This will be on my to-do list for our next cross-country excursion!
It’s a must have travel item for me! So comfy
I love the pattern. I use the micro-beads and use them in a separate pillow then the decorative outer shell I put a 1/2 inch loop in the seam. I attach a carabiner to that. When I am not using it after a flight I can attach it to a loop or strap before I leave the plane and don’t loose me favorite pillow. Just a thought worth mentioning.
Great idea, Judi, thanks for sharing. This sounds like a handy feature
this is amazing but here are the some best travel pillows for tall person that support your neck and head than that any other pillow
These are custom made pillows so that can be made to fit any person tall or short
That’s really very nice. Thanks.
Great project. I will be making one of these soon. Could I use scraps of fabric with the Polyester fill?
If you do yarn crafts, put a zipper on the back and leave a small gap at the bottom of each “arm”. Put 1 skein in each arm, threading the end through the gaps. Put an extra skin or 2 to fill it for comfort and now you can knit or crochet easily.
That is clever! Thanks for the tip, Susan!
Lately I have seen notices that say we use this type of pillow wrong. The opening goes in the back. This is so the pillow supports our head when we fall asleep and the head nods forward. Always something new to learn.
Yes, isn’t it funny how we are taught to do something and we are doing it this way for years when suddenly you realize you are doing it all wrong
Leave a Reply:

30+ FREE Travel Pillow Sewing Patterns

Don't ever pay top dollar for a travel pillow again!
I was taking a flight recently and during a short stopover before boarding the long overnight flight across the Atlantic, I realized that I had forgotten my trusty travel pillow on the plane. That old pillow definitely helps me get some rest when sitting upright for hours and hours in economy.
Well, I decided I just couldn't deal with an overnight flight without a travel pillow so I went to the gift shop to purchase one. And holy smokes, it was almost $30 for a simple pillow!
I resolved to figure out how much these pillows actually cost to make and to find some good patterns so I could make my own when I got home.
Well, it turns out that these travel pillows are quite easy to make and cheap too. It will only cost a couple of dollars of materials if you don't already have what you need in your stash –which you probably do.
In any case, I wanted to share the long list of free travel pillow sewing patterns that I was able to put together so you can save money too and travel more comfortably on your next trip.
Want something a bit different from a standard travel pillow?
Here's one of our designs for a comfortable road trip car pillow .
Comfortable road trip car pillow
Travel Pillow Sewing Patterns Roundup
Here's a huge list of some of the best free travel pillow sewing patterns I could find on the internet. I'm sure you'll love them. Hover over the picture to show the title, click to open, or right-click and open in a new tab to keep this page open too. And don’t forget to pin it .

If You'd Like To Support Our Site

hi, these are really great ideas, and awesome alternative to regular travel pillows from the shop

What can I use for stuffing to make it a “squishy” pillow that gives a lot when you squeeze it, but quickly resumes its shape when you let go?

I would use upholstery foam – High-Density Polyurethane Foam. It has different densities and firmness.

Thank you. This is great!

I saw one at the airport recently that had a hood attached- like a hoodie sweatshirt. Any patterns for that? Thanks!

Your neck pillows are unique and adorable.

Great job putting these all in one space. Pegeth

I find that none of the above type of pillows work. Not enough support for my neck. Last trip I bough a more expensive one with more support in it and it was much better. Still woke on and off with sore neck but not as bad.
Search this site
Welcome to our site.
We are delighted that you found your way to So Sew Easy! We are here to inspire you, guide you, and also learn with you. If you can donate a few dollars to help us keep running the site, we would be very grateful!
Subscribe to Our Sunday Email and Never Miss a FREE Pattern!
Featured video.

Pin It on Pinterest
Thanks so much for your comment.
It would be great if you could share this post with your friends!

Subscribe to our weekly Sunday newsletter below and never miss the latest free sewing patterns and tutorials.
Thanks, I’m not interested
How To Make A Pillowcase That's Perfect For Travel
Get Your Free Download
The Cottage Mama
sewing • cooking • crafting • all things domestic
Subscribe to my Newsletter
Subscribers receive FREE exclusive patterns & discounts
- Lessons with Lindsay Videos
- Sewing Basics
- The Cottage Mama’s Creations
- ALL CRAFTING
- Main Course
- Slow Cooker
- ALL RECIPES
Patchwork Travel Neck Pillow ~ Pattern & Tutorial
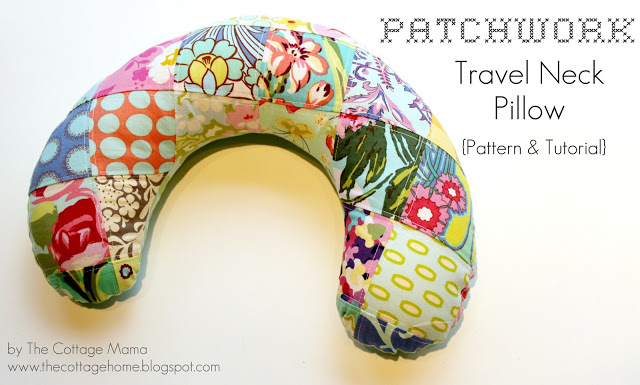
I know a lot of people travel around this time of year. As a matter of fact, my mom and her husband will be flying in to celebrate an early Christmas with us in less than two weeks! Many people are unable to sleep in airplanes and cars because of their uncomfortable neck position . I’ve seen lots of travel pillows in the airports, but I wanted to make one that was a little bit more exciting………a little more “me”, shall we say.
Happy Holiday Travels!

You may also like these:
Like this post? Want even more? Sign up below and receive all my tutorials, recipes and updates directly in your email inbox.
Popular Posts

Mary Jane Baby Shoes Pattern

Before and After Kitchen Makeover

15-Minute Pillowcase {with French Seams} ~ Tutorial

Purple Potluck Bowl Covers

Tile Coaster Tutorial

Embellished Hooded Towel Tutorial

Change Up Bag Lunches with Tortilla Roll-ups

Ruffle Bonnet Tutorial

Purchase My Book

Stay Connected
All Content Copyright © The Cottage Mama 2024 · Privacy Policy · Disclosure · Site design by Emily White Designs

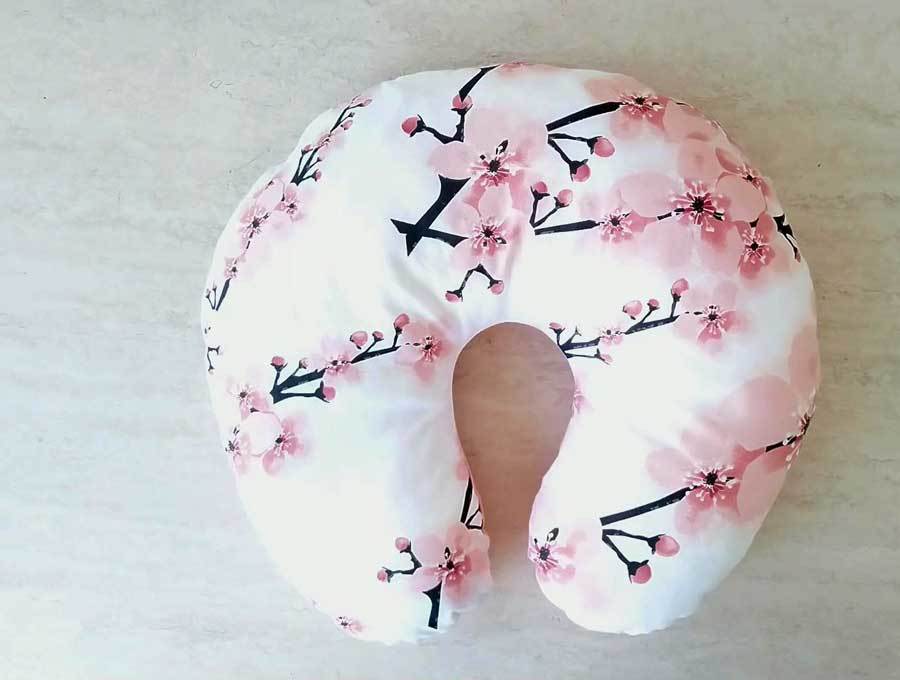
How to Sew a Travel Pillow

Introduction: How to Sew a Travel Pillow

Do you always experience neck pain during those long trips?? Have you felt shy thinking about your sleepy face on one side hitting the person in the next seat? No more worries.Today I am showing "How to sew an Travel pillow " to avoid all the those embarrassing situations.It is so simple to make that you can even hand sew or use fabric glue if you don't have a sewing machine .
Step 1: Materials Required

1/2 yard fabric
Matching Thread
Sewing Machine or Fabric glue
Paper for pattern
Ruler & Pencil
Hand sewing needle
Fabric Scissors & Paper Scissors
Straight pins
Step 2: Pattern Making

I used a 9" X 12" paper to make this pattern.(You can tape two A4 sheets if you don't have a 9"X12"). Divide the paper into one inch squares.Start drawing the outer curve of the pillow from third square counting right to left horizontally and inner curve from the fourth square counting from the top.Maintain the four inches width through out the pattern and draw the half pillow shape as shown. You can adjust a little bit to fit into the shape.(Picture 2). Cut the final pattern using scissors.
Step 3: Cutting the Fabric Pieces for Pillow

Use straight pins to attach the pattern to the fabric . Place the pattern in the fold and cut the fabric pieces.Leave 1/4" seam allowance while cutting .
You can double fold the fabric (Which is folding the fabric once vertically and then folding that horizontally again) or fold it once into half and cut twice using the pattern.In the picture shown above ,I used double fold and cut the fabric pieces in a single go.
Step 4: Stitching the Pillow Form

Place the cut fabric pieces right sides facing each other. Pin them together with straight pins.Stitch along the edges with 1/4" seam allowance leaving around 4" gap on the top to turn the pillow form inside out and stuff. Make slits on the seam allowance (be careful not to cut through the seam) to evenly spread them when turned inside out and avoid bulkiness . .
You can do the same steps with hand sewing by making back stitch all around or using fabric glue all around and repeating the same steps as mentioned above.
Step 5: Turn the Pillow Form Inside Out

Turn the pillow form inside out and iron.Make sure to Iron the seam allowance on the gap so that it is easy when hand sewing them.
Step 6: Stuffing and Closing the Gap

Now stuff the pillow through the gap .Work with little stuffing at a time and make sure to fill each corner.Stuff in such a way that your hand can't go through the stuffing once that area is stuffed. Once you reach the end, thread the hand sewing needle and finish the gap with a ladder stitch. If you don't know , how to sew a ladder stitch. Click here to learn.And that's it. Your pillow is now ready. How easy is that!!
If you are using fabric glue to make this pillow , use glue to secure the gap and pin them with binder clip or clothes pin until the glue is dry. You can also follow this step if you want to avoid sewing the ladder stitch.
For variation, you can use fleece instead of cotton or use two different fabrics on each side.It is totally customizable to your taste.
I hope you like this simple tutorial on travel pillow and give this a try.I am submitting this for "Travel Tips contest" .Please vote for me, if you like this i'ble . Thank you.

Runner Up in the Travel Tips Contest

Recommendations

Paper and Cardboard Contest

Big and Small Contest

Pets and Animals Contest

Travel Pillow Case FREE Pattern
Here are the materials you will need to make a Travel Pillow Case:
DIY Travel Pillow Case – Materials List
- Qty (1) 12” x 16” Pillow Form
- Check out my selection of “sporty fabric” from My SHOP
- ¼ Yard of Fabric for your Pillowcase Band ( French Blue )
- 1/8 Yard of Fabric for your Pillowcase Trim ( White )
DIY Travel Pillow Case – Basic Supplies
- Sewing Machine
- A thread that coordinates your project (I use Aurifil 50 wt )
- Sharp Fabric Scissors ( I love these scissors )
- Straight pins or wonder clips
This post contains affiliate links for your convenience. ? Read my full disclosure policy here .
Here is the Travel Pillow Pattern:
Travel Pillow Cutting and Sewing Instructions:
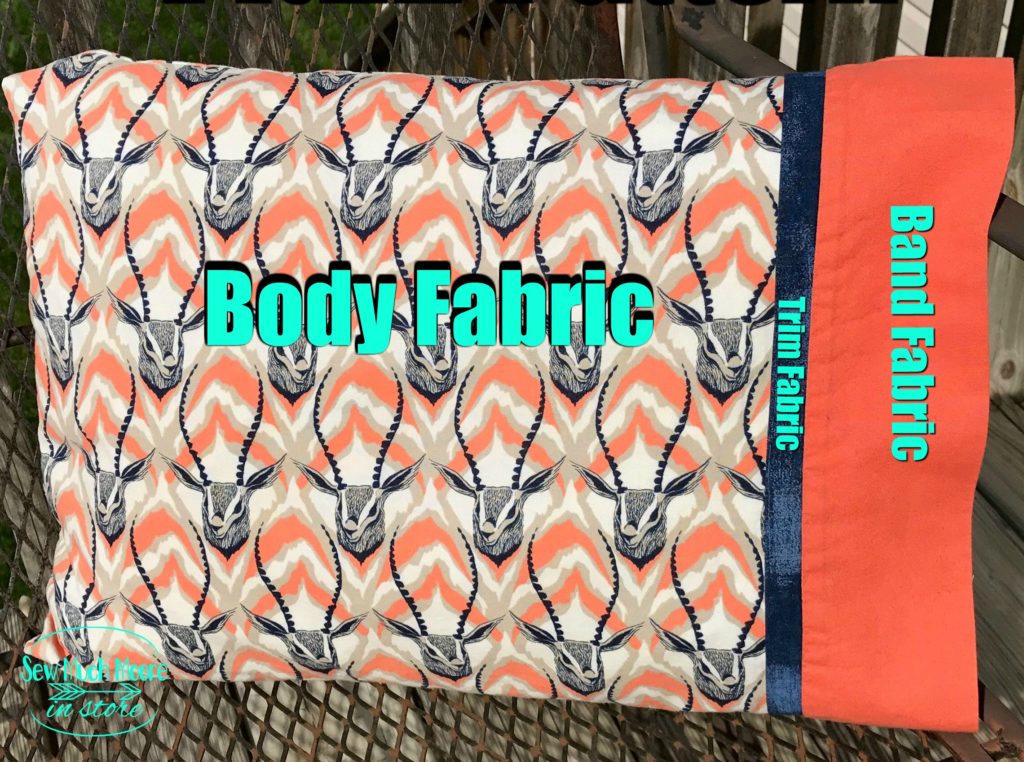
Based upon the direction of the body fabric print, you will cut the fabric accordingly:
- Body Fabric 17”x29”
- Cut Band Fabric 7” x 29”
- Cut Trim Fabric 2”x29”
Fold the Trim Fabric in half lengthwise with the wrong sides together. Press.
Layout the band fabric (right side up), place the body fabric (right side up) on top of the band fabric, and along the top edge with raw edges matching. Pin along the raw edge.
Place the trim on top of the other 2 fabrics and along the top raw edge, with raw edges matching. Repin all 3 fabrics along the top raw edge.
Take the bottom raw edge of the body fabric and roll the pillowcase Body Fabric up into a narrow tube until it meets the center of the Band Fabric. Pull the Band Fabric up and over the fabric tube and matching the raw edges and pin in place.
Stitch along the top raw edge, using 1/4″ seam allowance. Be careful not to catch the fabric tube in the seam.
Pull the body fabric out one end of the band tube and press flat.
Fold the pillowcase in half with right side’s together, stitch down the side and bottom raw edge of the pillowcase at 1/4″ seam. Leave the folded band edge open. Follow the last straight stitch down each seam with either a zigzag stitch or serger. Leave the Band folded edge open.
Turn right side out and press.
If you would like to see the video on how to do this as well, head back over to my Tutorial post right HERE .
Click HERE for a PDF Copy
Happy Sewing!

Patterns, Techniques, Articles, Blogs, and other resources to learn how to sew
Easy DIY Travel Pillow Free Sewing Pattern
July 3 , by Anne Weaver . Leave a Comment

Forget about uncomfortable travels and change them into a thing of the past with a DIY travel pillow. This neck pillow is soo easy to make and it’s beginner-friendly, which makes it a great project for both inexperienced sewing enthusiasts and experts alike. Go to Hello Sewing for a free pattern and a video tutorial.
The video tutorial will show you how to make a travel pillow in a very short amount of time. Just download the free neck pillow pattern and follow this neck pillow tutorial and you’ll finish making your travel pillow before you know it. Not only is this DIY neck pillow great for traveling, but it’s also a beautiful gift that everyone loves getting.
Watch the step by step video and learn how to make a neck pillow today! No more neck pain, simply enjoy your travel and focus on what’s really important!
The best thing is that you can whip it up in as little as 15 minutes! How cool is that? It takes less than half an yard of fabric, and you can even make it in two different colors and use your larger fabric scraps!
Oh, there’s more: make it in colorful fabrics and coordinate it with your luggage, your sleep mask, your clothes, your fabric luggage tags or whatever you like!
[photo from Hello Sewing]
Next Pattern:
- Sewing pattern: Vintage travel art pillow
- Sewing pattern: DIY hand towel travel organizer
- Boxy Travel Cosmetic Bag - Easy Sewing Tutorial
Share this:
- Click to share on Facebook (Opens in new window)
- Click to share on Pinterest (Opens in new window)
Have you read?
Free sewing pattern – crop tank top.

Are you tired of scouring stores for the perfect crop tank top, only to be disappointed by high prices and lackluster designs? Look no further! In this post, I’ll introduce you to a free sewing pattern and tutorial for an easy-to-make crop tank top that will become a staple in your wardrobe. With simple instructions and minimal materials, you’ll be whipping up stylish tops in no time.
The beauty of this crop tank top lies in its simplicity. The pattern, available for free download from the Sew in Love website, is a basic design that’s both versatile and timeless. I was inspired by the creator’s resourcefulness in using fabric from a thrift store, proving that fashion doesn’t have to break the bank. The suede-like material adds a touch of luxury to the finished garment and eliminates the need for hemming due to its non-fraying nature.
The free step-by-step guide covers everything from sewing the shoulders and side seams to finishing off the neckline and armholes with bias binding. Even beginners will find this tutorial easy to follow, thanks to the detailed explanations and accompanying photos.
Sewing Pattern-Nora Square Neck Lounge Crop Top
3 Ways to Crop a Sweatshirt – DIY Sewing Tutorial
Leave a Reply Cancel reply
Crafty Gemini Creates
A new crafty YouTube tutorial every Wednesday!
New Tutorial: Make Your Own Travel Neck Pillow
Are you a traveler? With the holidays approaching fast, we’ve all got quick (but beautiful) gifts on the brain and what better than a customized travel neck pillow for the ride home? These adorable pillows are so easy to put together that you’ll be making them for all your friends and family!
We’ve even included a free downloadable template that you can get HERE .
This tutorial features Shannon Fabrics Cuddle Cloth that comes in so many adorable prints and styles (There are even camouflage and several other masculine options)!
Click on the button to watch the tutorial and find out about all the supplies Vanessa used!
- ← New Tutorial: Baby Playmat Quilt
- New Tutorial: The Pumpkin Pincushion! →
- About Crafty Gemini Creates
- Crafting Tutorial
- Crocheting Tutorial
- Sewing Tutorial
- Uncategorized
How to Make a Neck Pillow
:max_bytes(150000):strip_icc():format(webp)/MollieJohanson-fc7e70e224544781b74708d692e21d00.jpg "baby travel pillow sewing pattern")
The Spruce Crafts / Mollie Johanson
- Skill Level: Beginner
Anyone who travels knows that a long flight or car trip feels a lot better when you have a specially-shaped pillow to support your head. It's easy to sew your own with our free neck pillow pattern. This mini cushion fits easily behind your head, but you can also adjust it to one side or the other. Plus it has a strap with snaps so you can attach it to your carry-on luggage.
Start to finish, this pillow takes less than an hour, so it's even suitable as a last-minute sewing project before your trip. In addition to being a fast project, it's also easy enough that kids can make their own pillow.
What You'll Need
Equipment / tools.
- Snap fastener tool
- Sewing machine
- Hand sewing needle
- Rotary cutter and cutting mat (optional)
- 1/4 yard quilting cotton (or a fat quarter)
- 1/4 yard anti-pill fleece
- 1/8 yard fusible interfacing
- Snap fastener
Instructions
Print out the patterns.
- Mini Travel Neck Pillow - Pattern Piece A
- Mini Travel Neck Pillow - Pattern Piece B
Download and print the two pattern piece JPG files as large as they will fit on US letter or A4 paper. Be sure to print both pieces at the same size. Cut out the patterns and tape them together so the arrows match up.
The pattern includes seam allowance, but you can add seam allowance if you'd like a larger pillow.
Prepare and Cut the Pieces
Use the printed pattern to cut one quilting cotton piece and one fleece piece.
Fleece stretches more in one direction than the other. It's best to match the stretch with the arrow as indicated on the pattern.
Cut two 2-1/2 x 4-3/4 pieces of quilting cotton and two of fusible interfacing. Press the interfacing onto the back of the fabric.
A rotary cutter makes it easy to accurately cut the rectangles for the straps, but you can also mark them with a pencil and cut them with scissors.
The Spruce / Mollie Johanson
Make the Straps
Press the two strap pieces in half the long way with right sides facing.
For each strap, sew one long edge and one end. Trim the corner to reduce bulk.
Turn the strap right side out, poke the corners into shape, and press with an iron.
Assemble the Pillow
Pin the two strap pieces to the outer curve of the quilting cotton pillow piece. Match the raw edges as shown.
Pin the two pillow pieces with right sides together. Starting on the inner curve of the pillow, sew around the shapes, backstitching at the beginning and end. Use a 1/4-inch seam allowance .
Stuff the Pillow
Turn the pillow right side out. Fill the shape with stuffing until it is firm.
Use small pieces of stuffing to avoid lumpiness.
Sew the Opening Closed
Use ladder stitch to hand sew the opening closed. To do this, take a small stitch on one side, then a small stitch directly across on the other side, and so on. Pull the stitching tight as you go.
Secure the end with a concealed knot.
Add a Fastener to the Straps
Install a snap fastener to the ends of the two strap pieces. Follow the manufacturer's instructions for installation.
If you'd rather, you can sew hook and loop fastener tape instead of using a snap.
Fluff the Stuffing
With the neck pillow sewn closed, take a moment to squish and adjust the stuffing to even it out.
More from The Spruce Crafts
- How to Sew a Pillowcase Pattern With the "Burrito" Method
- 19 Free Pillow Patterns and Ideas
- How to Make a Pair of Pants
- How to Make a Rag Quilt
- How to Make a Tablecloth
- How to Make an Oven Mitt
- How to Sew a Knitting or Crochet Project Bag
- How to Make an Adjustable Bow Tie
- How to Sew a Microwave Potato Bag
- How to Make a Tooth Fairy Pillow
- How to Sew a Large Tote Bag With Striped Pockets
- How to Sew a Dog Bone Toy
- Free Sewing Pattern for a Walker Bag
- How to Make a DIY Reversible Swimsuit
- How to Sew a Backpack
- How to Make an Apron
- Capes & Cloaks
- Coat&Jacket
- Romper & Jumpsuit
- Baby & Kids
- Saint Patrick’s Day
- Mother’s Day
- Father’s Day
- Baby & Kids
DIY Seat Belt Travel Pillow Free Sewing Patterns + Video
These DIY Seat Belt Travel Pillows are one of the most practical travel sized pillow projects to make road trips easier! There are many different pillows and cushions I have surfed for those who are keen on sewing. The seat belt pillow makes it easy to tuck behind your neck when you’re in a car so you won’t wake up with a sore neck. They are easy to make and fabulous enough to send unique, personalized gifts for all the fellow car sleepers out there!
You may love: DIY Cat Travel Pillow Free Sewing Pattern

Click the link below for the free sewing pattern and detailed tutorial:
Comfortable Road Trip Car pillow By Stephanie

Seatbelt Pillow By Liz Johnson

Click the link below for the free sewing pattern and video:
DIY Seatbelt Pillow By The Renegade Seamstress
Related articles more from author, sea turtle softie free sewing pattern, fabric baby rings free sewing pattern, fabric luggage tag free sewing tutorial, sewing travel kit free sewing pattern, magical folding tray pouch free sewing pattern + video, fabric basket liner free sewing tutorial.
- Clear Search
- Recently Viewed
- BEDDING SETS
- NURSERY ESSENTIALS
- Crib Sheets
- Crib Skirts
- Crib Rail Covers
- Baby Blankets
- Changing Pad Covers
- Rag Tie Bunting Banner
- Window Accents
- Multi-Use Nursing & Car Seat Covers
- Nursing Pillow Covers
- Nursing Covers
- Kids Sheet Sets
- Kids' Blankets
- Kids' Duvet Covers
- Bundle Boxes
- Lovey Blankets
- Bibs and Burp Cloths
- PERSONALIZED
- For Mom & Grandma
- For Dad & Grandpa
- Gift Registry
- FOR EASTER BASKETS
- LAST CHANCE
- NEW ARRIVALS
- ABOUT SUITEBABY
- PRODUCT INFORMATION
- Care Instructions
- STAY UP-TO-DATE
- Register / Login
- Afghanistan (USD $)
- Åland Islands (USD $)
- Albania (USD $)
- Algeria (USD $)
- Andorra (USD $)
- Angola (USD $)
- Anguilla (USD $)
- Antigua & Barbuda (USD $)
- Argentina (USD $)
- Armenia (USD $)
- Aruba (USD $)
- Ascension Island (USD $)
- Australia (USD $)
- Austria (USD $)
- Azerbaijan (USD $)
- Bahamas (USD $)
- Bahrain (USD $)
- Bangladesh (USD $)
- Barbados (USD $)
- Belarus (USD $)
- Belgium (USD $)
- Belize (USD $)
- Benin (USD $)
- Bermuda (USD $)
- Bhutan (USD $)
- Bolivia (USD $)
- Bosnia & Herzegovina (USD $)
- Botswana (USD $)
- Brazil (USD $)
- British Indian Ocean Territory (USD $)
- British Virgin Islands (USD $)
- Brunei (USD $)
- Bulgaria (USD $)
- Burkina Faso (USD $)
- Burundi (USD $)
- Cambodia (USD $)
- Cameroon (USD $)
- Canada (USD $)
- Cape Verde (USD $)
- Caribbean Netherlands (USD $)
- Cayman Islands (USD $)
- Central African Republic (USD $)
- Chad (USD $)
- Chile (USD $)
- China (USD $)
- Christmas Island (USD $)
- Cocos (Keeling) Islands (USD $)
- Colombia (USD $)
- Comoros (USD $)
- Congo - Brazzaville (USD $)
- Congo - Kinshasa (USD $)
- Cook Islands (USD $)
- Costa Rica (USD $)
- Côte d’Ivoire (USD $)
- Croatia (USD $)
- Curaçao (USD $)
- Cyprus (USD $)
- Czechia (USD $)
- Denmark (USD $)
- Djibouti (USD $)
- Dominica (USD $)
- Dominican Republic (USD $)
- Ecuador (USD $)
- Egypt (USD $)
- El Salvador (USD $)
- Equatorial Guinea (USD $)
- Eritrea (USD $)
- Estonia (USD $)
- Eswatini (USD $)
- Ethiopia (USD $)
- Falkland Islands (USD $)
- Faroe Islands (USD $)
- Fiji (USD $)
- Finland (USD $)
- France (USD $)
- French Guiana (USD $)
- French Polynesia (USD $)
- French Southern Territories (USD $)
- Gabon (USD $)
- Gambia (USD $)
- Georgia (USD $)
- Germany (USD $)
- Ghana (USD $)
- Gibraltar (USD $)
- Greece (USD $)
- Greenland (USD $)
- Grenada (USD $)
- Guadeloupe (USD $)
- Guatemala (USD $)
- Guernsey (USD $)
- Guinea (USD $)
- Guinea-Bissau (USD $)
- Guyana (USD $)
- Haiti (USD $)
- Honduras (USD $)
- Hong Kong SAR (USD $)
- Hungary (USD $)
- Iceland (USD $)
- India (USD $)
- Indonesia (USD $)
- Iraq (USD $)
- Ireland (USD $)
- Isle of Man (USD $)
- Israel (USD $)
- Italy (USD $)
- Jamaica (USD $)
- Japan (USD $)
- Jersey (USD $)
- Jordan (USD $)
- Kazakhstan (USD $)
- Kenya (USD $)
- Kiribati (USD $)
- Kosovo (USD $)
- Kuwait (USD $)
- Kyrgyzstan (USD $)
- Laos (USD $)
- Latvia (USD $)
- Lebanon (USD $)
- Lesotho (USD $)
- Liberia (USD $)
- Libya (USD $)
- Liechtenstein (USD $)
- Lithuania (USD $)
- Luxembourg (USD $)
- Macao SAR (USD $)
- Madagascar (USD $)
- Malawi (USD $)
- Malaysia (USD $)
- Maldives (USD $)
- Mali (USD $)
- Malta (USD $)
- Martinique (USD $)
- Mauritania (USD $)
- Mauritius (USD $)
- Mayotte (USD $)
- Mexico (USD $)
- Moldova (USD $)
- Monaco (USD $)
- Mongolia (USD $)
- Montenegro (USD $)
- Montserrat (USD $)
- Morocco (USD $)
- Mozambique (USD $)
- Myanmar (Burma) (USD $)
- Namibia (USD $)
- Nauru (USD $)
- Nepal (USD $)
- Netherlands (USD $)
- New Caledonia (USD $)
- New Zealand (USD $)
- Nicaragua (USD $)
- Niger (USD $)
- Nigeria (USD $)
- Niue (USD $)
- Norfolk Island (USD $)
- North Macedonia (USD $)
- Norway (USD $)
- Oman (USD $)
- Pakistan (USD $)
- Palestinian Territories (USD $)
- Panama (USD $)
- Papua New Guinea (USD $)
- Paraguay (USD $)
- Peru (USD $)
- Philippines (USD $)
- Pitcairn Islands (USD $)
- Poland (USD $)
- Portugal (USD $)
- Qatar (USD $)
- Réunion (USD $)
- Romania (USD $)
- Russia (USD $)
- Rwanda (USD $)
- Samoa (USD $)
- San Marino (USD $)
- São Tomé & Príncipe (USD $)
- Saudi Arabia (USD $)
- Senegal (USD $)
- Serbia (USD $)
- Seychelles (USD $)
- Sierra Leone (USD $)
- Singapore (USD $)
- Sint Maarten (USD $)
- Slovakia (USD $)
- Slovenia (USD $)
- Solomon Islands (USD $)
- Somalia (USD $)
- South Africa (USD $)
- South Georgia & South Sandwich Islands (USD $)
- South Korea (USD $)
- South Sudan (USD $)
- Spain (USD $)
- Sri Lanka (USD $)
- St. Barthélemy (USD $)
- St. Helena (USD $)
- St. Kitts & Nevis (USD $)
- St. Lucia (USD $)
- St. Martin (USD $)
- St. Pierre & Miquelon (USD $)
- St. Vincent & Grenadines (USD $)
- Sudan (USD $)
- Suriname (USD $)
- Svalbard & Jan Mayen (USD $)
- Sweden (USD $)
- Switzerland (USD $)
- Taiwan (USD $)
- Tajikistan (USD $)
- Tanzania (USD $)
- Thailand (USD $)
- Timor-Leste (USD $)
- Togo (USD $)
- Tokelau (USD $)
- Tonga (USD $)
- Trinidad & Tobago (USD $)
- Tristan da Cunha (USD $)
- Tunisia (USD $)
- Türkiye (USD $)
- Turkmenistan (USD $)
- Turks & Caicos Islands (USD $)
- Tuvalu (USD $)
- U.S. Outlying Islands (USD $)
- Uganda (USD $)
- Ukraine (USD $)
- United Arab Emirates (USD $)
- United Kingdom (USD $)
- United States (USD $)
- Uruguay (USD $)
- Uzbekistan (USD $)
- Vanuatu (USD $)
- Vatican City (USD $)
- Venezuela (USD $)
- Vietnam (USD $)
- Wallis & Futuna (USD $)
- Western Sahara (USD $)
- Yemen (USD $)
- Zambia (USD $)
- Zimbabwe (USD $)
- Search Clear
Traveling with Babies: How to Fly With A Pack and Play
Whether this is your first time flying with a baby or your tenth, preparing for air travel with your kids is a lot of work and can be stressful. The packing, prep, and travel time can be overwhelming for first-time and experienced parents! From the first time a baby comes home, you need somewhere for them to sleep safely, and as they get older, a spot for them to play without getting into trouble. If you plan on traveling, you will still need these things, which can be particularly difficult when the place you visit isn't exactly baby-proof. A pack n play is a play space, a bassinet, and a diaper changing station, making it the perfect solution. Whether driving or flying, you can fold them up and tuck them away in an easy-to- carry case for travel.
CAN YOU GATE CHECK A PACK-N-PLAY?
When traveling with my three young kids, I purchased small suitcases adorned with their favorite Disney characters, with wheels and a handle for my toddlers. You can also buy a solid color and use fabric markers to decorate and make it unique, so they’ll want to pull it. I bought mine from Amazon for $20, but you can sometimes find them used or even borrow from a friend. The toddler suitcases contained small toys, coloring books, storybooks, and a tablet to help keep the kids entertained during the flight. Each of the toddlers having their own suitcase that contained their belongings helped make traveling memorable, and they

To make things even easier on everyone, all three kids’ clothes were in one checked bag equals less luggage to wait for after the flight.
I held my infant in a wrap-style baby carrier to allow for hands-free, ensure that the baby was always near, and help keep the baby calm through the noisy space. The long piece of stretchy fabric was easily adjustable to different body types, which made it great for traveling, especially when visiting family.

When traveling by airplane, some parents rent baby equipment at their destination. Whether a stroller, crib, car seat, high chair, or pack-n-play, these rentals get pricey - upwards of $25 a day per item. If you plan a little, you can bring your own gear and minimize what you carry through the airport! I always brought a stroller as it provided transportation for kids that get tired, a place to put the small suitcases, a bag of snacks we purchased before the ride, and the diaper bag. At your gate, check in at the desk to receive a tag for gate-checking a stroller. Your stroller will be waiting for you when you land at your destination.
HOW DO I FLY WITH A CAR SEAT/BOOSTER SEAT?
Published: Mon, Aug 22, 2022
Leave a comment
Please note, comments must be approved before they are published
Availability
- Home & Kitchen
- Decorative Pillows, Inserts & Covers
- Throw Pillow Covers
Image Unavailable

- To view this video download Flash Player

Moscow Aero First Pattern Illustration Throw Lumbar Pillow Insert Cushion Cover Home Sofa Decor Gift
Purchase options and add-ons, about this item.
- Polyester Fabric,100 % Polyester
- Size: 40 x 60cm / 16 inch x 24 inch ( There are some measurement error )
- Classification: Pillow
- Feature: Made from high-quality Simplex knit fabric, each side is full color printing with the same image. these 100% polyester pillows are soft and wrinkle-free.; Machine washable , Synthetic-filled insert included.
- Material: Polyester fabric
- Package Quantity: 1 x pillow
Product information
Warranty & support, looking for specific info, product description.
Size: 40 x 60cm / 16 inch x 24 inch ( There are some measurement error ) Classification: Pillow Feature: Made from high-quality Simplex knit fabric, each side is full color printing with the same image. these 100% polyester pillows are soft and wrinkle-free. Machine washable , Synthetic-filled insert included. Material: Polyester fabric Package Quantity: 1 x pillow Keywords: Pillow,Moscow,Lumbar Pillow,Russia,Throw Pillow,Cushion,Toss Pillow,Pillow Cover Take this rectangular-shaped pillow as a prefect decoration for your sofa and create a new home style. It is also a great wedding gift for your friends†new home. Made by high-quality simplex knit fabric, the pillows are comfortable to touch and layon. This 100% new polyester pillows with Synthetic-filled insert are soft and wrinkle-free. The size is approximate 40 x 60cm (16 inch x 24 inch). Machine washable, separately from other articles, gentle circle in low. No bleach. DIYthinker wishes to bring everyone's ideas into reality. We provide the greatest product choice for you, such as 3C, ceramic mugs and dishes , wall decorations, car peripherals or clothing accessories. You can easily to find different products with particular pictures design in DIYthinker. Apart from ready-made products, you can also customize products with your superb ideas in DIYthinker. If you come up any interesting ideas, you can feel free to contact us and start your design. We are ready to bring you high quality products, prefect shopping experience and unique lifestyle.
Customer reviews
Customer Reviews, including Product Star Ratings help customers to learn more about the product and decide whether it is the right product for them.
To calculate the overall star rating and percentage breakdown by star, we don’t use a simple average. Instead, our system considers things like how recent a review is and if the reviewer bought the item on Amazon. It also analyzed reviews to verify trustworthiness.
No customer reviews
- Amazon Newsletter
- About Amazon
- Accessibility
- Sustainability
- Press Center
- Investor Relations
- Amazon Devices
- Amazon Science
- Sell on Amazon
- Sell apps on Amazon
- Supply to Amazon
- Protect & Build Your Brand
- Become an Affiliate
- Become a Delivery Driver
- Start a Package Delivery Business
- Advertise Your Products
- Self-Publish with Us
- Become an Amazon Hub Partner
- › See More Ways to Make Money
- Amazon Visa
- Amazon Store Card
- Amazon Secured Card
- Amazon Business Card
- Shop with Points
- Credit Card Marketplace
- Reload Your Balance
- Amazon Currency Converter
- Your Account
- Your Orders
- Shipping Rates & Policies
- Amazon Prime
- Returns & Replacements
- Manage Your Content and Devices
- Recalls and Product Safety Alerts
- Conditions of Use
- Privacy Notice
- Consumer Health Data Privacy Disclosure
- Your Ads Privacy Choices
IMAGES
VIDEO
COMMENTS
Download the free travel pillow pattern. Cut the fabric. Put the fabric pieces with right sides together and stitch all the way around, leaving a 1 ½ inch (4cm) gap on the outside as shown. Clip the curves, leaving the gap unclipped. Turn your DIY travel pillow to the right side through the gap. Give your pillow a good press and start stuffing.
Step 1. Fold the fabric crosswise, right side together, and cut out the pillow piece, adding 3/8" for the seam. Step 2. Stitch the two pieces right side together, leaving about six-inch opening. Also, snip notches on all the curves. Step 3. Turn the sewn travel neck pillow piece right side out through the opening.
A request by one of my viewers has seen me making this fillable travel pillow. I've provided layouts to draft the pattern yourself, but I got the shape idea...
Here is a DIY tutorial on how to make a travel pillow. It comes with a PDF pattern in toddler and adult sizes. For the accompanying written instructions and ...
Step 3- Cut a rectangle 16″ long X 12″ tall and lay it facing right side up. Sew the handle on, centered and tucked down, away from the edge, as shown. Step 4.1- Cut another rectangle 12″ long X 7.5″ tall. 4.2- Lay down the rectangle with the attached handle facing right side up, and then the rectangle with the hemmed pocket facing ...
Pin or clip your pillow pieces together. Using a ½" seam allowance, sew around the pillow, leaving a 4" opening on one side to stuff the pillow. Clip notches around the curved middle "smile" and the curved bottoms. Turn the pillow right side out. Using a warm iron, press the pillow. Stuff the pillow with your fiberfill.
STEP 2: Cut the fabric. Fold the fabric in half and align the edges. Then put the travel pillow sewing pattern on the fold, pin it and cut through both layers according to the pattern. The seam allowance is already included. Do this two times, as you need two identical pieces of fabric - one for the front and one for the back.
Cut out your pattern on the fold of the fabric to the right. And you'll need two of those a front and a back. With right sides together, sew around all edges leaving an opening ( she did it on the inside part where the neck would go). Flip the pillow right side out. Stuff with batting.
Everyone loves a neck pillow when travelling! Now you can sew one yourself with this free pattern with sizes for children and adults, as well as a useful car...
This DIY tutorial comes with a pattern in toddler/kids and adult sizes that you can get for free as a "Thank you!" gift if you choose to become a subscriber to my email list. The kid's size pattern fits nicely up to a 10-year-old. For older kids, use the adult version of the pattern. To download the travel neck pillow pattern, scroll down ...
Travel Pillow Sewing Patterns Roundup. Here's a huge list of some of the best free travel pillow sewing patterns I could find on the internet. I'm sure you'll love them. Hover over the picture to show the title, click to open, or right-click and open in a new tab to keep this page open too. And don't forget to pin it.
At 12½" x 18½", it's the perfect size for a child's travel companion in the car, on camping trips and sleepovers! For adults, it's just the right size for neck and back support in bed. Get the FREE download here! - Magic Pillowcase Kits - Travel Size - Magic Pillowcase Pattern (full color, step-by-step instructions for 3 sizes)
Basic sewing supplies (including hand-sewing) Travel neck pillow pattern piece (click HERE) Instructions: Print and cut out the pattern piece. Use this pattern to cut the backing for your pillow. Place pattern piece on fold of fabric and cut. Gather a bunch of fabric scraps that you have lying around.
Step 3: Cutting the Fabric Pieces for Pillow. Use straight pins to attach the pattern to the fabric . Place the pattern in the fold and cut the fabric pieces.Leave 1/4" seam allowance while cutting . You can double fold the fabric (Which is folding the fabric once vertically and then folding that horizontally again) or fold it once into half ...
Pull the body fabric out one end of the band tube and press flat. Fold the pillowcase in half with right side's together, stitch down the side and bottom raw edge of the pillowcase at 1/4″ seam. Leave the folded band edge open. Follow the last straight stitch down each seam with either a zigzag stitch or serger. Leave the Band folded edge open.
This neck pillow is soo easy to make and it's beginner-friendly, which makes it a great project for both inexperienced sewing enthusiasts and experts alike. Go to Hello Sewing for a free pattern and a video tutorial. The video tutorial will show you how to make a travel pillow in a very short amount of time. Just download the free neck pillow ...
This tutorial features Shannon Fabrics Cuddle Cloth that comes in so many adorable prints and styles (There are even camouflage and several other masculine options)! Click on the button to watch the tutorial and find out about all the supplies Vanessa used! '. Tagged on: crafty gemini Crafty Gemini Creates cuddle homemade gift ideas neck pillow ...
Assemble the Pillow. Pin the two strap pieces to the outer curve of the quilting cotton pillow piece. Match the raw edges as shown. Pin the two pillow pieces with right sides together. Starting on the inner curve of the pillow, sew around the shapes, backstitching at the beginning and end. Use a 1/4-inch seam allowance .
These DIY Seat Belt Travel Pillows are one of the most practical travel sized pillow projects to make road trips easier! There are many different pillows and cushions I have surfed for those who are keen on sewing. The seat belt pillow makes it easy to tuck behind your neck when you're in a car so you won't wake up with a sore neck.
When traveling by airplane, some parents rent baby equipment at their destination. Whether a stroller, crib, car seat, high chair, or pack-n-play, these rentals get pricey - upwards of $25 a day per item. If you plan a little, you can bring your own gear and minimize what you carry through the airport! I always brought a stroller as it provided ...
Buy Fashion Beautiful Night Moscow City Pattern Set Of 18 X 18 Inch Pillow Case: Throw Pillow Covers - Amazon.com FREE DELIVERY possible on eligible purchases
Buy Trip To Moscow fashion design pillow case 18''x18'': Throw Pillow Covers - Amazon.com FREE DELIVERY possible on eligible purchases
Buy DIYthinker Moscow Aero First Pattern Illustration Throw Lumbar Pillow Insert Cushion Cover Home Sofa Decor Gift: Throw Pillow Covers - Amazon.com FREE DELIVERY possible on eligible purchases