Air Brake Adjustment
Air brake adjustment and in-service check.
Air Brake adjustment (push rod travel) must be checked as part of the pre–trip air brake inspection (Section 9).
On vehicles equipped with hydraulic brakes it is possible to pump the brake pedal to compensate for brakes that are out of adjustment. This is not possible with a vehicle equipped with an air brake system with manual slack adjusters. When the brakes are adjusted by slack adjusters, the shoes are moved toward the drum. This brings them as close to the drums as possible minimizing the amount of free travel when the brakes are applied. It also reduces the volume of air used to apply the brakes.
Your company may have a maintenance crew to keep vehicles safely running. But one person alone is ultimately responsible to ensure that the brakes are operating properly before the vehicle is moved. That person is the driver.

Brake Adjustment – It’s Critical
The most important part of any braking system is the foundation brakes. If these are not in correct working order and properly adjusted, the best designed air brake system won’t be able to safely stop the vehicle.
Unfortunately, brake adjustment is often neglected. The reality is that brake failures and runaways that result in crashes are almost never caused by an air system failure, but by the absence of routine brake maintenance, or by the driver failing to check brakes on a daily basis.
Daily pre–and post–trip inspections are mandatory. The driver may be held responsible if the brakes are incorrectly adjusted or not working properly.
Brake Adjustment – It’s the Law
Federal and provincial laws require that manual and automatic slack adjusters be checked daily, during the pre–trip inspection. It is up to you, the professional driver, to ensure your vehicle has safe, correctly adjusted brakes. You the driver, can be fined if the brakes on the vehicle you are driving are found to be out of adjustment.
You’re also required by law to check your brakes before driving down steep grades that are posted with regulatory signs.
You can’t always crawl underneath your vehicle to measure air brake chamber pushrod travel, but there are devices available to help you visually check for brake adjustment.
S–Cam Brake–Release
S-cam brake–applied.

The most common type of air brake chamber used on trucks and trailers is the Type 30. These chambers have a maximum available stroke of 2M inches. A long stroke Type 30 is designated Type 30LS, and has a maximum available stroke of three inches.
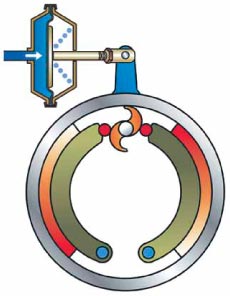
In this diagram, the brakes have been applied and the brake linings have contacted the brake drum. The brake chamber has stroked less than M of its maximum stroke, indicating that the brake is in correct adjustment.
Each brake on an axle should be adjusted to have a similar amount of pushrod travel—that is, the pushrod travel of the left brake should be similar to the pushrod travel of the right brake on the axle.
Checking and Adjusting S–Cam Brakes–Manual Slack Adjusters
S–cam brake–incorrectly adjusted and hot brake drum.
This brake chamber pushrod has excessive travel, but may work as long as the brake drum is cool. But it won’t stay cool for long!
Note that the brake chamber has stroked more than ½ of its maximum, which means that this air brake chamber pushrod has excessive travel and the brakes are in need of adjustment.
When the brake drum is cool and with normal brake application pressure, the brake will seem to be effective, so it is easy to be lulled into a false sense of security.
Air brake equipped vehicles rarely “lose” their brakes. Rather, brake failure occurs because the driver has failed to check and correctly adjust the brakes.
Cast iron brake drums expand when heated, causing the air chamber to stroke further and further as the temperature rises.
If an unforeseen event required the driver to make a sudden stop, the brake chamber could bottom out, and braking power would be greatly reduced.
On long downgrades, the expansion of hot brake drums can cause a total loss of braking and result in a runaway.
Even incorrectly adjusted brakes may seem to work when brakes are lightly applied.
This could result in brake fade under moderate to heavy braking, or on a downhill.
S–Cam Brake–Incorrectly Adjusted and Cold Brake Drum
Drivers seldom have the luxury of having the use of a pit and hydraulic jacks so that brake adjustment can be done with wheels off the ground. However, brakes can still be adjusted very accurately with the wheels on the ground using one of the following methods. Be sure that the vehicle is safely parked with the wheels blocked. The air system should be at full pressure and the spring parking brakes released. Turn the engine off so that you can listen for air leaks. There are two methods of checking for correct adjustment, but the measurements that indicate the need for adjustment are different. Pry Method of Free Stroke Measurement

You will need:
- A marker to measure pushrod travel
- Sturdy clothing suitable for crawling under the vehicle
- A flashlight
You should also wear eye protection and a bump cap. To begin, make sure system air pressure is at least 90–100 psi and all parking brakes are released.
- Make a mark on the pushrod where it exits the brake chamber.
- Note: It is sometimes difficult to mark the pushrod at this location. Alternatively, mark the center of the clevis pin on the slack adjuster arm.
- Pull the pushrod out from the brake chamber, using a tool for leverage.
- Measure the distance between the chalk mark and the face of the brake chamber ½ to ¾ of an inch of free stroke is a good range for a type 30 standard stroke brake chamber. If this distance is more than ¾ of an inch, the brakes need adjustment.
Applied Stroke Method (service brake application)
The applied stroke (brake application) method requires two people—one to apply the brakes and one to measure travel.
If you have a device to apply and hold the service brakes on, you can use the brake application method without needing another person.
Checking the pushrod stroke by applying the brakes.

Brake Adjustment Indicators
New air brake chamber pushrods have a marking (usually red) to indicate when brake adjustment must be done immediately. If the pushrod travel becomes excessive, the marking will show.
Don’t wait until the red marking is exposed before adjusting the brakes.
If the red marking on the pushrod (at the chamber face) is visible, it indicates that the brake is dangerously out of adjustment and it needs immediate attention.

The applied stroke method is the preferred method and is also a method recommended by commercial fleet maintenance supervisors.
- With the brakes released, make a mark where the pushrod exits the brake chamber.
- With the engine off, make a series of brake applications to reduce the reservoir pressure to between 90 to 100 psi.
- Apply and hold a full brake application (90 to 100 psi).
- Measure the distance between the mark and the face of the brake chamber. The difference between measurements is called the chamber applied stroke.
While checking air brakes look for other brake component wear and excessive play including:
- S–cam bushing wear
- S–cam spline wear
- Slack adjuster play (worn gear)
- Clevis pin wear
Brake Adjustment–Manual Slack Adjuster

With a typical Type 30 standard stroke brake chamber, you must adjust the brakes if pushrod travel is:
- more than ¾ of an inch using the pry method of free stroke measurement, or
- more than 1-½ inches using the brake application—applied stroke measurement method.
Note that these are maximum measurements. You should adjust the brakes if your measurements approach these limits.

Most manual slack adjusters have a spring–loaded locking sleeve that must be pressed in and held so the adjusting bolt can be turned.
Depending upon the orientation of the slack adjuster, the correct direction to turn the adjusting bolt may be clockwise or counterclockwise. Watch to ensure that you are tightening and not loosening the slack adjustment.
With a wrench of the proper size, usually a 9/!^ inch, depress the locking sleeve and turn the adjusting bolt while watching the end of the camshaft. The camshaft will rotate slightly as the bolt is being turned. If you are turning in the right direction, the cam will rotate in the same direction that it would if the brakes were being applied, as shown by the arrow on the cam end in the diagram below.
The push rod and the slack adjuster arm should never move away from the brake chamber while turning the adjusting bolt.
If when turning the adjusting bolt, the slack adjuster is pulling the pushrod out of the chamber, stop. The adjusting bolt is being turned in the wrong direction.
Once the proper direction is established, continue turning until solid resistance is met. This indicates that the brake linings have contacted the brake drum.
If the brake has no dust shields, or if you can see the brake shoes and linings through an inspection slot, you can visually verify that the linings have contacted the drum.
Backing off the adjusting bolt about 1 ⁄ 3 of a turn should establish correct running clearance between the lining and drum. Be sure the locking sleeve re–engages the bolt so that the adjustment will not back off.
It is common, especially on tandem axle units, for the adjusting bolts on one axle to adjust in one direction, while the other axle requires an opposite turn. It is not uncommon to find that the brakes on one or the other axle have been mistakenly backed off, creating a serious safety hazard.
After adjusting, verify that there is sufficient clearance by again pulling or prying on the slack adjuster arm, and re–measuring the free stroke, remember that ½ inch is ideal.
Adjusting S–Cam Brakes with Automatic Slack Adjusters—Why—When—How
Automatic slack adjusters are entirely different than the manual types.
Once properly installed, automatic slack adjusters should not need manual adjustment. If an automatic slack adjuster is found to stroke beyond the maximum allowed, this usually indicates that there are brake problems that need to be repaired by qualified brake service personnel.
Automatic slack adjusters still need to be regularly checked to ensure that correct adjustment is being maintained.
Pushrod strokes with automatic slack adjusters are usually slightly longer than with well–adjusted manual slack adjusters. While a manual adjustment may temporarily shorten the stroke, the automatic slack will soon re–set to its designed stroke.
Manufacturers recommend that automatic slack adjusters be checked by a mechanic at each chassis lubrication interval, or from 40,000 to 80,000 km.
However, the National Safety Code of Canada, as well as federal and state laws in the U.S. require a daily check of brake adjustment as part of a pre-trip inspection. Also, in certain mountainous areas of North America, trucks are required to stop and check brakes before proceeding down long grades. The checking is required regardless of whether manual or automatic slack adjusters are used.
Prior to manually checking slack adjuster stroke, ensure tractor spring parking brake control valve and trailer supply valve are open. Ensure reservoir air pressure is above 90 psi and make a full brake application and release. Repeat this process 6 times—these brake applications will be adequate to cause an automatic slack adjuster to adjust. A light brake application will not cause the adjustment.
If after making 6 full brake applications with reservoir pressure above 90 psi, a pushrod stroke is excessive, the automatic slack adjuster has either failed, been incorrectly installed, or there is a problem within the foundation brake. Manual adjustment at this time is only a stop–gap measure so the vehicle can be driven to a service depot for inspection and possible replacement.
Most manufacturers of automatic slack adjusters specify that pushrod stroke be checked by making a 90 to 100 psi application. If you have no application pressure gauge, turn the engine off and pump the reservoir pressure down to between 90 and 100 psi–then make a full application.
Automatic slack adjusters should only be adjusted or repaired by a qualified mechanic except in an emergency. Follow the manufacturer’s instructions in carrying our any adjustment.
Emergency Manual Brake Adjustment—Automatic Slack Adjusters
THESE ARE EMERGENCY PROCEDURES ONLY. A REPAIR OR REPLACEMENT MUST BE MADE AS SOON AS POSSIBLE.
Be sure that the vehicle is safely parked with the wheels blocked. The air system should be at full pressure and the spring parking brakes released.
With a typical Type 30 standard stroke brake chamber, you must adjust the brakes if pushrod measurements are:
- more than two inches using the brake application—applied stroke method.
Four types of automatic slack adjusters
Note that these are maximum measurements. You should adjust the brakes if your measurements approach these limits.
If you make an emergency adjustment of an automatic slack adjuster, be sure to record it on your daily post–trip inspection report.
It is strongly recommended that you obtain the service data books for the make of automatic slack adjusters that you are using. They contain all the information needed to keep them operating properly, including lubrication requirements, initial setup, inspection and testing. They are available where truck parts are sold.
Slack Adjusters with Hexagonal Adjusting Bolts
If the slack adjuster has a hexagonal (six-sided) adjusting bolt, the brakes may be set up by turning the adjusting bolt in a clockwise direction until the lining contacts the drum. Backing off the adjusting bolt by ½ a turn should restore running clearance. Backing off may take considerable force and may be accompanied by a ratcheting sound and feel. This is normal.
These two types of automatic slack adjusters both have hexagonal adjusting bolts.
Slack Adjusters with Square Adjusting Bolts
If the slack adjuster has a square adjusting bolt located at the bottom end of the body, do not attempt adjusting until a spring–loaded pawl that meshes with internal teeth is disengaged. These units have a ¾ inch hexagonal (hex) cap located on the slack adjuster body. Some of these hex caps are equipped with a round “button” that can be pried up approximately 1 ⁄ 32 of an inch and held, using a screwdriver. On units not equipped with the button, the hex cap, spring and pawl must be removed. With the spring and pawl disengaged, an adjustment can be made.
These brakes must be set up with a counter–clockwise turn until the lining contacts the drum. Turning the adjusting bolt ½ a turn clockwise will restore running clearance. Release the button or re–install the spring and pawl if they were removed. This type of slack adjuster has a square adjusting bolt.
Disc Brake Adjustment
There are a number of makes and models of air disc brakes, each with a different adjustment procedure. It is therefore recommended that you consult the manufacturer’s manual for adjustment or service.
Wedge Brake Adjustment
Manual adjusters:
- Hoist or jack wheels off the ground.
- Remove dust cover from adjusting slots at two places on each brake. On twin chamber units the adjusting slots are in the backing plate below the forward chamber and above the rear chamber. If star wheel adjusting bolts are not found at these positions, the brake has been assembled on the wrong side of the vehicle. The single chamber units have adjusting slots in the backing plate on each side of the chamber.
- Adjusting bolts have right–hand threads. Turning the wheel by hand, use an adjusting spoon to turn the star wheel until the shoe develops a heavy drag on the drum. Then back off the bolt to a very light drag on the drum.
- Repeat for the other shoe on that brake assembly.
- Replace the dust covers in the adjusting slots.
- Repeat the above steps on the other brake assemblies.
There is no reliable substitute for physically checking brake adjustment.
After a Brake Adjustment
At the first stop after adjusting the brakes, check each brake drum or rotor for temperature. An extra hot brake drum indicates that you have over adjusted it.
Only when all brakes are properly adjusted will the system be able to absorb the required amount of energy to bring the loaded vehicle to a safe stop under extreme conditions. Remember that poorly adjusted brakes may appear to be working at slow speeds on light air application. The only way to be sure your vehicle brakes are properly adjusted is to physically check the push rod travel at each wheel.
In-Service Checks
In some areas signs are posted in advance of steep or long downgrades. These signs indicate that the driver must stop the vehicle in the pullout area and inspect the braking system before proceeding. Check that:
- the compressor is maintaining full reservoir air pressure;
- push rod travel is within limitations on all chambers;
- there are no air leaks;
- the glad hands and the lines are secure;
- the drums, bearings and tires are not overheating;
- the trailer supply valve is operating properly.
This should be used as an in–service check only and not mistaken as a daily pre–trip air brake inspection.
The driver must be aware of the condition of the vehicle’s braking system at all times. This can be done by:
- watching the pressure gauges;
- hearing the warning signals; and
- feeling the braking response of the vehicle.
By this method of observation, the driver should be able to notice any defects developing in the braking system and be aware that service or adjustment is required.
Maintenance and Servicing of the Air Brake System
Ensuring that the vehicle is in proper condition to drive is the responsibility of everyone involved.
Preventive maintenance checks are designed to prevent mechanical failures that could result from neglect. These checks cut repair costs by detecting minor mechanical defects which would otherwise develop into major breakdowns.
Preventive maintenance may be assigned to a maintenance crew or to the driver. However the driver must ensure that the braking system is in safe operating condition before the vehicle moves.
Click Below for More Information
Air Brake Adjustment Myths
There is some misinformation about air brakes that you may hear. Most of this is not critical, but the following three myths could be dangerous, if believed.
Myth #1: Air Brake adjustment can be checked from the cab by making a full brake application and checking for an initial pressure drop of between 8–12 psi. The assumption is that as the brake chambers stroke further and further, that more air volume will be required, and this should show up on the reservoir gauges.
Fact #1: Modern trucks have very large air reservoirs, and even if all the brakes had excess pushrod travel, the pressure drop would not reach the 8–12 psi range. Also, most truck reservoir gauges do not have markings fine enough to accurately estimate such pressure changes.
Myth #2: With the brakes applied, a 90-degree angle between the centre of the slack adjuster arm and the chamber pushrod is a good indication that the brake is in correct adjustment.
Fact #2: The 90-degree angle is more dependent on the length of the chamber pushrod than on brake adjustment. Also, to prevent interference between the slack adjuster and suspension parts, some manufacturers will vary the angle up to plus or minus 10 degrees.
Myth #3: A clockwise turn of the adjusting bolt on a manual slack adjuster will set up the brakes.
Fact #3: Depending on the orientation of the slack adjuster on the brake assembly, the correct direction to set up the brakes may be clockwise, or counter-clockwise. On vehicles with tandem axles, it is common to find that one axle sets up with a clockwise turn, while the other requires a reverse direction.
Section Summary
- Why is it so critical to check slack adjustment?
- Who is ultimately responsible for the brakes on a vehicle?
- Who will be fined for operating a vehicle with brakes improperly adjusted?
- What are the dangers of operating a vehicle where the pushrod travel is barely within tolerance when the brake drums are cold?
- What items should you carry to measure and adjust slack adjusters?
- What is the first thing you should do when preparing to measure slack adjustment?
- How much pressure should you apply to the foot valve when measuring slack adjustment using the applied stroke method?
- How do you know you are turning the adjusting bolt in the correct direction when adjusting a slack adjuster?
- What is an advantage of automatic slack adjusters?
PALMER DIFFERENCE
Your Quality Equipment Partner
You run your business, we provide the equipment. It’s a partnership that works.
Additional transportation capacity is a strategic business asset, but it doesn’t have to drain your financial resources. Palmer offers flexible leasing terms that allow you to manage cash flow and position your company to take advantage of changes in your business. Unlike banks or other finance companies, we understand trailers and storage containers and have the capacity ready to fully service your equipment needs.
Palmer will provide you with consistent quality and superior service, on-demand. Palmer equipment is maintained by our experienced team to meet our stringent, 80-point inspection. You can be confident our equipment is ready when needed.
Palmer offers affordable, professional delivery and pickup, saving you the expense of transportation to and from your location.
Your Qualified Team
What truly sets us apart is the total experience – the way we put an entire company, not just a fleet of equipment, at your command. Palmer hires the mechanics, maintains the fleet, attends to the logistics, and ensures quality. To oversee your needs, a dedicated team works for you to assure our services are executed with precision.
Flexible Palmer Leasing is privately-owned and operated. We are not encumbered by corporate bureaucracy, allowing us to better serve our customers.
Responsive With credit decisions within one business day, you have the equipment you need quickly.
Personal Experienced leasing consultants will help you obtain the right equipment for your needs.
A Good Partner Palmer functions as a partner and investor in your business, providing you with the flexibility of allowing you to optimize cash flow, better serve your customers, and focus on the growth of your business.
Knowledgeable Sales, service, and support personnel have many years of experience and training.
Ready The Palmer fleet is one of the strongest and most varied in the industry; it is composed of equipment from the industry’s leading manufacturers and is large enough to support your unique needs.
You run your business, and we provide the equipment. It’s a partnership that has worked since 1965.
Customer Forms
- Credit Application
- Credit Card Agreement
- Road Insurance Requirements
- Storage Insurance Requirements
- Lease Agreement
- Personal Guarantee
Trailer Info
Maintenance
Missing Equipment
Manufacturer Information
Emergency Repair Service
× You are using an outdated browser. Please upgrade your browser to improve your experience.
Shopping Cart
Your cart is currently empty., meritor m820625 simplecheck air brake stroke indicator tool, 5/8" pushrods, 1-3/4" od, availability, product details.
Cross References: M820625, 650-M820625 A cross reference listing means that this item should be a suitable replacement for the part numbers listed. You should check the description to be sure it will work in your application.

Meritor M820750 SimpleCheck Air Brake Stroke Indicator Tool, 3/4" Pushrods, 1-3/4" OD
Part# 650-M820750
$1.66 USD Not Yet Rated | Write the First Review
Meritor M810500 SimpleCheck Stroke Indicator, 1/2" Pushrods, 1-3/8" OD
Part# 650-M810500
$1.70 USD Not Yet Rated | Write the First Review
Meritor M810625 SimpleCheck Stroke Indicator, 5/8" Pushrods, 1-3/8" OD
Part# 650-M810625
Be the first to rate this item!
Write Review
Copyright © 2024 AnythingTruck.com.

- Jun 14, 2021
Air Brake Pushrod Stroke - Why its so Important?
Updated: Oct 11, 2022
The brake system on a commercial motor vehicle must work well every time, under all conditions. If not, the driver’s life and the lives of others are at risk.
To effectively stop in every braking situation, all components in the air brake system, including the foundation brakes, must be properly installed, adjusted and maintained by qualified technicians. Stroke limits specified by Canadian and U.S. regulations help maintenance technicians and enforcement personnel inspect and identify brakes that may not be properly adjusting.
During day-to-day driving, a driver cannot tell how well the brakes will work during an extreme braking maneuver. The most effective way to confirm that S-cam drum brakes are within regulatory limits is to measure pushrod stroke. Pushrod stroke is the length in inches or millimeters that the pushrod travels when the brake is fully applied. If the pushrod stroke is beyond the limit in the regulation, the foundation brake may no longer be able to provide full braking force and the brake may need servicing.
Brake system violations represent the most common reason commercial motor vehicles are placed out of service during roadside inspections. When pushrod stroke exceeds the regulatory limit, a violation exists and something may be wrong in the foundation brake system or with the slack adjuster.
By following manufacturers’ recommended foundation brake maintenance intervals (for lubrication, lining replacement, wear tolerances, etc.), regularly measuring the pushrod stroke and proactively addressing issues immediately, crash risk can be mitigated, safety ratings may improve, and the chances of a violation or out-of-service order can be reduced.

Keeping a brake chamber pushrod within regulatory stroke limits ensures there is sufficient pushrod travel to apply full force to the foundation brake under all operating conditions. The limits are based on the size of the brake chamber and whether the chamber is a standard or long-stroke design. See Clamp Type - Air Brake Adjustment Limit Chart.
Pushrod stroke that exceeds regulatory limits not only violates federal, state, provincial or territorial regulations but, more importantly, results in a decline in the braking force – eventually to zero – provided by the foundation brake, which will increase the distance it takes to stop the vehicle.
Vehicles manufactured in after Oct. 20, 1994 must be equipped with self-adjusting brake adjusters (SABAs) to automatically account for normal brake system wear. Manual brake adjusters are only permitted on legacy vehicles manufactured prior to the dates above and must be regularly adjusted by hand.
The use of SABAs has helped to significantly reduce the rate of out-of- service brake violations. However, even with properly working SABAs, abnormal or excessive wear or broken components can result in excessive pushrod stroke and must be properly serviced.
How to Correctly Measure the Brake Chamber Stroke:
To measure chamber pushrod stroke, you will need a ruler, chalk, flashlight, eye protection, pencil and paper. You will also need another person to apply the service brakes. The procedure is as follows:
Step One – Ensure the vehicle is in a safe location and make sure the wheels are properly chocked to prevent rolling. Release the spring brakes. Confirm your dash gauge indicates 90 to 100 PSI supply pressure in the air brake system reservoirs. Then, shut off the engine. Note: Supply reservoir pressure exceeding 110 PSI will result in incorrect pushrod stroke assessments.
Step Two – Visually inspect each brake and confirm it is in the normal released position with nothing wrong or out of place. Mark each pushrod to establish a reference starting location. This should be level with where the pushrod exits the brake chamber or the chamber mounting bracket. Note where the pushrod mark started out and where moves to with brake application, then measure the difference in the next step. See Measuring Pushrod Travel.

Step Three – Have the other person press and hold the service brakes (pushing the brake pedal all the way down until it stops) while you measure and record the distance each pushrod mark moved (or “stroked”).
Note: It is normal for pressure to drop slightly as brakes are applied. If multiple brake applications cause the pressure to drop below 90 PSI, pause the procedure to rebuild reservoir pressure to 90 to 100 PSI, then resume with the engine off.
Step Four – Compare your recorded pushrod stroke values with the stroke limits in the regulation for your brake chambers. See Clamp Type - Air Brake Adjustment Limit Chart .
If any chamber stroke measurement is near, at or beyond the prescribed regulatory stroke limit for your chamber type or size, the foundation brake, brake chamber, SABA, drum and wheel-end need to be inspected in more detail and serviced as soon as possible.
If any pushrod stroke measurement exceeds the prescribed stroke limit, a violation exists and braking force is greatly reduced.
Important Information and Facts Regarding Self-Adjusting Brake Adjusters
Self-adjusting brake adjusters – SABAs should not be manually adjusted; they will do so automatically. If a chamber with a SABA has excessive stroke, there is a problem with the foundation brake, the drum, the SABA itself or other components. The entire wheel end (chamber, SABA, drum, hub and other hardware) should be inspected and serviced by an authorized brake technician as soon as possible.
A manual readjustment may temporarily improve the stroke length, but it can cause damage and does not fix the underlying problem. The stroke violation will return within a few brake applications and, most importantly, stopping ability may be significantly impaired.
When SABAs exceed the regulation limit, consider the following before adjusting the brakes:
Drivers may be legally prohibited from adjusting SABAs in some jurisdictions.
The motor carrier may prohibit the driver from adjusting SABAs.
Do not readjust a SABA unless you have been specially trained to do so.
Manually adjusting a SABA improperly can damage the adjuster. The manufacturer’s instructions must be precisely followed.
The brake chamber will return to the excessive stroke condition until the cause of the problem is repaired. Excessive stroke can return quickly, in just a few brake applications.
If the driver readjusts the brake chamber stroke, he or she must continue to monitor the brake chamber stroke and report any excessive stroke problems to the motor carrier or service provider.
Be sure that any technician hired to correct an excessive brake chamber stroke is qualified and will fix the underlying cause.
If a brake chamber with SABAs exhibits excessive stroke, some of the contributing causes could include worn or seized clevis pin connections, worn S-cam bushings, cracked chamber bracket or cam tube welds, worn rollers, cracked drums, worn linings, worn drums and/or loose mounting hardware. A trained brake technician should diagnose and correct the underlying problem(s).
Charting and Tracking Chamber Stoke Travel in the Vehicle Maintenance Record
Tracking and maintaining a record of pushrod travel will help assist the fleet management in identifying brake wear periods for individual vehicles or specific routes which may cause additional brake wear.
Many fleets have found success in preventing violations by tracking brake chamber stroke measurements at each wheel as part of their maintenance programs. This involves recording pushrod stroke each time it is measured. See Stroke Travel Chart
For example, consider a truck-tractor with Type 24L chambers on the steer axle and Type 30LS on the drive axles. Stroke limits in the regulation for Type 24L and Type 30LS are 2 inches and 2 1/2 inches, respectively.
The table below shows pushrod stroke measurements recorded on three occasions. Note the circled entries show one brake at the regulatory limit (it will need service soon) and another exceeding the regulatory limit (it is a violation and must be serviced). This table can be expanded to account for all axles in a vehicle or combination.

Make sure to check out our online DOT Training, DOT University ! We currently are offering Reasonable Suspicion for Supervisors , Cargo Securement and Defensive Driving . In the coming months we plan on releasing Pre/Post Trip Inspection, Designated Employer Representative, and Appendix A.
Until then , check out our other blogs or follow us on Facebook , Twitter , and Instagram to be the first to know when new classes are made available or for other updates like this! You can also opt-in to our newsletter for exclusive offers, regulation changes, and industry news!
Stay Off The Radar!
#brakes #airbrakes #tractortrailer #FRCS #Compliance #DOT
Recent Posts
Getting zero violations during a roadside inspection
Securement Devices and Their Limits
10 Safety Tips for Commercial Drivers
- New Drivers - 1st License
- Defensive Driving
- CDL Practice Tests
- Air Brakes Courses—CDL & RV
- Log Books - US & Canada
- CDL Pre-Trip
- Learner's Permit
- Motorcycles
- Newly Licensed Driver
- Driving Test SHORTS
- Smarter Car Care
- SHORT Driving Tips
- Winter Driving
- Crash Analysis
- Air Brake Valves
- United States
- CDL Beginner
- CDL Turning
- CDL Pre Trip Inspection
- CDL Coupling
- Driving Instructors
- Pass CDL Air Brakes - Free
- Can't Log In
- Live Q & A
- Expert Witness
- The Founder
- 100K Campaign
- Smart Driver Success Stories
- Funny Driving Memes
Cannot find your purchased courses? Click here to Login!
- air brakes course
- Pass CDL License
- CDL Air Brakes
For truck or bus driver inspection of air brakes is 'MUST KNOW'!
How to Do the CDL Air Brake Pre-Trip
https://youtu.be/rMZwffPGAiQ
Closed Caption
Introduction.
Hi there smart drivers, Rick Smart Drive Test talking to you today about the airbrakes and the pre-trip inspection that you need to do as part of your CDL license.
For those of you in the United States, the CDL license--the commercial driver's license--for those of you working towards becoming a truck or bus driver.
If you're operating a vehicle that has air brakes you're going have to be knowledgeable air brakes.
To do the CDL pre-trip inspection you must inspect the air brake components as part and parcel of your CDL license.
Now before we get started here I would like to thank Inland Kenworth here in Vernon, British Columbia, Canada for providing equipment and making this video possible.
Now for those of you in Canada, the airbrake pre-trip inspection is going to be part of your airbrake endorsement and that's going to be a separate requirement for getting your CDL license - your commercial driver's license.
Now quickly, safety first!
Make sure you chock the wheels, pump the air pressure up over 90 pounds per square inch, in order to be able to check the air brake for adjustment, and then release the parking brakes.
And make sure that you have the required amount of air to do the outside inspection of the components.
And your mantra for the outside components are: “secure, not damaged, not leaking."
And to check the air brakes, you're going to do the pry bar (free-stroke) method .
And this for the most part is the way to check air brakes.
There are some jurisdictions that will get you to do the applied stroke method.
There's another video here on the channel that will explain both the pry bar method and the applied stroke method.
After you do all the checks outside—lines, hoses, valves--check all the brakes for adjustment; you’re going to go in the cab, and there's five check in the cab.
You're gonna check the governor, the low-air warning ensure that the spring brakes apply between 20 and 45psi.
You're going to check the compressor that it builds with set volume of air in a prescribed amount of time.
And then finally you’re to do a leak test.
And the very last test is a tug test on the parking brake and do a response test on the service brakes.
We are going to go over all of that today in more detail, so stick around we'll be right back with that information
[OPENING CREDITS & MUSIC]

Rick with Smart Drive Test talking to you today about the airbrake pre-trip and what you need to do for the purposes of an airbrake endorsement.
Essentially what you need to do is check the components and what you're going to say is: “secure, not damaged, not leaking.” because the components have air in them.
And the first step that you do for the purposes of your pre-trip inspection is chock the wheels, release the parking brakes and ensure that you have over 90 pounds of pressure, because you need to check pushrod travel adjustment on the brakes to ensure that they're in adjustment for the purposes of a pre-trip inspection.
So you have to release the parking brake and make sure that you have over 90 pounds of pressure in the system.
And for the pre-trip inspection for your air brakes you have to test the air tanks.
Essentially the air tanks on this truck are underneath the step, so these air tanks are up underneath the steps here.
Often times, the air tanks will be up underneath the frame, and other places on the vehicle.
For a pre-trip inspection of air brakes on an older model that doesn't have an ADIS (Air Dryer Integrated System) as we said this vehicle has an ADIS system so it only has a primary and a secondary tank - it doesn't have a wet tank.
The older models will have a wet tank, and as part of your pre-trip inspection, the first step is to drain the wet tank.
And the way that you find the wet tank on an older vehicle is you go in the cab take note of what the pressure is on the two pressure gauges - because you only have pressure gauges on the primary and secondary tank.
You don’t have a pressure gauge on the wet tank.
So you take note of what the pressure is, go outside and start draining tanks.
The tank that you drain that doesn't drop the needles on the dash is your wet tank.
Checking the Primary & Secondary Sub-Systems
Drain that tank completely.
And the reason you're draining the wet tank completely is to determine if the one-way check valves are working at the entrance to the primary and secondary tanks.
After you drain the wet tank completely, you go in and see if the needles have dropped; if they haven't dropped, your one-way check valves are working.
The one-way check valves are primarily responsible for dividing the system into two independent subsystems - the primary and secondary subsystems.
So if one system fails, the other will continue to work normally, so long as the compressor continues to work.
So you have to drain the wet tank on older systems to check the one-way check valves and ensure that your two independent subsystems are working.
Now to check the air tanks on this system, the ADIS system, you just have a primary and secondary tank and these are “secure, not damaged, not leaking.”
And you're listening for audible air leaks and making sure that the drain valves are working.
[RELEASING AIR FROM THE TANK].
You can see that there isn't any moisture coming out of there or any other contaminants.
Air Dryers are Really Good
Actually, filter technology is really good on these newer units and it's improved vastly in the last decade or so.
And so there's very little contaminants.
As well as the air dryer is incredibly effective at ridding the air of moisture and other contaminants.
So those are the air tanks that you have to check and on most newer vehicles you're going to have an ADIS system .
Air Compressors Are Parasitic

An air brake air compressor is air cooled." width="500" height="375" style="margin: 10px auto; border: 1px solid #000000; display: block;" srcset="/images/ochri/098ec80eb5c023eba1def9bc8f5123d3-500px.jpg 500w, /images/ochri/098ec80eb5c023eba1def9bc8f5123d3-480px.jpg 480w" sizes="(min-width: 1920px) 500px, (min-width: 1366px) 500px, (min-width: 1200px) 500px, (min-width: 992px) 500px, (min-width: 768px) 500px, (min-width: 575px) 500px, (min-width: 480px) 480px" > The air compressor is secure, not damaged, not leaking.
It's bolted to the side of the engine.
Nothing flew up and hit it and it's not leaking because there's oil inside.
It uses the engine lubrication system to lubricate the air compressor.
And so there is any oil leaking out of it.
And it's in behind here on this Cummins.
It's actually kind of hard to find, but just point to it, light touch, “Secure, not damaged, not leaking.
The lines, hoses, and valves which are up here on the firewall “secure, not damaged, not leaking.”
You can listen for air leaks, and you don't hear anything.
All the lines are secure and none of them are hanging down.
The line out to the brake chamber is not damaged, not leaking.
ABS (Anit-Lock Braking Systems)
You can see that there's a wire on this one, which means that the brakes have ABS (Anti-Lock Braking System) on them.
You will also be able to tell that from the dash, because you'll turn the key to the ON position, wait momentarily and the ABS light will come on and then go out.
The light indicates that the ABS are working normally.
Determining If The Brakes Are in Adjustment
For the purposes of this pre-trip inspection test we're going to use the pry bar method.
I'll put a video up here for you on how to test adjustment on brakes using the free stroke method and the applied stroke method.
We're going to use the pry bar method.
Essentially just put the pry bar in here and half to three-quarters of the width of your thumbnail in terms of pry bar for the slack adjuster slack adjusters.
All the components of the brakes in the inside of the hub is all secure not damaged.
That's essentially all that you do for the purposes of checking this side of the engine.
It's just the air brake components.
We're going to go around to the other side of the motor.
Passenger Side
So on the passenger side of the vehicle there isn't very much on this side of the vehicle because there aren't any air brake components on this side of the vehicle.
So essentially you're checking is the line out to the brake chamber.
The brake chamber is secure, not damage - the wire for the ABS is all of that check.
The push rod travels is within half to three quarters of an inch on the pushrod travel for the free stroke method.
And checking the inside of the hub, there's nothing on the inside of the hub – it is secure and everything is not damaged.
And the lines of wires for the ABS valve, which you can see back up in here is secure, not damaged.
All the wires, lines, and hoses are good.
Underneath the Vehicle
So we’re underneath the truck and we're doing the pry bar method to check pushrod travel to ensure that it's within limits.
So we pull the pushrod out, and we can see the yellow marker is coming out - essentially not even the width of my thumbnail, so it's within half to three-quarters of an inch - well within the inch in the state of California .
And you're going to check the brake chambers because you have the brakes released and the wheels chocked.
And there's air inside the brake chambers and you're listening for air leaks.
I don't hear any air leaks - the lines, and hoses are all secure, not damaged, and not in any danger being ripped off or being caught in the moving parts.
And we can see the valves are all secure, and not damaged as well.
So essentially, just put your pry bar on the pushrod and determine that it doesn’t extend more than half to three quarters out of the brake chamber.
As well, to determine adjustment, you're going to do the same on the other three brake chambers underneath the truck.
The Back of the Vehicle from the Top

It's unlikely they're going to because most of the driving schools use a tractor for dual purpose: for Class 1 and Class 3 - in Ontario it’s Class A or Class D.
And if you're doing an airbrake pre-trip inspection you can just stand up here on the deck and just look and you can see the brake chambers, and you can see all the lines and valves and hoses.
And basically you stand here and then go to the rear of the truck and you inspect the lines, hoses, brake chambers, and valves - all secure, not damaged, and not leaking.
Because of course there's air in the system, the wheels are chocked, and the parking brakes are released.
And if there are any leaks as well when you're up on the deck, you will hear those.
And you can check all the lines and hoses on the back of the cab and check your glad-hand connections as well that they're secure and they're not going to be dragging down.
So that's the final part for the outside air brake pre-trip inspection for the purposes of getting an airbrake endorsement or in British Columbia, a Code 15 or in the United States, air brakes as part of your CDL license.
Airbrake Pre-Trip - In Cab
So after you do everything outside of the vehicle you inspect all the components secure, not damaged, not leaking and determined that everything is safe on the vehicle and not leaking and nothing is damaged then you come into the cab.
And you release the parking brakes.
You've already released, so just check to make sure the brakes are released.
And the vehicle is not moving obviously because you chocked the wheels first - safety first.
Never go under a vehicle that doesn't have wheel chocks in.
And the first thing you're going to do is you’re going to start the engine.
Turn the key to the ON position and as I said before, let the gauges cycle through, wait for the lights on the dash go out and then fire up the truck.
So the truck’s dash lights have gone out, and on all new vehicles you're going to have to push in the clutch to get the engine to start.
The first step you're going to have to make sure that you have over 90 pounds of pressure in the system.
So right now we've got the little under 90 pounds.
So we're just going to throttle up a little bit and let it build up air pressure over 90 pounds.
So essentially for those drivers working in different jurisdictions, the numbers are going to be slightly different.
But essentially for the purposes of a Class-3 (Class D) road test to do an airbrake endorsement, you're going to have certain tests:
1) you got to do the minimum and maximum pressure on the governor ;
2) the low-air warning device - check and make sure it activates.
In this day and age, they're all going to be audible and visual.
In other words you’re going to be able to hear it and you're going to be able to see it;
3) you’re going to check to make sure that the spring brakes activate automatically between 20 and 45psi .
4) And how much pressure that the air compressor can build.
Most of the times it’s 50 to 90 pounds within three minutes.
In other jurisdictions, I know for a fact that it’s 85-100psi in 2 minutes.
Essentially what you have to do with the compressor is determine that it builds a set volume of air in a certain amount of time to determine that it is working.
1b) You’re going to check the maximum setting of the governor, which is the hardest part for most people.
You listen for the air dryer to purge, but the air dryer is not definitive trait that shows you that the system is at maximum pressure.
I hear the air dryer purge, and you check the needles to see that these are between a 100psi a 135psi and these have stopped climbing and therefore you know the system is at maximum pressure.
And therefore the governor has put the compressor into the unload phase or cut out phase.
5) And shut the vehicle and do a leak test.
On a single unit you're allowed to lose three pounds; on a tractor unit, four pounds; and on multiple trailers, six pounds.
So just to reiterate the tests inside the cab on an airbrake system: 1) minimum and maximum on the governor; 2) low-air warning; 3) spring brake supply automatic between 20 and 45;
The compressor is able to build a set volume of air in a certain amount of time;
And a leak test when the system goes to a maximum setting.
Some driving schools, if you're going to a driving school, will have different sequences of how you do the in-cab cab.
Essentially some of them might get you to build up a maximum pressure, but for me it's just up to a hundred, and then pumped down and you can see on this system here there is a lag, and there will be on a lot of systems it is going to have a lag from the time that you fan the brakes down, pump the brakes to exhaust air from the system to the time it shows up on the gauge.
Governor Test - Minimum Setting
Essentially we're at 90 pounds, actually we're a little bit less - it has to be above 80psi.
If the pressure goes below 80 pounds, your test to test the governor's minimum setting and returns the compressors to the load phase or the cut in phase is going to be void - so make sure you don't go below 80psi.
And the needles are rising, therefore I know that the governor has put the compressor back into the load phase or the cut in and phase.
Low-Air Warning Test

The low-air warning activates above 60 pounds per square inch." width="500" height="281" style="margin: 10px auto; border: 1px solid #000000; display: block;" srcset="/images/ochri/7a8e6dd6796b4eb11fdd8d21d8046ef8-500px.jpg 500w, /images/ochri/7a8e6dd6796b4eb11fdd8d21d8046ef8-480px.jpg 480w" sizes="(min-width: 1920px) 500px, (min-width: 1366px) 500px, (min-width: 1200px) 500px, (min-width: 992px) 500px, (min-width: 768px) 500px, (min-width: 575px) 500px, (min-width: 480px) 480px" > The next test is to pump down to 60psi and test the low-air warning.
The low-air warning must activate above 60psi and a lot of vehicle of the low-air warning is going to come on well about 60 psi.
So on this one it came on at about 60psi.
You can hear that it's audible and I can also see that there's a light on the dash telling me that I have low pressure in the system.
Spring Brakes Apply Automatically
Next one I'm going to shut off the motor, otherwise I’m just working against the compressor to try and get the spring brake to work.
So we're going to continue to pump down until the parking brakes apply automatically.
So I have to turn the key on to get the air pressure needles to work.
My needles are between 20 and 45psi and the spring brakes activated automatically.
The air brake system passed the test.
Compressor Test
We're going to do is we're gonna fire the engine back up and at a high idle - a high idle is between 1000 and 1,200.
The compressor has to build 50 to 90psi in 3 minutes.
I start my timer and the ADIS system is going to load one system--the primary and the secondary systems first--and then it will load the other one--so it's the first needle to 50psi, and the second needle to 90psi on the system.
So the first gauge has gone to 90psi, now my other needle has started coming up.
And certainly the low-air warning has gone out above 60psi.
That’s the other things you can indicate on the way up.
It's not a marketable on a road test, but you just want to indicate that the low-air warning has gone out.
And the system has built 50-90psi well within three minutes at a high idle.
When the system gets to 90psi, release the parking brake - release your parking brakes.
You fill the air back up and fill the spring brake chambers for the purposes of your leak test.
Governor Test - Maximum Setting
When the system builds to 90 pounds and you've done your compressor test, release the parking brake and then build to maximum pressure.
So “I hear I, and I see.” I heard the air dryer purge, and I see that the system is between a 100 and 135psi, therefore I know that the air brake system is at maximum pressure and the governor has put the compressor into the unload or cut out pressure.
And I know that it’s maximum pressure because the needles have stopped climbing.
Now I just shut the engine off an do a full service brake application.
I push down on the foot brake as hard as I can or 1 minute – it is the longest one minute of your life.
And in other jurisdictions--in the province of Alberta--I know for a fact they do it for 2 minutes on a leak test.
And you push down on the service brakes --full brake application--otherwise you're not going to be able to know if there are leaks in the system.
And you can roll down your window, listening for air leaks.
And after the initial drop, you're not allowed to lose more than three pounds on a single unit, four pounds on a truck and trailer, and six pounds on a truck with two trailers.
And we can hear that small air leak on this truck that we talked about earlier in other videos.
Essentially it's not losing any air - it's holding at a hundred pounds per square inch.
And you time for one minute, and after one minute you state to the examiner that you did not lose more than three pounds of pressure within one minute.
And that's how you do your in-cab pre-trip inspection.
In-Cab Review
So just quickly review – you’ve got to test the minimum and maximum settings of the governor, that it returns the governor returns the compressor to the load phase or the cut in phase.
And a maximum pressure it returns the compressor to the unload or cut-out phase.
You have to check that the low-air warning that comes on at 60psi or above; that the spring brakes apply between 20 and 45psi when you pump down the air.
And be sure to shut the motor off because you don't want to be fighting the compressor when you're trying to pump down between 20 and 45psi, because the compressor builds a lot of air.
The next test you have to do is the compressor test.
That it's working - that it builds a set volume of air within as prescribed amount of time at high idle.
And different jurisdictions will have different parameters, but the most common test is 50 to 90 pounds per square inch within three minutes.
At maximum system pressure I hear I see.
I hear the air dryer unload and I see the needles have stopped climbing between 100 and 135psi, therefore the system is at maximum pressure and the governor has put the compressor into the unload or cut out phase.
Next you shut the truck off.
Back up there for a second…after you get 90 psi, you can release the parking brakes.
As I said, at maximum pressure, you test the maximum setting of the governor.
Shut the truck off and make a full service brake application: on a single unit you're allowed to lose three pounds in a minute after the initial drop; four pounds on the truck and trailer; and six pounds in the truck with two trailers.
The last part of the pre-trip inspection is going to be a tug test on the parking brakes and a response test on the service brake.
So what you're going to do is apply the parking brakes , get out of the cab and remove your wheel chocks and stow your wheel chocks.
Tug & Response Tests of Spring & Service Brakes
Get back in the truck and start the engine.
Make sure you have more than 90 pounds of pressure and on a single unit you're going to apply the parking brake and put it into a low gear and try to move the vehicle forward.
If it doesn't move the parking brakes are working.
And then you're going to release the parking brake, put it in low gear and roll ahead two or three feet and apply the service brakes.
And it’s a response test because you're testing that the service brakes apply and the service brakes release.
And at that juncture you're done.
You’re going to apply the parking brakes and you're going to fill out your pre-trip inspection form.
So that's the last part of your air brake pre-trip inspection.
Quick review on the air brake inspection for the purposes of a road test to get your CDL license.
You have to do an airbrake pre-trip inspection either as part of your complete pre-trip inspection or you're going to do it independently.
If you're in Canada, you're going to be doing an airbrake endorsement and you have to do a pre-trip inspection independently of your pre-trip inspection.
Now if you're going to a driving school and you're upgrading your license as part of your pre-trip inspection when you do your road test you're gonna do your practical air brake test at that point.
So the first step of the pre-trip inspection is to chock the wheels, make sure you have more than 90 psi in the system, and release the parking brakes.
And when you release the parking brakes, keep your foot over the service brake pedal in case the chocks don't hold.
And then ensure that you have more than 90psi pressure in the system.
You're going to check your air tanks.
If it's an older system, you're going to drain the wet tank and we talked about how to find the wet tank.
You're going to do that to check the one-way check valves and to ensure that the division of the system into two independent subsystem is working properly.
So after you do that, then you're going to go under the hood and check on the driver side.
You're going to check the compressor - most of the time it's found on the driver's side.
Check the governor, the hoses and wires.
Check all of that and make sure it's secure, not damaged, and not leaking.
Check adjustment of the push rod on the front.
You’re going to go to the passenger side - on some trucks the air dryer will be over there as well.
And again, check the adjustment on brake chamber and push rod on that side of the truck.
Then you're going to go around the truck the other side of the truck at the rear of the truck.
Check all lines and hoses on the areas at the back the truck.
And check the adjustment on all of the brake chambers underneath the back.
Now if you're doing the pry bar method, you are simply going to get underneath the truck and pull on the push rod and see if it extends out of the brake chamber the width of your thumbnail.
If it doesn't extend out more than the width of your thumbnail then the brakes are within adjustment.
All the hoses, lines, and wires are secure and not damaged.
Then you're gonna come in the cab and in the cab you have five checks that you have to do for the purposes of the airbrake pre-trip inspection.
You test the governor - the minimum and maximum settings; you test the low-air warning; you ensure that the spring brake apply between 20 and 45 psi.
After you have tested that the spring brakes apply then you're going to do a compressor test.
Check to see if it builds a set volume of air and prescribed amount of time.
Then you're going to build to maximum pressure.
When you finish the compressor test, you're going to push in the parking brakes and build to maximum pressure.
You know it's at maximum pressure because you hear the air dryer purge and you confirm that by looking at the needles and the needle are between a hundred and hundred thirty-five pounds and have stopped climbing.
That's how you know the system is a maximum pressure and the governor has put the compressor into the unload or cut out phase.
And then the last test is your leak test.
And the very last part of your pre-trip inspection is to apply the parking brakes, remove and stow the wheel chocks, and do a tug test on the parking brakes and a response test on the service brake.
So that's the last test of your pre-trip inspection for the air brakes.
And after you finish all that, you have to fill out your pre-trip inspection form because you have to write it down and it's a legal document and you have to prove that you in fact fulfill the requirements of a commercial driver's license.
So that's how you do an airbrake pre-trip inspection.
And again if you have any questions at all, send me an email.
I’ll be happy to help you with the specific numbers, because the specific numbers for the in-cab pre-trip might be a little bit different depending on your jurisdiction.
Question for my smart drivers:
Do you use the primary method or the applied stroke method to check the air brake in your jurisdiction where you live? What is the required method for checking the airbrake adjustment?
Leave a comment down in the comment section there, all that helps out the new drivers working towards getting their CDL license and learning how to drive.
Again I would like to thank Inland Kenworth for providing equipment to make this video possible.
Without the equipment, it's pretty tough to make a video about airbrake pre-trip inspection.
Salutations
Thanks so much for watching.
If you like what you see here share, subscribe, leave a comment down in the comment section.
As well, hit that thumbs up button.
Check out all the video here on the channel if you're working towards the license or starting a career as a truck or bus driver – great information here.
As well, head over website - more great information over there and online courses that you can purchase.
Stick around to the end of the video, funny bits and links to the other videos and to my website.
Thanks again for watching.
Good luck on your road test.
And remember, pick the best answer not necessarily the right answer.
Have a great day.
a little bit different depending on your jurisdiction.
Question for my smart drivers: what is the question for my smart drivers [EXHALING AND PONDERING] what is the questions for my smart drivers?
[CLOSING CREDITS & MUSIC]

How to Adjust a Manual Slack Adjuster - CDL Air Brakes

How to do In-Cab CDL Air Brake Pre Trip Inspection

Testing Tractor Protection Valve & System

Why Air Brakes Won’t Fail
CDL Air Brakes S. 6.2—Combination Vehicles | New York State

CDL Air Brakes S. 5.4 | New York State

How to Determine Air Brake Adjustment | Air Brake Smart

How the Air Dryer Works to Pass CDL Air Brakes Test
How to do a Leak Test for CDL Air Brakes
CDL Air Brakes Section 5.2 and 5.3 | New York State
CDL Air Brakes Section 5.1 | New York State

Chart of Air Brake Adjustment Limits

CDL Air Brake Governor

The Compressor and Build Up Test

Air Brakes Explained Simply

Basic CDL Air Brake Components

Brake Fade | Air Brakes

Downhill on Canada's Coquihalla Highway | Trucking Smart

How to Brake Downhill Safely with a Large Vehicle

Single Unit In-Cab Air Brake Checks—Infograph

CDL Combination Air Brake Pre-Trip—Infograph

Types of Foundation Brakes
Two-way Check Valves
Trailer Air Supply Valve
Trailer Hand Control (Spike)

Tractor Protection Valve
Tractor Protection Valve and System

Tractor Parking Brake Control Valve
Stop Light Switch
Spring Parking Brake (Emergency)
Spring Brake Modulator (Inversion) Valve
Slack Adjuster

Safety Valve
Air Tanks (Reservoirs)

Relay Valve
Relay Emergency Valve

Quick Release Valve

Manual Front Wheel Limiting Valve

Low Air Pressure Warning

Brake Pedal - Foot Valve OR Treadle Valve
Compounding Air Brakes

Caging Bolt
Brake Linings & Drums
Bobtail Proportioning Valve
Automatic Front Wheel Limiting Valve
Air Gauge(s)
Air Brake Chambers

One-Way Check Valves

Air Brake Manual Adjustment – Pry Bar Method
Compressor or Build-up Test (Air Brakes)
Pry Bar - Check Air Brake Adjustment
Applied Stroke - Check Air Brake Adjustment
© Smart Drive Test Inc. 2024.
Contact Us: [email protected]
Get Your CDL Air Brake Checklist

Ontario.ca needs JavaScript to function properly and provide you with a fast, stable experience.
To have a better experience, you need to:
- Go to your browser's settings
- Enable JavaScript
Inspecting Air Brake Adjustment
On this page skip this page navigation.
Proper brake adjustment is important to your safety and that of other road users. Drivers of vehicles with air brakes must inspect brake adjustment regularly using a reliable inspection method. This chapter explains how to carry out such an inspection.
Brake adjustment must be inspected regularly
The pushrod stroke of each brake chamber is critical to the proper function of a brake system. As the brakes wear, brake pushrod stroke increases. Brake wear occurs at varying rates, depending on the type of vehicle and driving conditions. To determine whether brake adjustment is correct, the pushrod stroke must be inspected at least daily. When brake pushrod stroke exceeds the adjustment limit, the brake is out of adjustment.
Brake pushrod stroke must comply with the Ontario Highway Traffic Act and regulations. Each air brake chamber’s pushrod stroke must not exceed the specified adjustment limits.
Since adjustment limits vary depending on the size and type of air brake chamber, you must be able to identify the particular brake chamber in use. Brake chamber size can be determined by measuring the diameter of the clamp used to hold it together or by locating the size markings on the brake chamber.
The most common brake chamber size is 30. However, there are vehicles using both smaller and larger sizes. For example, sizes 16, 20, 24 and 36 brake chambers may be used.
Measuring the diameter of brake chambers requires a special tool. Locating and reading the size markings on a brake chamber may require removing dirt, corrosion and paint from the surfaces.
You are most likely to determine the size of the brake chambers on any vehicle through your employer or the vehicle owner’s manual. This will avoid the need to measure a brake chamber or locate size markings. The type of brake chamber also affects the specified brake adjustment limit, which can vary by 19 millimetres or more between standard and long-stroke brake chambers. Long-stroke brake chambers can be identified by three visible characteristics:
- The air lines attach to a square port in the brake chamber body.
- A trapezoidal tag is placed under the clamp bolt that indicates the brake chamber’s maximum stroke dimension. (Not the brake adjustment limit.)
- Markings are placed on the brake chamber body to indicate that it is a long-stroke brake chamber, and only long-stroke diaphragms are to be used as replacements.
The most visible and permanent of the markings used to identify long-stroke brake chambers are the square ports. Standard brake chambers have round ports.
It is critical to use correct inspection methods to obtain reliable inspection results. The most reliable method for inspecting brake adjustment is to measure the applied pushrod stroke.
Step-by-step procedure for measuring applied pushrod stroke
It is important to note that the body design and suspension of some vehicles may limit safe access to certain brake components unless the vehicle is supported on a hoist or is over a pit or ramp. Also, some brake systems have covers or housings that conceal the brake linkage, making it impossible to inspect brake adjustment using the techniques described here.
- Secure the vehicle with wheel chocks or blocks.
- Ensure air pressure is above 621 kPa (90 psi ) and release the spring brakes.
- Method 1 : Mark the pushrod at the brake chamber or at a suitable fixed reference point. (Use chalk, soapstone, marker or other similar instrument - marks must be narrow and precise.)
- Method 2 : Measure the released position of the pushrod. (Measure and note the distance from a point on the pushrod to a suitable fixed point at the brake chamber. This is measurement number 1.)
- Raise or lower the air pressure by running the engine or pumping the brake pedal until both the primary and secondary air-tank gauges display 621 to 690 kPa (90 to 100 psi ).
- Shut off the engine.
- Press and hold the brake pedal in the fully applied position.
- Method 1 : Measure the distance from the brake chamber or fixed reference point to the mark on the pushrod (See Diagram 11-1).
- Method 2 : Measure the applied position of the pushrod. (Remeasure and note the distance from the previously selected point on the pushrod to the previously selected fixed point at the brake chamber. This is measurement number 2.) Subtract measurement 1 from measurement 2 to calculate the applied pushrod stroke measurement (See Diagram 11-2).
- Determine the number size (such as 16, 20, 24 or 30) and type (such as standard or long-stroke) of the brake chamber.
- Determine the adjustment limit for the brake chamber. (See the chart here )
- Compare the applied pushrod stroke to the applicable adjustment limit and identify any brake that exceeds the adjustment limit as defective.
Note : All drivers are required to demonstrate an applied pushrod-stroke measurement method for inspecting brake adjustment as part of the Ministry of Transportation air brake endorsement practical examination.

Diagram 11-1: Method 1: Measuring pushrod stroke with spring brakes released

Diagram 11-2: Method 2: Measuring pushrod stroke with service brakes applied
Brake stroke indicators
Brake chamber pushrods are generally marked with some type of indicator that becomes visible when pushrod stroke exceeds the adjustment limit. Brake-stroke indicators can also be fitted to the brake linkage, which include external reference points to provide a visual indication of the applied pushrod stroke.
Pushrod-stroke indicators must be correctly installed and maintained, and drivers must be fully trained in the proper use of brake-stroke indicators to ensure reliable brake-adjustment inspection results are obtained.
Automatic slack or brake adjusters
Automatic slack or brake adjusters are used to avoid the need to regularly perform manual brake re-adjustment. When they are properly installed and maintained, automatic slack adjusters are very reliable.
Inspection of brake adjustment must be carried out whether automatic or manual slack adjusters are used.
Re-adjusting brakes
When brakes with manual slack adjusters are out of adjustment, they must be re-adjusted so that the pushrod stroke is less than the adjustment limit. Only certified technicians may repair and perform brake re-adjustments on manual slack adjusters. In Ontario, drivers can become certified to perform brake re-adjustments on manual slack adjusters. Only those who have obtained certification are permitted to perform brake re-adjustments. This certification does not permit you to manually re-adjust automatic slack adjusters.
Automatic slack adjusters, if they are working properly, do not require regular re-adjustment. If periodic re-adjustments are required, it means that the automatic slack adjuster is defective and must be repaired by a certified technician. Only certified technicians are permitted to perform re-adjustments or repairs on automatic slack adjustors. It is dangerous for someone who is not certified to attempt to adjust the automatic slack adjustors. You may unknowingly damage the brake and cause it to malfunction. Check your automatic slack adjusters often to ensure that the adjustments are correct; however, do not attempt to repair them yourself.
Important : The Ontario Highway Traffic Act and regulations prohibit the operation of a vehicle with a brake that is out of adjustment.
Key points to remember
- Measuring applied pushrod stroke is a reliable method for inspecting brake adjustment.
- Inspection of brake adjustment at each wheel should be performed with air pressure between 621 and 690 kPa (90 and 100 psi ), the engine shut off and service brakes fully applied and spring brakes must be released.
- When pushrod stroke exceeds the adjustment limit of the brake chamber the brake is out of adjustment.
- Only qualified individuals may repair or re-adjust brakes.
- Drivers who have a valid Ontario air-brake adjustment certificate are qualified to re-adjust the brakes on vehicles fitted with manual slack adjusters.
- The Ontario Highway Traffic Act and regulations prohibit the operation of a vehicle with a brake that is out of adjustment.
Origin not known. Check the value and select between results suggested.
Destination not known. Check the value and select between results suggested.
You should at least select 1 adult passenger.
Additional Luggage?
Children + -
Please indicate child age.
Each passenger may carry one standard piece of luggage and one small item of hand luggage (for example a handbag or laptop). If you have additional or extra large baggage or sporting equipment, select from the options below:

Please insert the date and time of your flight arrival (not take off), as informed by the airline. The driver will take into account luggage collection and immigration formalities.
Please select hours.
Please select mins.
Please insert the date and time the flight takes off, as informed by the airline. The pick-up time will be calculated automatically taking into account journey time and check-in time at airport.
Moscow Vnukovo Airport Transfers
Need help? Contact us
The driver was most professional and took us straight to where we wanted to go.
Mr P O from South Africa

You’re in Moscow to take in the sights and sounds of Russia’s capital city, but instead, you’re in the arrivals terminal struggling to organise a safe and affordable transfer to your accommodation. This would not happen with Shuttle Direct. Our reputation is built on reliability, affordability, and world-class service. Our team are here to help you start your visit on the right foot. That means a safe, comfortable, and direct transfer from the airport to your destination of choice. We have shared rides, private rides, shuttle buses, and even limited care hire options. Find the right fit for you and experience airport transfers that make travel easy. Get a quote.
Low-Cost Transfers from Moscow Airport
Are you tired of expensive and unreliable taxis? Select one of our transfer packages, and you’ll never pay more than you have to again. Our services are ultra-competitive so that you have more spending power on your trip.
Getting a quote from us is easy. Simply use our website to pick your dates, and you will be offered a wide selection of transportation services. Choose the best fit for your particular needs (and budget) and secure your booking. You could travel in comfort with our chauffeur-driven private transfer or take a shared taxi. We also provide limited vehicle hire for those who want to go it alone, as well as shuttle buses that travel along predefined routes for those who wish to save as much money to spend in Moscow as possible. Whatever transportation you choose, know that our reliability, service and affordability are never compromised. We are here to do everything we can to make your Moscow visit as smooth and hassle-free as possible. This is the Shuttle Direct difference. Book today.
Arriving at Moscow Vnukovo (VKO) Airport
Avoid the typical headaches and hassle when you land by choosing Shuttle Direct. We’ll arrange everything so that your arrival is smooth and hassle-free. You’ll be enjoying Moscow in no time at all.

Private transfer with driver
- Private hire with driver
- Door to Door Service
- Driver meets you personally
- Vehicle exclusively for you
Shared ride Shuttle Service
- Shuttle Bus Service
- Shared ride
- Predefined meeting point
- Shuttle Service or similar
Travel suggestions from Moscow - Vnukovo Airport (VKO)
Explore russia’s capital city.
Moscow is a vibrant mix of old and new: Mother Russia meets Modern Russia. Visitors can enjoy cultural artefacts like the treasures found in the Armoury or the varied delights of the Kremlin Museums. High-brow, low-brow, any-brow will be raised in amazement at one of the performances at the world-renowned Bolshoi Theatre. The six-tier auditorium is the perfect place to take in an evening of dance and music. To really get in touch with the modern Russia, there is a thriving nightlife that has something for everyone. On a warm summer day a trip to the city’s green lung, Gorky Park, is truly essential.
Frequently Asked Questions
How long will my driver wait for me to clear customs? Your driver will wait for you for 60 minutes after you land. If you are held up for whatever reason, your driver won’t just leave you behind. They will contact immigration, customs and the airline to find out where you could possibly be. Your driver will only leave if, after these attempts, there is no sign of your whereabouts. If your arrival is delayed, please contact your supplier on the numbers provided on your voucher. This way we can inform your driver to ensure they are there to pick you up when you finally arrive.
Independent verified customer feedback

ShuttleDirect Moscow - Vnukovo Airport (VKO) Reviews
Shuttle Direct booking service
étant dans une zone sans connexiion => je n'étais pas atteignable, et ne recevais pas de messagerie. Shuttle s'est aperçu du retard de l'avion, le chauffeur était présent, comme convenu. j'ai reçu un sms,, mais n'ai étè connectée que juste a la sortie de l'aèroport,.. précisions donnes sur le sms, contrôle phonique fait par la centrale avec le chauffeur (qui parlait anglais) voiture impeccable, et conduite délicate et confortable dans le traffic , donc,
Transport company service
the booking form is not clear, resulting in having to give flight details that do not exist
prompt and professional service
The driver was waiting right at the door and took us straight tot he car
Puntuación del servicio : muy facil acceso Producto : muy puntuales muy buen coche
Service-Bewertung : DANKE! Produkt : hat alles bestens geklappt - vielen Dank dafür!!!
Service-Bewertung : Ich konnte, da mein Flug ausgefallen war, ohne Umstände den Shuttle Service auf den nächsten Tag verlegen! Ich bin sehr zufrieden!! Produkt : Der Fahrer hat am Flughafen mit einem Schild mit meinem Namen auf mich gewartet. Den vorher gebuchten Kindersitz hatte er auch dabei. Bin skr zufrieden und würde hier sofort wieder buchen.
Easy website to use
Very good and pleasant driver
dificult because the round trip was nt from to the same airport.

Session timed out
Session has timed out, you should fill in the form again and request a new quote.

Planning a trip to Moscow? Our travel guide contains up-to-date, personal information on everything from what to see , to when to visit , where to stay , and what to eat !
- General Information
- What to see
- How to get to Moscow
- Where to stay
- Where to eat
Why visit Moscow?
Majestic churches, impressive historic fortresses, and palatial buildings: Moscow is a fascinating city whose emblematic architecture reflects the turbulent history that has defined Russia throughout the centuries.
The traces of the USSR can be found around every corner of the city , side by side with the iconic relics of Imperial Russia , like the mythical Red Square , the imposing Kremlin , and the beautiful St Basil's Cathedral .
Discover a fascinating world of Cold War bunkers, golden-domed basilicas, world-class art museums, and the legendary "palace of the people," as the Moscow Metro has been nicknamed. Whether you fancy watching a classical Russian ballet at the Bolshoi Theatre , perusing the fine arts at the Pushkin Museum , or marveling at the sheer size of the monuments to the Soviet state's achievements at the All-Russia Exhibition Centre , this travel guide will help you on your way!
Where to start?
If you're going to travel to Moscow and you don't know much about the city yet, the first thing to do is to dive into its legendary history - understanding the past will help you understand the present. Next, check out our practical hints and tips on traveling to the city before discovering which of its most important museums , monuments , and attractions pique your interest.
Looking for a place to stay?
Booking your accommodation in advance is the best way to get great discounts. Our detailed guide on where to stay in Moscow will help you decide which neighborhood you'd like to look for hotels or apartments in, and our hotel search engine will find you the best deals!
Why is our Moscow travel guide the best?
Introducing Moscow is a city guide written by travelers for travelers and contains personalized advice to help you make the most of your trip to the city.
All the information in this guide is valid as of December 2022. If you find any errors or have any comments, please feel free to contact us .

Our travel guides
- top attractions
- and much more
IMAGES
VIDEO
COMMENTS
Slack Adjuster. Slack adjusters have three purposes: 1) To convert the forward linear motion of the push rod into rotary motion of the camshaft. The slack adjuster works on exactly the same principle as a box end wrench on a nut. 2) To act as a lever, thus generating greater….
Brakes should be adjusted so pushrod travel does not exceed the respective stroke limit in the regulation. (2) A drum brake with new linings that have not yet fully seated to the drum has the potential to exceed the stroke limit in the regulation upon a full brake application of 90 to 100 psi (620 to 690 kPa). Drum brakes with new
Most heavy vehicles on the road are equipped with self-adjusting (automatic) brake adjusters (S-ABAs). Trucks and buses manufactured in the United States after Oct. 20, 1994, and in Canada after May 31, 1996, equipped with air brakes must automatically adjust for normal wear in the brake system, thereby helping to maintain proper pushrod stroke.
Driver's should be able to check push rod stroke real easy if "poker chip" style indicators are installed on all the push rods. really no reason for slacks o...
Air Brake adjustment (push rod travel) must be checked as part of the pre-trip air brake inspection (Section 9). On vehicles equipped with hydraulic brakes it is possible to pump the brake pedal to compensate for brakes that are out of adjustment. This is not possible with a vehicle equipped with an air brake system with manual slack adjusters.
6 Pack Adjustment. Pump the system up to maximum pressure and make three hard brake applications. By the time you make three hard brake applications, you are going to be below 90 psi, so pump the system back up to maximum pressure again. And again, make three more full hard brake applications. That's called a six-pack!
push rod travel or adjusted chamber stroke. If push rod travel or adjusted chamber stroke is greater than two-inches (51 mm): Refer to the diagnostics table in this bulletin. If push rod travel or adjusted chamber stroke is less than .88-inches (22 mm): Readjust the brake. Refer to the initial brake adjustment procedure in this bulletin. Figure 1
All commercial vehicle inspectors conducting air brake pushrod stroke measurements to determine compliance with 49 CFR 393.47 are reminded to build the air system pressure to between 90 and 100 pounds per square inch (PSI) (620-690 kPa) prior to the initial brake application. When applying the brakes, the driver must apply full foot force to the
Regulation Stroke Limits For Clamp-Type Brake Chambers. (1) In safe location, block wheels and release spring brakes; (2) bring air pressure to 90-100 psi & turn off engine; (3) identify the size and type of brake chamber; (4) mark pushrods; (5) fully apply & hold brakes; (6) measure & confirm pushrod stroke is within regulation limits. Table 2.
3. Check the brake chamber push rod travel (refer to chart below for the Commercial Vehicle Safety Alliance (CVSA) max. allowable stroke). With the parking brakes released and service brakes applied with 80 to 90 psi of air pressure to the service chambers. 4. Check the angle formed between the brake chamber push rod and slack adjuster arm.
The National Safety Code madates that every driver of a commercial vehicle equipped with air brakes must check push rod travel every day. In many jurisdications, drivers are allowed to use the pry bar method; in others , they must use the applied stroke…. CDL drivers must check brake adjustment every day as part of their pre-trip inspection.
PUSH ROD TRAVEL MEASUREMENT TRACKING CHART TRACTOR TRAILER 1 3/4 inch Location steer axles Maximum Travel Limit Allowed FMCSA Brake Regulation 393.47(e) Short Stroke 20 or 24 (round air port) Brake Chamber Type & Size Equipment manufactured after October 1994 must be equipped with Automatic Slack Adjusters Don't adjust your Automatic Brakes ...
2 - The Push Rod Travel 3 - A Long Stroke Model. The BRAKE CHAMBER TOOL will quickly & easily identify an air brake chamber's model number, from type 9 to type 36. When the chamber has two clamp rings, a long stroke unit may be identified with the 3-1/8"gage on the side of the tool.
During a brake application or with the parking brakes set, you can visually check to the amount of push rod travel at each wheel. The SimpleCheck should travel less than or equal to the length of a standard 1-1/2" brake chamber stud. ... Meritor M820750 SimpleCheck Air Brake Stroke Indicator Tool, 3/4" Pushrods, 1-3/4" OD. Part# 650-M820750 ...
The brake system on a commercial motor vehicle must work well every time, under all conditions. If not, the driver's life and the lives of others are at risk.To effectively stop in every braking situation, all components in the air brake system, including the foundation brakes, must be properly installed, adjusted and maintained by qualified technicians. Stroke limits specified by Canadian ...
Now quickly, safety first! Make sure you chock the wheels, pump the air pressure up over 90 pounds per square inch, in order to be able to check the air brake for adjustment, and then release the parking brakes. And make sure that you have the required amount of air to do the outside inspection of the components.
Inspection of brake adjustment at each wheel should be performed with air pressure between 621 and 690 kPa (90 and 100 psi ), the engine shut off and service brakes fully applied and spring brakes must be released. When pushrod stroke exceeds the adjustment limit of the brake chamber the brake is out of adjustment.
The air brake test set-up. Bring the air pressure to between 90 and 100 psi. Turn the engine off and chock the wheels. Release the parking brake (s). Mark the brake pushrod at its point closest to ...
Pull the chamber push rod out to its limit by pulling on the slack adjuster arm or by prying with a short bar. If push rod travel is 3/4 in. (19 mm) or more, brakes MUST be adjusted.. You must have an Endorsement A specified on your licence to operate a vehicle equipped with an air brake system. The endorsement is not required when operating a Class 3 or 5 vehicle licensed as a farm truck or ...
Our team are here to help you start your visit on the right foot. That means a safe, comfortable, and direct transfer from the airport to your destination of choice. We have shared rides, private rides, shuttle buses, and even limited care hire options. Find the right fit for you and experience airport transfers that make travel easy.
Majestic churches, impressive historic fortresses, and palatial buildings: Moscow is a fascinating city whose emblematic architecture reflects the turbulent history that has defined Russia throughout the centuries. The traces of the USSR can be found around every corner of the city, side by side with the iconic relics of Imperial Russia, like ...
Fly Newark to Moscow Vnukovo • 19h 28m. Fly from Newark (EWR) to Moscow Vnukovo (VKO) EWR - VKO. RUB 46927 - RUB 123304. Quickest way to get there Cheapest option Distance between.
Welcome to Russia! Grand Russia is a Russian Tour Agency based out of the cosmopolitan Moscow city. We are a prominent Russia Travel Agency engaged in providing travel experiences to the people wishing to explore Russia for more than ten years. We specialise in providing guided tours, custom made packages, exclusive excursions, visa facility services, unexplored destinations and lot more.