Here you can find current software and drivers for AGT Patrol Monitoring System
Winkontrol 7 (4.3.2006.2419) ֍download
Winkontrol 7 (4 .5.25.7 ) Beta ֍download
TMD Drivers ֍download
General Guard Tour System Tender Specification sample
(download editable document here)
TMD adapters since 2013
Granted that you have purchased the TMD adapter in 2013 or later, you can merely install the current version of Winkontrol, which you can find on this website.
Assuming that you have been using the older version of Winkontrol before, it is sometimes also necessary to delete the file: FTD2XX.dll (it is most often located in C:\Program Files (x86)\WinKontrol\) and to add to the same folder a library which you may download >> here <<

Guard Tour Tender Specification for Reference
Agt datasheet catalogue.

AGT Job References updated 2023
Agt presentation show 2023 (d) v2, agt presentation video, ifsec 2013 anti-vandal video, sample of reports, agt sensor warranty , term & condition, agt datasheet catalogue , agt bunting / banner hd, manual e-book.
CONTACT US
DISTRIBUTOR
A LTON CONTROLS SDN BHD (589918-D)
established since 2001
34A, Jalan Hujan Rahmat 3
Taman Overseas Union
58200 Kuala Lumpur
Tel: 603-77812198 / 60123319088
Fax: 603-77815399

West Malaysia
East Malaysia
Philippines
Manage Private Patrol Operations On The Cloud
Receive Actionable Insights Into On-Site Activities
View Useful Data To Make Data-Driven Decisions
Manage Your Workforce For All Types Of Business

GuardsPro: A Dynamic Guard Tour System
Get actionable insights into on-site security operations - access live activity feed, reports, GPS tracking, and more.
Streamlining Real-Time Data Across Multiple Channels
Align on-site performance with security plans to optimize guard efficiency using live updates from client sites, and prevent missed patrols with live tracking and check-in or out alerts. With GuardsPro, you’re in complete control.
Maximize Productivity And Operating Performance
Coordinate Efficiently To Deliver Better Services

Proactively Monitor And Resolve Issues
Stay on top of your private patrol operations with actionable insights into the on-field operations on a centralized platform- view check-in or out, incidents, site tours, dispatch calls, reports overview, and so much more.
Grow Your Business As A Competent Team!
With secure and controlled user access, invite your staff to the GuardsPro dashboard and delegate them to different roles. Divide out responsibilities making it easier to manage your private patrol company as it grows.

Harness The Power Of Real-Time Notifications
Get notified about critical changes in the system and on-site patrolling activities as they happen. Always stay updated with immediate input from the field to ensure timely corrective action is taken.
Provide Business Intelligence To Your Teams And Clients
Standardize Your Reporting Process For Powerful Benchmarking
Generate, Access, And Share Custom Reports In Real-Time
GuardsPro Reports Support Photos, GPS Location, & Time Stamps

Effective Guard Tour Reporting Software
Simplify the reporting process - generate and share detailed reports faster and identify inefficiencies with comprehensive reports.
Drive Efficiency With Real-Time Statistics
With reports that are concise, come in timely, are supported by logical data relevant for evaluating the performance of guards, drive productivity and profitability by delivering matchless services.
Simplify Online Report Writing And Sharing Live
Create Unlimited Custom Reports When Needed

Make Smart Decisions Based On Live Data
Never lose visibility of what is happening on the client site with GuardsPro reports - general, incident, standard, log, and list reports, coming in real-time ensure client’s expectations meet services delivered.
Build Custom Reports To Access Right Type Of Data
The back-office users define criteria for custom reports, with mandatory information fields using GuardsPro. This makes sure that the guards submit only necessary and relevant data from the post site tailored to clients’ needs.

#1 Time Clock App For Guards
Cut Down On Team Management Time Using GuardsPro Time Clock
Keep Track Of Time, Attendance, Time Off Requests, & Billable Hours
Automatically Generate Detailed Timesheets Accurately In Real-time

Easily Track Guard Work Hours
Make it simple for your guards to clock in or out and for your managers to keep track of their work hours, improve payroll accuracy, and streamline workforce efficiency.
Say Goodbye To Manual Time Sheets
Without any glitch, know when your guards were on duty and for how long. Absenteeism is automatically registered. You do not need to run after your guards to collect timesheets and manually do all the calculations.
Allow Guards To Clock In Or Out Using Mobile App
Live Updates With Push, Email, And SMS Notifications

Streamline Billing And Payroll Process
With GuardsPro’s online time clock system, cut back significantly on the amount of time spent on payroll processing. Further, reduce the chances of errors occurring to make your payroll and record-keeping as efficient as possible.

Enforce Geofence- Based Clock In Or Out
Time tracking with geofencing helps prevent buddy punching and guessing at work hours. Using GuardsPro, you can force your guards to clock only inside the geofence and get detailed, location-based records of work hours.

Setup Custom Breaks Hassle-Free With GuardsPro
Setup custom breaks for specific guards based on the number of times a break can be taken. You can define breaks based on the days when the break starts and if the guard can end the break before the break end time.
Add On Modules
Powerful yet flexible security guard scheduling module.
Speed Up Your Scheduling, Saying Goodbye To Manual Processes
Create Shift Templates, Offer Open Shifts, Enable Shift Exchange
Publish Shifts Based On Skill Set, Work Hours, And Pay Rates

Schedule Security Guards Like A Pro
Create and manage more than timesheets. Schedule for weeks in advance, generate reports, create open shifts, view shift status, and do so much more.
Bringing Automation In Critical Guard Scheduling
Create effective patrolling schedules using GuardsPro’s end-to-end scheduling module, reduce unnecessary overtime, and manage preferences like cost optimization or equal staff hours to match your scheduling priorities.
Strategically Optimize Guard Schedules
Make Scheduling Changes Instantaneous

Actively Take Charge Of Guard Time And Attendance
Simply create and assign schedules based on guard availability for the week, manage shift exchange, and time-off requests. Stay updated on the on-site attendance with shift status and real-time notifications.

Empower Your Guards To Do More Without Losing Control
Give your guards the flexibility to choose and confirm open shifts, ensuring they’ll be available on time at the scheduled site. To further encourage work-life balance, guards are allowed to offer confirmed shifts to other guards.
Improve Workforce Capacity Utilization
Make the most of your guard workforce with intelligent guard scheduling. Take control of your wage liabilities with the ability to schedule guards based on pay rate, skill sets, regular, and overtime hours.
Respond To Emergency Calls In Time With The Dispatcher
Manage Multiple Dispatch Calls Coming In From The Client Sites
Record, Update, And Access All The Information On A Single Window
Quickly Create And Assign Dispatch Calls To Multiple Guards

Integrated Security Guard Dispatcher
Register and update the dispatch calls coming in from multiple sources on one platform and assign guards quickly to take appropriate action.
Respond To Emergencies More Efficiently & Effectively
Get the live status of the guards on-site to know if guards have copied the dispatch call, are on the way or have arrived on the site with the security guard dispatch software.
Respond Faster To Incidents On-Site
Live Track Your Dispatch Operations

Respond In Real-Time With Streamlined Notifications
Manage dispatch calls coming in from multiple sources with real-time status updates. Any delays are notified so that priority calls are never missed and urgent situations are addressed efficiently.
Register And Access Dispatch Data Faster
With GuardsPro, the dispatcher creates and assigns dispatch calls to multiple guards quicker. The status of each call is updated making sure the important information is readily accessible anytime in the future.

Never Lose Site Visibility With The GuardsPro Live Tracker
Establish Accountability And Reinforce Schedule Compliance
Surveil On-Site Presence And Movement Of Your Security Guards
Create Virtual Perimeter On The Post Site With Geofence
Real-Time Security Guard GPS Tracking
Track your security guard workforce on the live map with the ability to view GPS history and geofence authorized areas on post sites.
Always Know Where Your Security Guards Are
GPS enabled GuardsPro makes sure you are always updated about the location and movement of the guards on a post site. It is designed to not only assist guards on patrol but also help them get their job done efficiently and to perfection.
Streamline Your Guard Tour Tracking
Make Data-Driven Decisions Instantly
Keep Your Security Teams Engaged On Client Sites
Do away with assuming what is happening on site. With inactive flags and check-in or out notifications enhance field visibility that reinforces accountability and discourages guards from skipping patrol sites.
Create GeoFence Around Post Sites & Monitor Activities
Build virtual perimeters to mark the authorized and restricted areas on the post site and be informed of violations keeping the guards safe and compliant with the area accessibility as defined by the client.

Keep The Security Team Informed And Updated
Allow Guards And Admins To Connect And Collaborate Seamlessly
Add Multimedia To All Chats For Better Clarity In Real-Time
Works With Both The Mobile App And Back-Office Dashboard

Secure Messenger For Security Workforce
A simple, seamless, and secure messenger that allows guards and back-office users to connect and collaborate in real-time.
Take Chats To A New Level With Multimedia Interactions
When the text does not cut it, add clarity to chats by adding multimedia. Add images captured on the site, audio messages, and video files and share them with guards and back-office users instantly.
Communicate With The Team In Real-Time
Encourage Teamwork To Boost Productivity

Seamless Across Multiple Devices And Platforms
Whether on the Back-Office Dashboard or the GuardsPro mobile app, the messenger works seamlessly across platforms to ensure the communication never stops and you stay updated on the information shared by the guards, admins, or super admins.
Focussed And Professional Chats
Confidentiality of the data shared is important. That is why GuardsPro gives admin the power to manage user access, allowing only the guards who have checked in on the post site to chat so that the chats remain focused and professional.

Simplify Your Security Guard Company’s Payroll
Automate Your Payroll Processing To Make It Simpler And Faster
Generate And Export Guard Payroll Reports In A Single Click
Eliminate Duplicate Entries With GuardsPro Payroll Integrations

GuardsPro Payroll Integrations
Integrate GuardsPro with your payroll software to streamline the payroll process.
Integrate With Your Preferred Payroll Software
Automate your payroll processing. GuardsPro integrates with Quickbooks, Gusto, ADP Workforce, and Paychex. Now, enjoy the convenience of generating and exporting payroll reports in a single click.
Minimize The Risk Of Human Error
Be Better Equipped To Meet Deadlines

Make Payroll Processing Simpler And Faster
Minimize the need for multiple reconciliation steps, once the guard timesheets are updated a click is all it takes to generate and export payroll reports to your preferred payroll software.
Track Work Hours & Sync Timesheets With Payroll
Timesheets are automatically updated based on scheduled shifts, confirmation, no-shows, and check-in or outs so that you never have to adjust guard time cards manually again.

Smart GuardsPro Security Vehicle Patrol Solution
Have Full Control Over Your Vehicle Patrol Security Operations
Stay Connected To The Field And Boost Productivity Like Never Before
Manage Vehicle, Routes, Post Site Hit Frequency, And So Much More

GuardsPro Vehicle Patrol Security Solution
Optimize your security vehicle patrol and gain unparalleled insight into fleet operations.
Ensure That Vehicle Patrols Are Hitting All Post Sites
If you are looking to increase efficiencies and cut costs of your security vehicle patrol operations, GuardsPro allows pre-defining vehicles, routes, and the number of hits per day that are made easily accessible on the guard’s security patrol app.
Ensure Vehicle Patrol Security Guard Accountability
Keep Tabs On Your Guards With GPS Tracker

Automate Vehicle Patrol Tasks & Boost Productivity
Minimize the margin for errors and save time by automating your tasks using the GuardsPro guard tour system. By adding custom reset time for the number of hits to be conducted, ensure guards never miss patrols again.
Flexibly Convey Actionable Insights
Don’t just effectively monitor and track your entire fleet for improved response, but also synchronize the number of hits with guards on the same site and communicate flexibly using the messenger application.

Professional Visitor Management Software
Monitor Multiple Locations From One Centralized Dashboard
View Detailed Logs And Profiles Of Visitors & Vehicles Easily
It Helps Facilitate Rapid Visitor Evacuation In Emergencies
Extraordinary Visitor Management Software
Manage your check-in or out processes with the GuardsPro Visitor Manager and improve safety, security, and compliance for visitors on-site.
Organized Visitor Profiles
Enhance the security of your client’s facility with visitors and vehicle movement recorded chronologically in profiles and logs, making it easier to track who visits the post site and when. Share the data with clients right from the dashboard.
Visitor Check-In Made Super-Fast
Suitable For Post Sites Of All Sizes

Mobile App Entry
The GuardsPro mobile app is the most effective way to register visitor movement on site. Quickly enter all details and upload them to a secure database making it easier to expedite visitors in and out of client property.
Secure And Private Database
GuardsPro lets you register and store all information in a secure cloud database right from the GuardsPro mobile app, that can’t be duplicated, or compromised by unauthorized personnel making sure information stays confidential.

Best Invoicing Software For Private Patrol Companies
Offering A Complete Billing Solution For Your Business
Create Estimates And Invoices From A Single Platform
Streamline The Bid Estimation Process For Accuracy

An Essential And Effective GuardsPro Invoicer
An online billing software that makes invoicing process simpler and professional for private patrol businesses.
Create And Send Invoices In Minutes
GuardsPro calculates your invoice totals directly from the timesheets so you can create and send invoices faster for different services and in multiple currencies.
An Easy-To-Use Online Invoice Software
Create Powerful And Professional Invoices

Record Payment Effortlessly
Don't stress about tracking invoice payments anymore. GuardsPro lets you track payment status with the ability to record partial and full payments in cash or via credit or debit cards.
Speed Up Invoice Delivery And Payments
Enjoy the convenience of e-mailing invoices and estimates with GuardsPro Invoicer, get instant delivery updates that ensure that you always get paid on time.

With GuardsPro Analytics Gain Insight Via Digital Visualization
Gain A Quick And Clear Understanding Of Reports And Schedule Data
Enhance Collaboration And Deepen Analysis Using Real-Time Graphs
Identify Emerging Trends And Act Quickly Based On Them

Empower Your Users With GuardsPro Analytics
Gain insight into your security guard operations, so you can stay on top of things and make the most informed decisions for your security guard teams.
Optimized To Simplify Essential Data Seamlessly
GuardsPro Analytics provides data vital for security guard management in an easily comprehensible form to help you streamline your security guard operations and run them efficiently.
Provides Extensive Reporting Data Effortlessly
Helps simplify security guard scheduling.

Access Report Insights To Optimize Your Outcomes
Review the effectiveness of your security measures with in-depth insights into incident reports. Find out the top incidents along with incident overview and report overview that summarizes detailed reports graphically.
Dive Into Scheduling Details And Get Smarter Insights
GuardsPro Analytics is built to smartly work with GuardsPro scheduler to deliver new and predictive insights from your data, so you can make smarter decisions analyzing data quickly and collaborate with your team easily.

Easily Identify How Well Your Invoice Processes Are Performing
GuardsPro invoice processing analytics provides details that help security guard companies understand basic invoice processing performance. With GuardsPro, you get an overview of invoices, paid amount, and top customers hassle-free.
Make Parking Management Easy With GuardsPro Parking Manager
Automate End-To-End Parking Management Process With GuardsPro
Create Custom Parking Areas, Parking Lots, And Vehicle Profiles
Keep Parking Lots Under Compliance With GuardsPro Parking Manager

Streamline Parking Management With GuardsPro
Manage all parking areas, parking lots, and vehicles from one platform to ensure a streamlined user and customer experience.
GuardsPro Parking Manager, An All-In-One Parking Solution For Security Teams
GuardsPro parking manager is a smart web & mobile based solution designed for all types of parking lots to allow you to take control and utilize parking areas effectively. It eliminates manual logging of parking lots and ensures vehicle compliance.
For All Companies, All Sizes, All Parking Areas
Manage, Optimize, And Automate Parking

Easily Manage Parking Lots And Vehicles Assigned To Them
GuardsPro parking manager offers ultimate flexibility and insight into vehicles assigned to parking lots in real-time. Your back-office team can import clients’ contacts, add multiple notes, assign and print QR labels, create incidents for parking lots, and define incident types while the guards can manage parking areas & lots, vehicles, and create incidents as they happen on-site.
Increase Availability Of Parking Lots With GuardsPro Parking Manger
Maximize the use of your client’s parking areas and parking lots. Increase availability and accessibility by having every data available at your fingertips from parking vehicles to parking violations. Keep your guards accountable with the best parking manager available online.

Start Your 30 Days
Risk free trial.
This website uses cookies to ensure you get the best experience.
Data Sheets
- Active Track Download
- Active view Download
- Minitool Pro Guard Tour System Download
- Fire Prevention, Fire Wardens & The MiniTool Pro Download
- Minitool Pro Prox Download
- Palm Touch Guard Tour System Download
- Patrol System Sales Guide Download
- Time Management Solutions Download
- EH-15 (GPP-M9) Body Worn CCTV Download
Software Drivers
- Landwell USB Driver for Windows XP/Server2003/Vista/7/8/8.1 Download
- Landwell USB Driver for Windows 10 Download
Training Videos
- GPP Patrol Monitoring Software – Setup Video Download
Guard Patrol Products
Give us a call today on 0800 817 4259 and one of our team will be happy to discuss your specific requirements and advise you on the most suitable options available to you.
Please leave this field empty.
Our Products
body worn cameras can reduce incidents and risks by roughly 50%...
ACTIVE TRACK is a handheld easy to use device designed...
We have a network of security dealers throughout the UK who...
wide range of starter kits which have everything you need to...
Our System is designed for Fire Watch, Fire equipment checking...
We provide a range of Patrol Management solutions...
Proof of Presence have been utilized for many years to monitor that cleaning teams...
This website uses cookie to ensure you get the best experience on our website and for analytic purposes. Learn more

What Problems Can Guard Tour System Solve?
Guard tour software—wepatrol, patrol with your cellphone.
Different types of patrol systems are optional. (NFC/BLE/QR-Code/GPS)
One for All Platforms: iOS and Android
Our Guard Tour APP is available on both iOS and Android platforms.
Intuitive Alarm Data
When guard met an emergency, wepatrol can send voice and image to the management center at once.

Real-Time Security Monitoring System
Collect all your position data with the exact point.
Intuitive Prompts with Human Voice
Remind you of the current state of the device.
Built for Simplicity
The interface displays the status of patrol data and analysis statistics.
Choose Your Patrol System

JWM Best Seller Durable RFID Guard Tour System with 20 Checkpoints

Guard tour patrol APP

JWM Touch Ibutton Guard Patrol System

JWM Long Range Guard Management System with Flashlight
Focus on patrol systems since 2001, 116 countries exported.
We Serve the World
41 International Expo Attended
Covering 5 Continents
27 Models Partfolio
APP, Cloud Software, Online, Basic Guard Tour System
Recent News

What Should I Pay Attention to When Buying a Doorbell in the UK?

Check If Your House Is Safe Through This Checklist

How to Protect the Safety of Capitol?
All stars feedback.


Video Tutorials
- 2.0 Software
Best seller IP67 guard tour system
High-light flashlight security checkpoint system.
Model: WM5000V4S
New design touch guard patrol system
Long range multifunctional security rfid management system.
Model: WM5000V8
Fingerprint rfid guard tour system
Model: WM5000X1
Model: WM5000X1(Version 3)
Real Time Remote Data Transmission Station
Model: WM5000H2
RFID Guard Monitoring Control Tour System With Camera
Model: WM5000F3
Real Time Guard Tour Management With Panic Button
Model: WM5000L5
RFID Wifi Walkie-Talkie Guard Tour Patrol
Model: WM5000K
4G Voice Call Real Time Guard Tour System
Model: WM5000L4D
4G Real Time Guard Tour System
Model: WM5000L4
- 6.5 Software
GPS Tracking Watchman Clocking System
Model: WM5000P5+
- Cloud Patrol System Software
Fingerprint Rfid Guard Tour System
Long range multifunctional security rfid management system, best seller ip67 guard tour system.
Model: WM5000V5
High-Light Flashlight Security Checkpoint System
New design touch guard patrol system.
Model: WM5000ES
Mobile patrol system
Model: Wepatrol
Your Name *
Your Company Name *
Your Website *
Your Email * Please enter your email in order to able to contact you.
Your Country *
Where Did You Get JWM Products? *
"Join us to protect security and empower your business with higher profits as a reseller. Don't miss out – fill out the form now or click here to dive deep into our reseller policies ."
Tick this box to receive exclusive offers, news, and updates via email.
- 1 Getting Started
- 2.1 Gmail account
- 2.2 App Installation via Google Play
- 2.3 App Installation through ginstr launcher
- 3.1 Logging In
- 3.2.1 Assign NFC tag
- 3.2.2 Clocking in at a checkpoint
- 3.2.3 Incident Reports / Special Reports
- 3.3.1 Office software
- 3.3.2 Workspaces
- 3.3.3 Portlets
- 4 Logging into the office software
- 5 The ginstr lobby
- 6 Changing the password for the main account
- 7 Defining roles
- 8 Creating subaccounts
- 9 Creating workspaces
- 10 Deleting workspaces
- 11 Specifying the content of individual portlets
- 12.1 Editing page for an individual data record
- 12.3 System tables
- 12.4 Creating tables independent of a ginstr app
- 12.5 Supported datatypes
- 13 Changing the size of portlets
- 14.1 Filtering tables
- 14.2 Swap the content of two portlets
- 14.3 Close portlet
- 14.4 Online help
- 15.1.1 Events presentation
- 15.2.1 Event labels configuration
- 15.2.2 View events overflow
- 15.3 Timeline slider
- 16.1.1.1 ‘Grouped columns’ chapter
- 16.1.1.2 ‘Ungrouped columns’ chapter
- 16.1.2 Calculations
- 16.1.3 Buttons
- 16.1.4 Automated Reports
- 16.2.1 Viewing advanced reports within a portlet
- 16.2.2 Formatted Automatic Reports
- 16.2.3 Filtering advanced reports
- 17.1 Creating a new data set
- 17.2 Editing a data set
- 17.3 Actions
- 17.4 Moving columns
- 17.5 Adjusting the column width
- 17.6 Automatically adjusting the column width
- 17.7 Automatically adjust columns when changing portlet size
- 17.8 Hiding columns
- 17.9 Searching in tables
- 17.10 Sorting tables
- 17.11.1 Export data
- 17.11.2 Import data
- 18.1 Show GPS positions of readings and incidents on a map
This manual describes the features of the Guard Tour Management ginstr app including ginstr web backend integration.
The Guard Tour Management app allows security guards to quickly and easily record checkpoints visited and report unusual incidents should they occur.
Getting Started
- Download ginstr launcher from the Google Play Store. Instructions
- Download the Guard Tour Management app. Instructions
- Sign up for a ginstr web account. A free trial is available from our website
- Open the app and log in. Instructions
- Make sure you have at least one NFC tag to assign to a checkpoint. Learn more about NFC
- Assign one new checkpoint with a tag. Instructions
- Scan a checkpoint tag to clock in at a checkpoint. Instructions
- Go to the additional report screen and scan the a checkpoint tag to begin creating a report. Instructions
- Save the report.
- Set up a ginstr web workspace. Instructions
- View and edit the data entered from the Guard Tour Management App. Details
Mobile App Setup
Gmail account.
An individual Gmail account is required for each device.
It is essential to ensure that each device is assigned its own unique Gmail account.
The use of the same Gmail account on multiple devices is strongly discouraged. Because of Google's security policies, in the case of a Google software update the device will be blocked meaning that each device would have to be updated manually after every Google update.
App Installation via Google Play
Please search in the Google Play Store on the smartphone/tablet for “ ginstr ” and install the desired app, Guard Tour Management .
Direct link: https://play.google.com/store/apps/details?id=com.ginstr.guardTourManagement
App Installation through ginstr launcher
The ginstr launcher app can be used to download and launch ginstr apps such as this one.
The ginstr launcher app is available to download here
Once installed, the ginstr launcher app can be opened by pressing the following icon on the launch screen:
Information on how to download and launch the Guard Tour Management app from inside ginstr launcher can be found here .
The Guard Tour Management app
Once installed, the Guard Tour Management app can be opened by tapping the following app icon on the launch screen:
The first screen which appears after the Guard Tour Management app is opened is the login screen.
To use this ginstr app a ginstr subscription is required.
If the user already has login credentials for this app, they should enter them in the e-mail and password fields to login.
If they do not, there is a “sign up!” link located directly above the e-mail field. This will direct the user to a website giving instructions on how to sign up and get login credentials.
There is a checkbox labelled show password next to the login button.
If valid login credentials are entered on the login screen, the app navigates to the first screen of the Guard Tour Management app.
Features of the Guard Tour Management app

The Guard Tour Management app consists of the following three screens:
- assign NFC tag
- send location
- additional report
Assign NFC tag
It is necessary to assign the NFC tag to a checkpoint before reading it for the very first time.
In order to do so, after reading a new NFC tag the ‘ assign NFC tag ’ screen opens automatically.
Please fill in all required information (marked with a ‘*’) and tap on the
button to save the data.
If you want to update some checkpoint master data, maybe because you moved the tag from one checkpoint to another checkpoint, then please swipe twice to the left to open the ‘assign NFC tag ’ screen.
Then read the NFC tag which you would like to modify the data for, and tap on the
button to update the data.
If GPS is activated on your mobile device and you are at a location with GPS reception, the checkpoint address field will be filled with the address of your current GPS location. You can edit this information if required.
As soon as you save some checkpoint information, this is transmitted immediately to the ginstr web office software and can be found there in the ‘ checkpoints ’ table.

Clocking in at a checkpoint
The first screen after logging in to the app shows some concentric circles.
This screen can be used for reading NFC tags previously assigned to checkpoints installed along the patrol routes of overseen properties.
Each reading of such an NFC tag is registered and the following information is immediately replicated to the backend :
- User (security guard)
- checkpoint NFC tag number
- checkpoint name
- checkpoint address
- checkpoint GPS coordinates
- timestamp of registration
Each reading can be examined, edited and exported in the backend .

Incident Reports / Special Reports
Incident reports can be created by the security guard in case of an incident.
Incident reports can be submitted to the police or to other involved parties at any time.
To enter an incident report, please swipe once to the left after logging in. Then scan the NFC tag of the relevant checkpoint and enter the required information including the security guard’s signature. After saving the incident report, you can return to normal operation with the back button of the device.
The incident report contains the following information:

Office software
The term ‘ office software ’ is used to refer to the web-based evaluation software ginstr web .
ginstr web can be accessed from any Internet-compatible computer, laptop or tablet.
A more precise description of how to access ginstr web can be found here .
The different graphic interfaces in the ginstr web office software are referred to as ‘ workspaces ’.
Up to 20 different workspaces can be defined in each user account.
Depending on its design, one workspace can contain between one and four portlets (see here for more details).
A more precise description of how to create workspaces can be found here .
The individual windows within a workspace are called ‘ portlets ’.
A portlet may contain
- a ginstr web table with master data
- a report about the data recorded
- a map to display locations
- a template to edit single records
- a system table
A more precise description of how to specify the content of portlets can be found here .
Logging into the office software
You can log into the office software using the login credentials delivered with the software.
The office software can be accessed at: https://sso.ginstr.com/

Please enter your login credentials in this login screen and click on the
Once successfully logged in you will be forwarded to the ginstr lobby .
The ginstr lobby
Once successfully logged in you will see the lobby menu:

You are now in the lobby.
Depending on the software modules ordered from ginstr, here you will see different buttons that take you to different programs.
Clicking on the ‘ ginstr web ’ button takes you directly to the interface of the ginstr web office software.
The operation of ginstr web is described in more detail here . In the top right-hand corner of the lobby you will see your name:

As soon as you hover the mouse over your name, a menu for basic settings for your user account appears:

Changing the password for the main account
Please follow steps 1 to 4 shown below to change the password for the main account immediately after you first log into the lobby.

The password provided during the delivery of the software is not safe because it was sent through e-mail or regular postal service.
Defining roles
Roles are rights groups.
You can create as many roles as you like and allocate a role to different users.
To do this, please click on the ‘ roles ’ menu item on the left-hand side and select ‘ add role ’.
Enter a name and brief description for the new role and click on the
button to save:

Now click on the name of this role to specify the authorisations associated with it.

In the column that has just opened, you are given a selection of all the ginstr apps allocated to your user account. Select the desired app here by clicking on its name:

In another column that has just opened, you will now see all the tables allocated to the software.
By clicking on the rights for each table, you can activate them for this role and deactivate them again by clicking on them once more:

The following rights can be assigned to each table:
Furthermore, you can specify per ginstr app and/or per table whether older data should be automatically deleted and if so, after how many days.
Activating this data cleansing is always useful for the following reasons if the old data is no longer required after a set period:
- Many processing stages take longer the more data records are stored in the database
- If the storage space assigned in the ginstr cloud exceeds the agreed data volume, additional monthly fees will be charged to expand the ginstr cloud storage
- It is not possible to show more than 10,000 records on the screen at the same time. If there are more than 10,000 records, only part of the data will be loaded and the user then has to decide what part of the data they want to edit every time, as shown below:

Automatically deleted records cannot be recovered. We therefore recommend that you regularly export older records.
If you have now successfully defined all the roles for your employees, you can proceed with creating the user accounts for them.
Creating subaccounts
For each ginstr customer, there is one main account for the individual who has overall responsibility for this software.
There is also a subaccount for each office employee or field employee. The total number of subaccounts you can create depends on what you have ordered from ginstr.
Now create the subaccounts for each of your office employees and mobile workers.
To do this, go to your user account’s settings and select the ‘ subaccounts ’ menu item on the left-hand side.
Now please click on ‘ add subaccount ’ in the second column.
Enter the e-mail address for the subaccount and specify a password:

Select one of the roles defined previously for the subaccount.
Please also activate the application in the ‘ applications ’ field.
Please ensure that the access status is set to ‘ active ’.
Save the newly created user subaccount by clicking on the
Repeat this process until you have created all the necessary user subaccounts.
Now you can exit the settings menu with the ‘ back to lobby ’ button, which you will find at the bottom of the left-hand column.
Creating workspaces
Along the bottom edge of the screen, you will find a row containing all the available workspaces:

Click on the + to create another workspace.
The following screen opens:

Here you can specify a name for the new workspace and the layout for it.
The name of the workspace subsequently joins the list of workspaces along the bottom edge of the screen.
Once you have made all the desired settings, save the new workspace by clicking on the
Deleting workspaces
If you have made a mistake when creating a new workspace, or if the workspace is no longer required, you can irrevocably delete workspaces simply by clicking on the × next to the name in the row for selecting the workspaces:

The data displayed in the workspace is not deleted as a result. It can be displayed again at any time in another workspace.
Specifying the content of individual portlets
Each workspace is made up of between one and four portlets. Portlets are windows in which different information can be displayed.
For the workspace that has just been newly created, you can now define what information is to be displayed in the relevant portlet.
To this end, you are shown in each portlet the following list of available information:

You can filter this selection by entering all or part of the table name in the ‘ quick search ’ field.
For each portlet, select from the list of available information the information you would like to display or edit in the relevant portlet of the current workspace.
It is useful to group together in the individual workspaces the information that is often needed. This makes later work with the data more effective.
It is also useful to base the name of the relevant workspace on the subsequent activity in this workspace, e.g. ‘Settlement’, ‘Accounting’, ‘Team management’, etc.
Each item of information can be simultaneously displayed in the different portlets, both within the same workspace and within different workspaces. If data in a table is changed, the same data displayed in other portlets is automatically changed as well.
As soon as you have selected the information to be displayed for one portlet, you are shown the column headings and some of the saved data, if available.
Here is an example of a workspace with four portlets, each filled with a table which already contains data:

Special portlet content
In addition to the usual tables, ginstr web also offers the following special content for each portlet:
Editing page for an individual data record
In addition to the option of editing a data record directly in the relevant row of a table, you can also conveniently edit an individual data record from any table in a separate portlet.

To do so, please select ‘ edit record details ’ for the portlet content of any portlet:

Once the user clicks on a data record of any table in the same workspace, this record’s data is then displayed in the ‘ edit record details ’ portlet and can be easily edited there.
To edit the data, double-click on the data to be changed. Now the data can be edited as desired.
Data that has been changed is automatically saved as soon as one of the following events occurs:
- the user clicks on another record in a table
- another portlet is activated
- another workspace is activated
- the portlet content is removed
- the user returns to the lobby
At the top of this portlet, there is a button which can assign this portlet to a table in the same workspace. When enabled, no other data from another table will be shown in this portlet, even if the user clicks on a data record in another table.
If multiple portlets in a workspace are open for editing data records, another table for editing data can be assigned to each of these portlets.
A map can be displayed in one or more portlets per workspace. These maps can show different regions and zoom levels in the different portlets.

If one or more of the currently selected table data records in the same workspace has GPS coordinates, these will be automatically shown on all maps in the same workspace when the data record is selected.
A geofence is a virtual perimeter marked on a map to define a designated area.
Geofences can be utilised with certain ginstr apps where it is useful to recognise when a device enters or leaves a designated area.
- right-click inside a map portlet on ginstr web
- select the add geofence option
- click on 3 or more points on the map to define the geofence boundary
- when the boundary has been sufficiently defined, double-click to complete the geofence
- click on the geofence inside a map portlet on ginstr web
- double-click on the geofence name at the top of the menu which appears
- type a new name for the selected geofence
- click the geofence inside a map portlet on ginstr web
- click on the hand icon at the bottom left of the menu which appears
- click and drag any of the solid white squares to move the boundary points
- click and drag any of the transparent white squares to add a new boundary point between two existing points
System tables
Depending on which features you use in ginstr web, the following tables may appear under the
Creating tables independent of a ginstr app
ginstr customers usually use table templates in conjunction with smartphone apps. However, there is sometimes the need to create additional tables which have little or nothing to do with the ginstr app table templates.
To do this, you can use the ‘ add table not belonging to a ginstr app ’ portlet content.
The following portlet content is shown after selecting this option:

First, a table name must be entered. Clicking on one of the + buttons allows you to add another table column in the relevant place.
After this, the details for the individual table columns must be specified:
- Each column must have a header
- Each column must have a data type:

Further details will be required depending on the selected data type. For example, these are the settings required for a number column:

A table will be created after all of the required information has been entered and the
button has been clicked.
This table can then be immediately populated with data either manually or via a data imports .
All of the table features from ginstr apps are also available for self-generated tables.
Supported datatypes
The following datatypes are supported:
- dateTimeDiff
- listOfDates
- listOfDateTimes
- listOfTimes
phoneNumber
pointer to a column of another table
Changing the size of portlets
Both the vertical separating line and the horizontal separating line between the portlets can be moved with the mouse.
In this way you can adapt the size of the portlets to the relevant content:

General portlet features
Each portlet shows the following icons in top-right corner:
Filtering tables
Each table in each portlet allows you to filter the content to be displayed.
Depending on the data types used in the relevant table, different filter options are displayed in the window that opens once you click on the filter icon:

For tables containing date & dateTime datatypes , there will be two calendars in the relevant section of the filter dialog window can be used to define a custom date range. By entering the earlier date in the left calendar and the later date in the right calendar, the table will be filtered to only show records with a date value between the two specified dates.
There are also the following shortcut options below the calendars which set the calendars to pre-defined date ranges.
- from tomorrow
- until (and including) today
- until (and including) tomorrow
- last week (Mo-Su) (or Su-Sa depending on applied settings )
- this week (Mo-Su) (or Su-Sa depending on applied settings )
- next week (Mo-Su) (or Su-Sa depending on applied settings )
- last complete month
- current month
- next complete month
- previous quarter (starts on Jan 1, Apr 1, Jul 1, Oct 1)
- this quarter (starts on Jan 1, Apr 1, Jul 1, Oct 1)
- next quarter (starts on Jan 1, Apr 1, Jul 1, Oct 1)
- previous year (Jan-Dec)
- this year (Jan-Dec)
- next year (Jan-Dec)
With the following buttons in the top right-hand corner of the filter window you can adopt the filter settings or clear all of the filters:
Swap the content of two portlets
To swap the content, click on this symbol, press and hold the left mouse button and drag the mouse over the portlet with the content you want to swap with the current portlet content.
Close portlet
No data is deleted by closing the portlet’s content. However, the settings for this portlet (column order, reports, etc.) will be lost.
Online help
Calendar portlet

Each selected data record will be presented as an event in the calendar portlet.
Each event (selected record) has two fields - Start and End .
The following buttons exist in this calendar widget:
- Month - show events in one-month range
- Week - show events in one-week range
- Day - show events in one-day range
- Work Week - show records in working week range (dependent upon first weekday defined in ginstr web settings )
- Today - switch to current local date (as per user's browser date settings)
- Back - switch to previous Month/Week/Day/Work Week (depending on currently selected view)
- Next - switch to next Month/Week/Day/Work Week (depending on currently selected view)
- Pin this portlet to table - when this option is activated, clicking on a record of another table will NOT show the data of this other table. Instead, the calendar will continue showing the data of the table it is pinned to.
Events presentation
Events can be displayed in two ways:
- ' Month' view :
- For events with start and end columns date datatype :
- For events with start and end columns with a dateTime datatype :
- ' Week' / 'Day' / 'Work Week' view :
- dateTime datatype :
- date datatype :
- dateTime datatype with only 1 column:
- events that are longer than one day are shown in the ‘all day’ section of the calendar portlet
Depending on the number and sequence of ‘ date ’ and/or ‘ date & time ’ columns, events are presented in different ways. This order can be changed by dragging & dropping column headers in the table into the desired order.
- 1 column with date datatype containing December 24, 2017 :
- 1 column with dateTime datatype containing December 24, 2017, 10:20:30 :
- 2 columns with date datatype containing December 24, 2017 & December 26, 2017 :
- 2 column with dateTime datatype containing December 24, 2017, 10:10:10 & December 26, 2017, 20:20:20 :
If the date or dateTime of the left-hand column is later than the date or dateTime of the right-hand column then both columns will be swapped.
If there is a mix of multiple date & dateTime cells in one record, then the leftmost cell with a date or dateTime datatype determines the datatype used for the event.
- Leftmost column with date or dateTime datatype (date 1) has datatype date
- Leftmost column with date or dateTime datatype has datatype dateTime and value December 24, 2017, 10:20:30
- Leftmost column with date or dateTime datatype (date 1) has datatype dateTime .
Interactions of the calendar portlet with a ginstr table
If the user selects records that have no columns with date or dateTime datatype , then there will be no events displayed in the calendar portlet.
Event labels configuration
View events overflow
If the number of selected events exceeds the available space, the calendar portlet will respond as follows:
Timeline slider
The timeline slider at the top of the calendar portlet allows the user to easily access data of different time frames in a selected table. The active range is shown above the slider.
Data saved in ginstr web tables can be grouped and formatted in a variety of ways to create user-friendly reports.
- Up to 20 different Basic Reports can be configured for each individual ginstr web table.
- Advanced Reports can contain graphs & charts, photo attachments, company logos, text formatting, advanced data calculation and complex aggregation & examination of multiple tables.
Basic Reports
Each table displayed in a portlet can be configured to show up to 20 different basic reports .
Above each table you will see a ‘ default ’ tab on the left-hand side. In this tab you are shown the table’s raw data without any calculations.

Clicking on the + symbol to the right of the default tab creates a new report of the table.
You can configure basic reports in any number of ways, for example group the data in the current table, create subtotals and sum totals, calculate mean values, count data sets and instances of particular data, etc.
The order of the report tabs can be changed at any time by clicking on the tab and dragging it to the left or right. The tab with the original data always remains pinned to the far left.
Right at the top, you can enter and/or edit the name of the report:
The report name can consist of several words.
This report name will later be shown on the report tabs above the table:

Below the report name entry field, the screen is split into two key chapters:
- Specifications for grouping data sets
- Specifications for calculations

The screen content depends on the table’s columns.
All changes are immediately applied to the report after changes have been saved.
Each line in the ‘ Grouped columns ’ and ‘ Ungrouped columns ’ chapters represents a column in the report.
Individual rows can be dragged with the mouse from the ‘ Grouped columns ’ to the ‘ Ungrouped columns ’ chapters and vice versa.
It is also possible to move a row up or down within a chapter. This enables you to specify the order of columns in the report.
Grouping data sets
‘grouped columns’ chapter.
The columns in the ‘ Grouped columns ’ chapter are displayed on the left half of the report in the defined order from left to right.
The report is arranged according to all the columns that are part of the ‘ Grouped columns ’ chapter. The sorting order is defined by the order of the columns from left to right.
Clicking on a black triangle in the chapter reverses the column sorting order.

For every column within the ‘ Grouped columns ’ chapter in the report, a row with sub-totals is displayed for each different content.
‘Ungrouped columns’ chapter
This chapter defines the order of ungrouped columns. These are displayed in the right half of the report in the defined order from left to right.
The set sort order of the ‘ Grouped columns ’ chapter has priority over the sorting settings of the ‘ Ungrouped columns ’ chapter.
Calculations
In the lower part of the screen, the following settings can be defined separated for
- Display interim results for each grouping
- Display overall results at the end of the report
- Display percentages / averages for each grouping
- Display percentage / averages at the end of the report
- Count miscellaneous content
- Count checkboxes
Each option can be activated/deactivated by clicking on the relevant icon.

The settings made here then generate the following report in our sample table.
Grouped by the values from the ‘ room ’ column with subtotals, totals, average values and count values for all columns:

At the top of the screen, there are the following buttons:
Automated Reports
Both Basic and Advanced Reports can be scheduled to be automatically generated and sent as an e-mail attachment to predefined recipients at predefined intervals (daily, weekly, monthly etc.).
Automated reports are generated based on a snapshot of the currently applied filter settings, with the exception of the date and dateTime attributes which are replaced depending on the selected frequency .

To create an automated report from a Basic Report, right-click on any record in a report and select the automated reports option from the context menu which appears. This will open the create automated report window consisting of the following fields:
- the .csv, .xlsx or .xml report file depending on the export format selected as type .
- all media files (e.g. .png image files, .wav sound files etc.)
Advanced Reports
In addition to the basic reports feature in ginstr web , the advanced reports feature offers advanced options for presenting information contained in ginstr web tables in a report format which can be easily exported in CSV, Excel, PDF or RTF format.
As with Excel or Powerpoint, advanced reports bring your data to life with graphs & charts, photo attachments, company logos, text formatting, data calculation and complex aggregation & examination of multiple tables.
ginstr report templates are customised by ginstr to the customer's specification so that the information is presented in the style best suited to the reader.
Please contact ginstr if you are interested in setting up a bespoke report template to use the advanced reports feature with your ginstr web account.

Viewing advanced reports within a portlet
A workspace with multiple portlets should be used in order to select between different records to be displayed in the advanced reports portlet.
The advanced reports portlet displays a preview of the report populated with information from a record selected in another portlet.
If more than one record is selected, the advanced reports portlet will contain multiple reports - scroll down below the first report to view all reports generated from the selected records.
The following buttons appear at the top of the advanced reports portlet:
Formatted Automatic Reports

The formatted automatic report window which appears upon clicking the
button at the top of the advanced reports portlet consists of the following fields:
Filtering advanced reports
When you have finished defining the desired filters, click the
button at the top right corner of the filter settings window to filter the displayed reports accordingly.
Editing features for tables
The following chapter provides a description of the features for adapting the tables in ginstr web is provided. These features can be used on all tables as long as the user has appropriate user rights.
Creating a new data set
To create a new data set in a table, please click on the
button above the table. A new row automatically appears in the current table.

If you would like to create new data sets which are to be allocated to a data set in an existing table, you can automate the allocation process by selecting the existing data set in advance.
If you select a property in the ‘ Properties ’ table, for example, and then click on the
button in the ‘ Zones ’ table, the link to the ‘ Property name ’ column is then automatically set to that zone.
Editing a data set
If you would like to edit data in an existing data set, then double-click in the cell to be edited. Depending on the data type of the current cell, the appropriate window opens to allow you to edit the cell content.
Stop the entry of new data by confirming with the Enter button or by clicking in an empty area of one of the workspaces. In both cases, the entered data is automatically saved and immediately transmitted to other users, other portlets and all the users of the associated ginstr app.
If you have edited the content of a cell and would like to edit other cells in this row, you can jump directly to the next cell to the right by pressing the Tab ↹ button on your keyboard and to the next cell to the left by pressing ⇧ Shift + Tab ↹ together.
Alternatively, you can also move between the individual cells in a row using the arrow keys on your keyboard ( ← / → ) and edit the content of the activated cell by pressing the Enter button.
To delete an incomplete record (as indicated whereby any required cells left empty are shown red), first select the incomplete record with the cursor or arrow keys and press the Delete button on your keyboard to remove the highlighted record.

Data sets marked in colour can be filtered at any time by clicking on the relevant colour above the table.

Moving columns
If you would like to rearrange the sequence of individual columns in a table, left-click on the column heading, press and hold the left mouse button, and drag the column to any place you like in the table.

Once you release the mouse button, the column is moved to the desired location.
These settings only affect the table in the relevant portlet. The same table in another portlet is not affected. This allows for the display of various views of the same table, which can be very useful, particularly for tables with many columns.
This option is not available for reports. The column order in reports is determined by the settings of the respective report (see here )
Adjusting the column width
Column widths can be adjusted continuously by clicking on the separating line between two column headings, pressing and holding the left mouse button, and moving the mouse to the left or right.

Once you release the mouse button, the column width is adjusted automatically.
Automatically adjusting the column width
The columns widths of a table can be adjusted automatically. To do this, right-click anywhere you like in the table. Now you have the following options:

Automatically adjust columns when changing portlet size
By default, column widths are not changed when editing the portlet width by dragging the vertical line between the portlets. If you wish to activate the automatic adjustment of a table to the portlet width, right-click anywhere in the table and activate the ‘ Resize columns while dragging ’ option. Now the column width will automatically adjust when you change the width of a portlet.
Hiding columns
You can hide individual columns in a table by right-clicking anywhere you like in the table.
Using the ‘ hide/show columns ’ menu item, you can now select which column(s) you would like to show / hide in the current table.

Searching in tables
You will find the search field in the top left-hand corner of each table.
As soon as you enter something here, the current table is immediately shortened to those rows containing the character string entered in the search field anywhere in any column.
This search refers to all the columns in the current table.
The string you are searching for does not have to be at the start of a string. In the example below, the search string ' mit' returns both 'Smith' and 'Mitchell'.

Detailed filter settings are possible in the filter settings (see here for more details)
Sorting tables
You can activate table sorting by column content by left-clicking on the heading of the column by which you would like to sort the table.
The small triangle next to the column name represents the direction in which and the column by which the current table is sorted. You can reverse the sorting order by clicking again on the same column heading.

Linking tables
In ginstr web you can link individual tables with one another. So, for example, tables with columns which refer to other tables are automatically filtered as soon as you select one or more data sets in the table referred to by another table.

If you would like to filter the second table by several values, you can select the data sets to filter by as follows:
- Multiple selection of individual data sets:
- Selection of several consecutive data sets:
You can combine the two methods for selecting data sets in whatever way you like.
Please note that, due to the links between the tables, under certain circumstances you may no longer be able to see a newly created data set in the ‘ Public Holidays ’ table once it has been saved. This may be because you clicked on one or more Public Holidays Categories and the ‘ Public Holidays ’ table was therefore automatically filtered by the category or categories selected; on the other side, the newly entered Public Holiday does not correspond to these filter criteria and therefore the newly added record is saved but not shown on the screen. You can clear this filter by clicking on the
button in the ‘ Public Holidays Categories ’ table.
If data sets disappear after being entered, they have not been deleted; rather, they have indeed been saved but are not visible at the present time.
Export data
In some cases, it is desirable to further process data generated using ginstr apps in other programs or Excel. The ‘ download data ’ feature allows downloading data stored in ginstr tables to your local PC.
To download data from a table or ginstr app, right-click anywhere in the table then select the ‘ download data ’ option to display the following pop-up window:

The following options are available to configure the data download:
export format
include attachments
- the .csv or .xlsx file depending on the chosen export format
- download of the data of just one table
- download of all tables of a ginstr app
rows filter
- visible rows
- table with dependencies
- all tables of this ginstr app

columns filter
- all columns
- visible columns
time format
date format
number format
Each table is exported with one additional column: " record created on ". The value in this column stores the record creation date which is used for filtering in the case of a large data table.
Access to media files (pictures, videos, audio files, documents) after download
- Tables that do not belong to a ginstr app:
- Tables belonging to a ginstr app:
Import data
In some cases it is desirable to import data generated using third party programs or to upload data that has previously been exported from the ginstr cloud back to the cloud again. The ‘ upload data ’ feature allows uploading data stored on your local PC to ginstr tables in the ginstr cloud .
To upload data to a ginstr table or ginstr app, right click anywhere in the table then select the ‘ upload data ’ option to display the following pop-up window:

In order to ensure that the headings of the tables to be uploaded to the ginstr cloud are correct and complete, it is recommended to download the existing table(s), even if they are empty, and to use these downloaded files for editing and subsequent data upload.
The following options are available to configure the data upload:
upload data
- in this table only
- all dependent tables
- in all tables of this ginstr app
- the .csv or .xlsx file
- all media files (e.g. png image files, .wav sound files etc.)
choose file
If the “ record created on ” column is empty in the file to be uploaded, then the newly uploaded records will have a record creation date from the moment when the data was uploaded. Otherwise the record creation date provided in the imported file will be used.
File names and table names
Please note that the data upload feature does not update records; it just creates new records.
In case of uploading Excel .xlsx files with dates and numbers columns stored in 'text' cell format, these values should have the format which was previously selected in the data upload pop-up window.
If dates and numbers are stored in an Excel file like a number datatype, then the Excel cell format will be used during the data upload and therefore the format specified in the upload dialog will be ignored.
Data upload is limited to max. 100 MB per file to be uploaded.
Data Recorded by the Guard Tour Management App
The Guard Tour Management app records data in three tables on the ginstr backend.
Incident report details including any photos taken can be found in table special events .

Mousing over a photo thumbnail shows previews of the photos of an incident report. After clicking on any of these preview thumbnails, the picture is shown in full size.
A double click on the table cell containing the photos allows downloading the photos as well as adding additional photos.

The locations of the checkpoints can be found in the checkpoints table.
Clock-in records for each checkpoint can be found in the checkpoint reports table.
Show GPS positions of readings and incidents on a map
If GPS was activated on the mobile device and GPS was available while reading an NFC tag , the GPS coordinates of this reading event were saved along with the other checkpoint or incident information and were transmitted to the ginstr cloud .
If you have activated the map in a workspace of ginstr web as well as the checkpoint reports table and/or the special events table, then if you select any record(s) in one of the tables, pushpins at the GPS position stored in the selected record(s) will immediately be shown on the map.

- ginstr app manuals
- Facility Management apps
- Inspection apps
- Security apps
- Work Report apps
Navigation menu
Personal tools.
- View source
- View history
- revision history
- What links here
- Related changes
- Special pages
- Printable version
- Permanent link
- Page information
- This page was last edited on 4 January 2022, at 16:31.
- Privacy policy
- About wiki.ginstr.com
- Disclaimers
- DOWNLOAD PORTAL
- ALARM HANDLING
- HYTERA ACCESSORIES
- REMOTE VIDEO SPEAKER MIC
by Fmeaddons
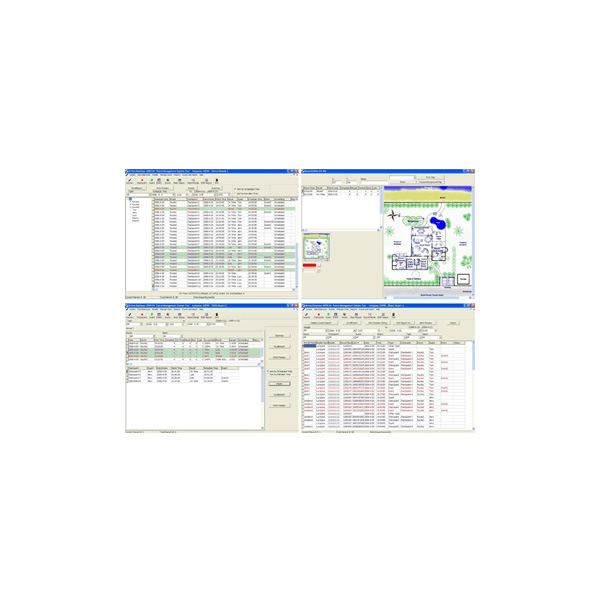
Patrol Management System Software
Patrol Management System (PMS) is Bluecard's patrol management software. It represents a convenient and powerful tool for patrol planning, hardware setting, report generation, as well as database maintenance.
Description
Integrated, secured, and easy to use 3 level data access/change rights Automatic or Manual Scheduling Basic, patrol details, shift and more reports Standalone and web-based versions available
Patrol Management System is Bluecard’s patrol management software. It represents a convenient and powerful tool for patrol planning, hardware setting, report generation, as well as database maintenance.
Patrol Management System software have several versions: basic, advanced, and web-based.
The basic version covers the most frequently used patrol management functions, e.g. has three layers of data access and modification rights, makes patrol schedules automatically, can generate multiple types of patrol reports, enables switch between database, hardware calibration and initialization, and many more…This version is being widely used and accepted by our clients worldwide.
The advanced version is more suitable for proficient computer users. As a naturally enhancement of the basic software, the advanced software further empowers users in deciding patrol schedules, and accordingly assess patrol results. Map (graphic) report is another extra benefit of the advanced version.
For large scale installation, our web-based versions not only ensure efficiency on data processing, but also simplify data sharing to authorised interested parties.
Bluecard’s web-based software has both B/S and C/S structures. They provide perfect solutions for large scale patrol management, where data can be uploaded from different sites to the data centre, while authorized persons can also check the reports instantly from their local PCs.
Related products
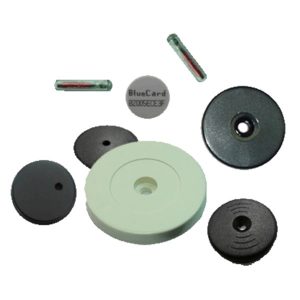
RFID Checkpoints
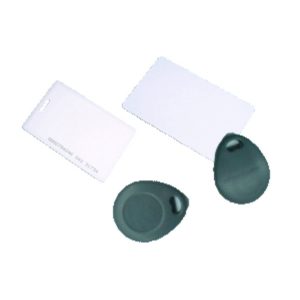
RFID Guard Cards
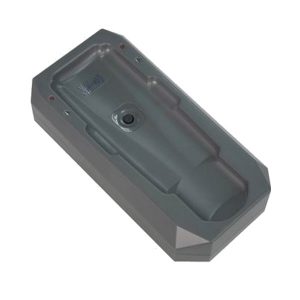
Remote Communication Station BS-2000
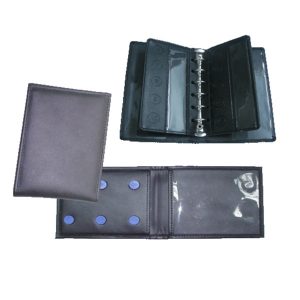
RFID Event Wallets
Radio & Security Products Ltd specialise in the Distribution and Service of Wireless Communications Systems, Data & Voice Two-Way Radio Systems (PMR), Digital Radio Systems, Paging Systems, Man-Down Alarm Systems & Intrinsically Safe Radio. We also distribute GUARDTOUR RFID Clocking Systems, and a wide variety of Accessories for these product lines.
READ MORE ABOUT US
CLICK TO REVIEW Modern Slavery Statement.

Unit 20c, Greenhills Industrial Estate, Walkinstown, Dublin 12. Republic of Ireland D12NX27
Ph: 00 353 (0)1 429-0002 Fax: 00 353 (0)1 429-0003
Contact Form
Privacy Overview
Necessary cookies are absolutely essential for the website to function properly. This category only includes cookies that ensures basic functionalities and security features of the website. These cookies do not store any personal information.
- Begin Shopping
- Readers & Accessories
- Buttons & Mounting Options
- Tags & Wristbands
- Complete Packages
- Support & Pro Services
- Access Control
Request a Demo
1-800-THE-PIPE
Safety made simple. Accuracy made easy.
Empower your staff to get more done, document more information in less time with perfect accuracy, and protect from liability.

Corrections
Guard1 is the leader in RFID inmate tracking, cell check and suicide watch documentation, and task management for your officers.

Commercial Security
The guard tour gold standard for over 30 years, Guard1 and The PIPE are used by companies, governments, and institutions worldwide.

Behavioral Healthcare
Know for sure that your well-being checks for residents and patients are being done – and know instantly if they are late, or missed.

Long-Term Care
Keep your residents safe with Guard1 . Document resident services and room checks. Keep track of resident location and elopement.
Document more information, in less time—with perfect accuracy.

Duty Posts & Task Reminders

Individual Movement & Well-Being Checks

Handouts & Activities

Tours, Rounds, & Patrols

Observations & Incidents

Personal Alarms

Real Time Location Updates & Alerts
Know what’s happening in your facility, when it happens. Instantly.
Guard1 gives you real time updates so you can track movement, activities, handouts, and more - all in real time.

Empower your staff to get more done.
Using our Mobile RFID Devices, you can ensure the accuracy of your logs and other data. Have an extensive digital record of every event and activity in your facility. Type or use talk-to-text to add custom comments and annotations to any observation. Get the reports you need for management and compliance.

Make audits & inspections painless.
Don’t dig through file cabinets and folders looking for specific paper logs. Find activity logs for a given time period in seconds and make inspections and audits painless.
")
Still the gold standard.
")
Proof of Presence

Well-Being Checks

Simple & Easy to Use

Super Rugged & Versatile

Eliminate the headache of tedious paper logs.
Get rid of the endless paper log sheets, spreadsheets, and sign-in/out sheets. No more papers taped up on the wall or hanging on a clipboard. Instead, use the mobile devices to log checks, observations, handouts, and more with greater accuracy and efficiency.

Prevent incidents before they occur.
Guard1 integrates with your JMS/OMS. We use your classification information – health conditions, dietary needs, security information, keep separates – to insure that individuals receive the meals and attention they require, and to detect and warn you of security exceptions like keep-separates.

Keep staff and visitors safe.
With our Duress Device, you know immediately if staff or visitors press the panic button, including their exact location. Our personal Guard1 alarms also provide alerts if there is a man-down, it registers no motion, if removed from its holster, or if it’s not detected by a receiver.
Jason Edgcomb
Lasalle county jail superintendent.
"The customization and accountability Guard1 provides for cell checks is outstanding and very easy to use. I couldn't be happier with the sales people, the customer support and the products they offer. I look forward to continuing my relationship with Guard1 and the cutting-edge technology they bring to the corrections field that makes my job easier and more efficient."
Luke Whitehead
Gregg county jail captain.
"What makes Guard1 unique is their customer and technical support. The Guard1 team is unbelievable when it comes to loyalty with their clients. Guard1 has changed the way Gregg County processes jail logs.
See how Guard1 can help keep your facility secure.
Everything that we did not like about our old system, we like about Guard1 . The difference has been amazing!
Billy harrison.
Head of Corporate Security, Rooms To Go Furniture
If Guard1 saves you one in-custody death lawsuit, it has paid for itself multiple, multiple times over.
Lt. joe morris.
Randall County Sheriff's Office
The PIPE is efficient, professional looking, and fits in a pocket. The officers can carry it around all day.
Ron hubbard.
Site Manager, South Pointe Hospital
What I love about the system is that it is simple. Guard1 Plus documents everything accurately and The PIPE is virtually indestructible."
Director of Loss Prevention Services, Marriott International
- Privacy Policy
- Terms of Use
Guard Tour System error and solution
INDICATOR EXPLANATION
1. Starting up: Press power up key, blue light on for 3 seconds
2. Read tag success: Press power on key, indicator light turn to red from blue
3. Memory full: Red light flicker 10 times
4. Time error: Blue light flicker 6 times
5. Low battery: Blue light flicker 3 times
1. Starting up: A buzzer sounds , and LCD will show “ Power on..”
2. Read tag success: A buzzer sounds, blue light flicker 4 times
3. Memory full : Red light flicker 6 times, along with related LCD display
4. Time error: Red light on for 3 seconds, along with related LCD display
5. Low battery: Red blue light flicker 3 times , along with related LCD display
[Z-6200/Z-6300/Z-6600]
1. Starting up: Vibrate once
2. Read tag success: Vibrate once, blue light flicker 4 times
3. Memory full: Red light flicker 6 times
4. Time error: Red light on for 3 seconds
5. Low battery: Red blue light flicker 3 times
1. Starting up: A buzzer beeps, red green/blue light flicker once
2. Read tag success: A buzzer beeps, green/blue light flicker 3 times
3. Memory full: Buzzer beeps 3 times, red light flicker 3 times
4. Time error: Buzzer beeps 6 times, red green/blue light flicker 6 times
5. Low battery: Buzzer beeps 6 times, red light flicker 6 times
6. Storage failure: Buzzer beeps 3 times, red light flicker 3 times
7. Data download is complete: Buzzer beeps 10 times, red light flicker 10 times
1. Starting up: A vibration, red blue light flicker once, along with related LCD display
2. Read tag success: A vibration, blue light flicker 3 times, along with related LCD display
3. Memory full: 3 times vibration, red light flicker 3 times, and along with related LCD display
4. Time error : 6 times vibration, red light flicker 6 times, and along with related LCD display
5. Low battery: Red light flicker 10 times, and along with related LCD display
[Z-6200C/A100/Z-6200E/Z-3000/Z-6200(New)/Z-6600(New)]
1. Starting up : A vibration , red blue light flicker once
2. Scan tag success: A vibration, blue light flicker 3 times
3. Memory full: 3 times vibration, red light flicker 3 times
4. Time error: 6 times vibration, red light flicker 6 times
5. Low battery: Red light flicker 10 times
*If the device battery you use is built-in rechargeable lithium battery , please take them out for charging when there is no use within 2 months , to avoid time error can not scan tags .
If error you faced can’t be settled with above checking ,please contact us timely for support .
- Azerbaijani
- Scots Gaelic
- Kinyarwanda
COMMENTS
Three Benefits of Guard Tour System; Guard Tour for Industries; Support Menu Toggle. FAQ; Video Tutorials; Download; User Guide; Free Test; Blog Menu Toggle. Case study; Useful Articles; News; About us; Contact us; Download. DOWNLOAD. DOWNLOAD. Main Products. JWM Guard Tour Management System; Vanma Lock System; ... Fill out the form to get the ...
Guard1 Plus 2.8. Quick Start Guide for Installing and Configuring Guard1 Plus. Guard1 Plus Manual. Mini-Attendant File Manager User's Guide. Rounds Tracker User Manual. Guard1 Plus SE 4.40 (Server Edition) Rounds Tracker SE (read instructions before downloading) Guard1 Plus SE Administrator's Manual. IP Attendant/IP Downloader.
The Guard1 team is unbelievable when it comes to loyalty with their clients. Guard1 has changed the way Gregg County processes jail logs. The PIPE Guard Tour system is the gold standard for guard tours and patrols, trusted by over 100,000 security professionals.
Monitor and respond to real time alerts. G uard 1 requires acknowledgements and logs all alerts. Alerts remain until they are no longer active, and have been acknowledged. Interactivity is a critical part of our offering. With maps, click on any zone and see a list of everyone who is there. Alerts are shown in color on both the map and inmate list.
DOWNLOADS. Here you can find current software and drivers for AGT Patrol Monitoring System. Winkontrol 7 (4.3.2006.2419) ֍download. TMD Drivers ֍download. General Guard Tour System Tender Specification sample. (download editable document here) TMD adapters since 2013. Granted that you have purchased the TMD adapter in 2013 or later, you can ...
GuardsPro guard tour system helps you manage your security guards using state-of-the-art private patrol dashboard and security guard mobile application. ... Guard Management Platform GuardsPro is not just a regular security guard tracking software, it is much more than that. It is a security guard management platform that helps to ensure ...
Meet Your Security Needs Today. We offer the most appropriate security solutions for users around the world. For guard managing, reporting, and tracking. Any problem, contact us! JWM focus on guard tour system since 2001. JWM's range of products include RFID Touch Online GPS mobile guard tour and patrol system and intelligent security locks.
Minitool Pro Guard Tour System Download; Fire Prevention, Fire Wardens & The MiniTool Pro Download; Minitool Pro Prox Download; Palm Touch Guard Tour System Download; Patrol System Sales Guide Download; Time Management Solutions Download; EH-15 (GPP-M9) Body Worn CCTV Download . Software Drivers.
The smart guard tour system software truly makes mobile patrol easier. Not only track guard activities and digital footprints. ... JWM Long Range Guard Management System with Flashlight. Rated 0 out of 5 $ 60.00 - $ 239.00. Select options. JWM Best Seller Durable RFID Guard Tour System with 20 Checkpoints. Rated 0 out of 5. Sale! $ 139.00 ...
7 TRBOnet Guard Tour— Configuration and Operation Guide 1.2.1. Setting Start/Stop Rules By default, a guard tour can be started, paused, resumed, and stopped manually by a Dispatch Console operator. To allow the guard tour management from the guard's radio, select the Start/Stop Rules tab in the Route window.
If guard scan the tag within the schedule. If device has assigned to any specific plan. Read data at beginning, then create a plan. Data is in processing. System is set as sequence patrol. Cannot get GPS data and no guard name. (For GPS device) Guard didn't read ID tag, while the information is downloaded in the device.
RFID Guard Monitoring Control Tour System With Camera. Model: WM5000F3.
This manual describes the features of the Guard Tour Management ginstr app including ginstr web backend integration.. The Guard Tour Management app allows security guards to quickly and easily record checkpoints visited and report unusual incidents should they occur.. Getting Started. Download ginstr launcher from the Google Play Store.Instructions; Download the Guard Tour Management app ...
Patrol Management System is Bluecard's patrol management software. It represents a convenient and powerful tool for patrol planning, hardware setting, report generation, as well as database maintenance. Patrol Management System software have several versions: basic, advanced, and web-based. The basic version covers the most frequently used ...
Instantly. Guard1 gives you real time updates so you can track movement, activities, handouts, and more - all in real time. The whiteboard view shows who is currently in every zone - with virtual headcounts and in/out counts. Empower your staff to get more done. Using our Mobile RFID Devices, you can ensure the accuracy of your logs and other ...
By default, a guard tour can be started, paused, resumed, and stopped manually by a Dispatch Console operator. To allow the guard tour management from the guard's radio, select the . Start/Stop Rules. tab in the . Route. window. The . Start Route, Pause Route, Resume Route, and . Finish Route. sections include similar settings. For instance ...
Data download is complete: Buzzer beeps 10 times, red light flicker 10 times ... guard tour patrol system, Guard tour management, guard tracking system, guard patrolling device, guard patrolling system, Send Email; sales1_zooypatrol; zooypatrol +8613715335805; x. Hit enter to search or ESC to close.
6.1 Generate & Download Plan 6.1.1 Generate Plan Generate, modify and delete a certain plan need to be done in guard tour system, user with this app is supposed to execute patrol plan. 6.1.2 Download Plan When generate or update a plan, the app will detect and download/update it automatically after user launch the app. 6.2 View & Execute Plan